question

mvader (Victron Energy) avatar image
mvader (Victron Energy) asked

Help wanted: testing new Raspberrypi 2,3 and also 4 images

UPDATE 2021-01-11: see accepted answer, the green one - usually on top.


ORIGINAL

Hi all,

As some of you know, Venus OS for raspberrypi is a hobby project by our developers, worked on in their free time.

And raspberrypi4 support has been wanted and asked for since a while now, as thats the now commonly available raspberrypi model.

We hoped and waited for someone in the community to step up and do the work, but that didn't happen. Perhaps too specialised a set of skills required (openembedded, linux, and-so-forth) - and I must admit that its quite the time investment to work on that.

Anyway, the good news is that we have a new set of images available. One image for the raspberrypi2 and 3, and another for the raspberrypi4.

So now, rather than looking to - or waiting for - the community to do the development work, we're hoping for people to do the testing work. Welcome to comment what work in your system and what does not.

Enjoy, Matthijs


Changes compared to our existing raspberrypi images:

  1. Update linux from 4.9 to 4.19
  2. The whole sdcard is now used and roughly 1/3 is assigned to /data
  3. both root filesystems are also increased to roughly 1/3 each
  4. u-boot settings are now stored redundantly on the sdcard; the FAT

    partition is no longer written to.


Not much has been tested, so the question is how many thing still work.

Note: these images are intended for that, testing, don't use them in anything serious. There are no automatic updates / bug fixes e.g.

This code is open source, and the changes are in this branch: https://github.com/victronenergy/meta-victronenergy/tree/WIP_rpi4


Downloads:


Note that they are full images. Its not possible to install it as a .swu file. They need to be burned to an sdcard, which erases all contents on that sdcard. For detailed instructions, see the Venus OS on raspberrypi instructions.


Things to test

Report results in the comments and answers below. Always include the exact model of RaspberryPi you are using please, and just to make sure there are no confusions, report firmware version & build number of Venus OS that you are using too.


rpi3
rpi4
Serial console (debug)
OK (rpi3B-v1.2 by Matthijs)
OK (rpi4B - Matthijs)
hdmi console
OK (rpi3B-v1.2 by Matthijs)
Not OK (rpi4B - Matthijs)
hdmi gui (remove /etc/venus/headless)
OK (rpi3B-v1.2 by Matthijs)
OK (rpi4B - Matthijs)
USB keyboard
OK (rpi3B-v1.2 by Matthijs)
OK (rpi4B - Matthijs)

GPS Dongles (pls report which one you use)

OK (rpi3B+ by PoloC)

Onboard WiFi

OK (rpi3B+ by PoloC)
OK (by Innar)

Onboard Bluetooth (note that I don't know on which rpis bluetooth is supposed to work)

Not OK (rpi3B-v1.2 by Matthijs)

VE.Direct USB


OK (by Innar)

MK3-USB to a Multi


OK (by Innar)

GX GSM


CAN (see here)

That inserting a USB stick makes VRM Logger recognise it


OK (rpi4B - Matthijs)
Pressing eject & then taking the stick out OK
Not OK (rpi4B - Matthijs)
Digital inputs

Analog inputs

Read through kernel bootlogs

.swu updating online (impossible to test for now)

.swu updating offline (sdcard or usbstick) (impossible to update for now)

booting into backup image (impossible to update for now)

Touchscreens and other add-ons that are being used

Logging to VRM (and thus DNS)
OK (by Innar)


Raspberry Pi
29 comments
2 |3000

Up to 8 attachments (including images) can be used with a maximum of 190.8 MiB each and 286.6 MiB total.

dirkmuc avatar image dirkmuc commented ·

Hello,

I am more than happy to change my Pi 3 to a Pi 4. I am currently running an Pi 3 on my RV with the 2.60~22 Version plus Node-Red provided by @mvader (Victron Energy).

But keep in mind that I am not an Linux nerd.... If you need access via vrm for what ever reason, please let me know.

I highly appreciate your work!


Cheers

Dirk

0 Likes 0 ·
mvader (Victron Energy) avatar image mvader (Victron Energy) ♦♦ dirkmuc commented ·

Hi Dirk, thanks. That image you are running needs testing as well, but then just node-red & signalk. Its not what this thread is about - this thread is about a new build for rpis, with newer kernel and other changes. And does not include node-red and signalk. Sooner or later we'll combine it all together.

But for now while running that v2.60~22-large-image-4, pls don't use this thread. And I'm assuming you are using node-red (?) - so then at the moment its not possible for you to use these new rpi2/3/4 test images. Thanks!

0 Likes 0 ·
dirkmuc avatar image dirkmuc mvader (Victron Energy) ♦♦ commented ·

Hello @mvader (Victron Energy),

I will get a Pi 4 up and running without Node-Red and will install it in my RV, no issues at all. There is currently no rush for me with Node-Red. More important is a stable image for the Pi 4.

Cheers

Dirk


0 Likes 0 ·
laurenceh avatar image laurenceh commented ·

I have completed an installation and tests on my Raspberry Pi 3 with 7" touch screen

Notes

  • I seem to be having problem with connection to the VRM portal but not sure if this is a firewall issue on my router - need to do more debugging.
  • There is a slight problem with the GPS D-Bus integration. Previous images have the GPS service as com.victronenergy.gps the service has changed to com.victronenergy.gps.ve_ttyACM0 which broke my customised UI.
  • The interface to the analogue devices seems to be broken in the settings menu even though working in the devices menu. The analogue devices do not appear in the IO/Analogue list.
  • venus-data.tar.gz appeared to install automatically and correctly on this image (I had not had this working on previous images)
  • I'm using an i2c interface to communicate with a combined temperature/humidity sensor for monitoring conditions on the boat (particularly when left unattended in the marina)

Here is a complete listing of the checks done by my install script after I have used the script to install all the required modifications. This shows most of the files that are touched for RPi Integration. It appears that some required overlays and files are now already included in the image. I need to re run the scripts again on a clean SD card image to see which files are already in the image.

RPI Venus setup log dated: Sun May 24 11:43:47 UTC 2020
Analogue driver
mcp3208 overlay file already exists: No change required
dbus-adc device interfaces already exist: No changes required
config.txt already configured for MCP3208 analogue interface: No changes required
/service/dbus-adc is already a link: No changes required
Display Driver
Package install/check will continue
List of installed packages:
mousedriver is installed: No update required
tslib-calibrate is installed: No update required
tslib-conf is installed: No update required
tslib-tests is installed: No update required
No updates required
Frame buffer already configured in config.txt: No change required
800x400 start gui already installed: No change required
/u-boot/config.txt configured for 800 width: No change required
I2C drivers
config.txt already configured for i2c interface: No changes required
rc.local already configured to start i2c interface: No changes required
Headless off
/etc/venus/headless.off Headless already disabled: No change required
Python server
/etc/hiawatha.conf already configured for python: No changes required
Screen dimming
/etc/venus/backlight_device requires configuration: Insufficient access to complete updated
Backlight dtb overlay already installed: No change required
List of installed packages:
rpi-backlight is installed: No update required
Screen invert
Screen is set to inverted, No change required
Screen timer
Timer already configured in /etc/venus/blank_display_device: No changes required
800x400 screen
800x400 start gui already installed: No change required
/u-boot/config.txt configured for 800 width: No change required

0 Likes 0 ·
laurenceh avatar image laurenceh laurenceh commented ·

And here is the test form

Test report table


rpi3

RPI3 (Laurence Hardwick)

Raspberry Pi 3 Model B Plus Rev 1.3

Official Raspberry 7” pi touch screen running at 800x480

Serial console (debug)

OK (rpi3B-v1.2 by Matthijs)

OK

hdmi console

OK (rpi3B-v1.2 by Matthijs)

Nothing seen – not tried

hdmi gui (remove /etc/venus/headless)

OK (rpi3B-v1.2 by Matthijs)

OK

USB keyboard

OK (rpi3B-v1.2 by Matthijs)

Not tried – Using Ethernet terminal access

GPS Dongles (pls report which one you use)

OK (rpi3B+ by PoloC)

GPS Vk-162 Glonast Navigation

Reports as NMEA-0183 GPS (ACMo) [0]

NOTE see notes about the change in service name on D-Bus

Onboard WiFi

OK (rpi3B+ by PoloC)

Yes

Onboard Bluetooth (note that I don't know on which rpis bluetooth is supposed to work)

Not OK (rpi3B-v1.2 by Matthijs)

No tried

VE.Direct USB


Not tried

MK3-USB to a Multi


Not tried

GX GSM


Not tried

CAN (see here)


That inserting a USB stick makes VRM Logger recognise it


OK

Pressing eject & then taking the stick out OK


OK

Digital inputs


Not tried

Analog inputs


Temperatures appear in the device list, but do not appear in the I/O/Analog in the menu

Read through kernel bootlogs


Unsure what this is

.swu updating online (impossible to test for now)


.swu updating offline (sdcard or usbstick) (impossible to update for now)


booting into backup image (impossible to update for now)


Touchscreens and other add-ons that are being used


Working see config above

Logging to VRM (and thus DNS)


Venus – Rpi says no error but VRM portal shows no connection.

Venus menu - "Remote console on VRM" says “online” but connection from the Portal is not working.

0 Likes 0 ·
mvader (Victron Energy) avatar image mvader (Victron Energy) ♦♦ laurenceh commented ·

Hi Laurence, thank you.


two comments fro my side:

1) the gps change is by design. You’ll have to update your UI code for it

2) for the vrmlogger, check the VRM portal for an “Unauthenticated device error”, see bottom of the Device list page on the portal.

0 Likes 0 ·
laurenceh avatar image laurenceh mvader (Victron Energy) ♦♦ commented ·

Thanks for response

GPS service UI code change is easy thanks for confirming (as log as the service name wont continue to change - or be different for different GPS devices?)

VRM logger is now working. (console and data logging)

0 Likes 0 ·
mvader (Victron Energy) avatar image mvader (Victron Energy) ♦♦ laurenceh commented ·

gps: first all the code assumed there would ever be only one gps. And now, since we added support for N2K gps-es, there can be more in one system. Hence the addition to the service name to guarantee a unique service name. No the service name wont change.

vrm: good!

0 Likes 0 ·
mtnscott avatar image mtnscott commented ·

Hi @mvader (Victron Energy),

Sorry I was not fast enough. I was in the process of working on the BT for the last set of releases on the raspberry pi 3 b and ran into a lot of challenges, 1 - open embedded is not straight forward to install, it's out of date and much of the online help does not work (or is not current) for debian linux. Then I went straight to Victron Linux sources and was able to build the kernel but was unable to get it to work with u-boot, I've learned how u-boot works and how to change the boot command line using the fw_environment variables. I was getting close but then you released these new versions. Thank you for that!

I've downloaded and installed the raspberry pi 3 image (you call it the raspberry pi 2 image) and tested the bluetooth. That works great, I've tested it with an MK3 USB connection to my MultiPlus 3000 KVA charger inverter. Where I am having trouble is with the sc16is7xx driver. It seems to be broken. With the last build 2.6x that kernel module had issues and I could get one uart to work. To solve that I was able to rebuild the kernel module for that driver with a newer version of that module I built by merging in the recent code changes to address some issues with the interrupt handler and building with your kernel (4.9.80). So I am trying the same path but when I try and access your link to the source for this current version I get a 404 error. Do you think you can help me get the 4.19.81-v7 source you used for the kernel in this last release?


0 Likes 0 ·
mtnscott avatar image mtnscott mtnscott commented ·

For anyone curious I found the version of the linux kernel (4.19.81) here -

https://github.com/victronenergy/linux/tree/rpi_4.19.81

Best..

0 Likes 0 ·
mvader (Victron Energy) avatar image mvader (Victron Energy) ♦♦ mtnscott commented ·

Hey mtnscott! thumbs up for trying OE; as said by many: it has a steep learning curve. And u-boot does as well, and so forth and so forth, sounds like you got quite far.

And yes the OE version we use today, Rocko, is a bit outdated. Know that we’re quite close to moveming to a newer version now.

Next time, rather than spending a lot time trying to make it build on a random machine, I recommend use a virtual, and on that install a Distro thats known to work. In this case Ubuntu 16 or 18:

https://github.com/victronenergy/meta-victronenergy/blob/a1dd3d6ce74c0ca679eb3756f60d8180de97a01d/meta-venus/conf/distro/venus.conf#L63

And wrt installing all you normally need to do is follow instructions in our venus repo readme. No need to really install it.

this is where we define which rpi kernel we use:

https://github.com/victronenergy/meta-victronenergy/tree/master/meta-bsp/recipes-kernel/linux

The master branch of that repo shows current development status.

Use tags to see what we used in for example v2.61. And note the b2.60 branch; its where the development/backporting for v2.62 and other v2.6x versions is happening.

Hope that helps you!

And, if you're looking for a new challenge, how about trying to make the rpi4 branch work on all rpi4 types. If I'd had to try, I'd (a) get a rpi4 and make the serial console work so I could see u-boot and kernel output, (b) install a build and see it fail. (c) update the binaries on the boot partition, and then as per my experience as I wrote somewhere here see it still fail, (d) try a far more recent kernel, since with rpi these binaries and kernel go hand in hand. Which btw is really annoying since the binaries are on the boot partition & kernel is not.

0 Likes 0 ·
mtnscott avatar image mtnscott mvader (Victron Energy) ♦♦ commented ·

Hi @mvader (Victron Energy),

Thanks for the suggestion on using ubuntu and cross compiling, I will take a look at that. I have been building the kernel (more specifically the kernel modules) to fix the driver for the SC16IS752 dual UART on a raspberry pi. I got it working with the 4.9.80 kernel build ~ Venus 2.58 by cherry picking and back porting changes to that version of the driver and it's been running solid. I'm working with @Rob Duthie and testing the last version 2.70_3-large-12 and unfortunately the kernel module for the SC16IS752 is not working. There is no data coming from the UARTS. So I tried the same process with that version of the kernel, grabbed the config file from your image, downloaded the Linux source from the Victron github branch using the 4.19.81 tag but the symbol module layout does not match on the new kernel driver and as a result I can't load it. That is where I'm stuck. I will keep digging to see if I can figure out why it's different. I'll take a look at the Pi-4 after we get the Pi-3 working as I will probably need the same fix.

Thanks for your suggestions!

0 Likes 0 ·
mtnscott avatar image mtnscott mtnscott commented ·

Hi @mvader (Victron Energy),

I discovered the issue was a GPIO conflict with my settings. I can say that the latest build 2.70_3-large-12 works with my dual uart expansion board. I love the fact that the bluetooth works now!

Thanks! Let me know if there is anything you would like me to test / look into.

0 Likes 0 ·
mvader (Victron Energy) avatar image mvader (Victron Energy) ♦♦ mtnscott commented ·

Hi @mtnscott, good to hear it works now!

Nothing else to test on the rpi3 from my side. With regards to rpis the main open issue is some Rpi4's not working.

0 Likes 0 ·
Show more comments
Rob Duthie avatar image Rob Duthie commented ·

Raspi 4 with 2GB Ver 1.4

Installed with .img file Raspi4 2.70.17

Still is blank no boot up etc.

Regards
Rob D

NZ

0 Likes 0 ·
Kevin Windrem avatar image Kevin Windrem Rob Duthie commented ·

Yea, the new kernel that's needed for the v1.4 board is not part of v2.70. We must wait a while longer.

0 Likes 0 ·
Rob Duthie avatar image Rob Duthie Kevin Windrem commented ·

Hi

Will do. As the new raspi Ver1.4 applies to 2,4,8GB, as when you buy a raspi4 you will get a 1.4 from now on, as the older Ver 1.2 is old stock before the Ver 1.4 change to improved component costs etc.

0 Likes 0 ·
29 Answers
mvader (Victron Energy) avatar image
mvader (Victron Energy) answered ·

Hey all, an update: we now have a working image. Looks like it works only for the Raspberrypi4 2GB. But I’ve heard about other versions working as well. And also heard about various people where their Rpi4 does not boot.

For now only available as part of the Venus OS Large beta series. More information as well as download info here: https://www.victronenergy.com/live/venus-os:large

Bluetooth works, and the other discussed thing here, console on the hdmi without having to login, also works.

As soon as v2.70 hits the betas, and or official releases, it will be available there as well.

Why not all rpi4 models work?

Why rpi4 models with more/less memory currently dont work is a not completely known. I have some ideas, but won’t fix it at the moment.

See below discussions for details about it; and if you have experience with OpenEmbedded and such you are more then welcome to try and make a patch for it!

will Victron make the images work for all rpi4s?

not at the moment. We have our hands full with other projects. There is an idea on what to try first: update boot files as well as kernel to latest available versions from raspberrypi, that will most likely solve it.

So, as said above, if there is someone out there with sufficient experience, welcome to take a look. You can also contact me for a reimbursement but not upfront unless you can prove that you have lots of experience with openembedded: I have seen too many people that think they can take care of this but really can’t.


so, I hope we get this sorted!

2 comments
2 |3000

Up to 8 attachments (including images) can be used with a maximum of 190.8 MiB each and 286.6 MiB total.

mtnscott avatar image mtnscott commented ·

Where can we get the linux source for this build?

0 Likes 0 ·
mvader (Victron Energy) avatar image mvader (Victron Energy) ♦♦ mtnscott commented ·

Hi the v2.70 builds, including the Venus OS Large image, are using the build referenced here:

https://github.com/victronenergy/meta-victronenergy/tree/matthijs/large-image-10/meta-bsp/recipes-kernel/linux

https://github.com/victronenergy/meta-victronenergy/tree/master/meta-bsp/recipes-kernel/linux

(those matthijs/large-image-x branches are everytime rebased onto what happens in master).


The v2.60 builds use the build referenced here:
https://github.com/victronenergy/meta-victronenergy/tree/b2.60/meta-bsp/recipes-kernel/linux

0 Likes 0 ·
polocamper avatar image
polocamper answered ·

Installed it on my PI3b+.

So far so good. Don't have much hardware (yet) to test. Gps module is detected and works.

Also is WiFi.

I'll test it tomorrow with the Mppt 75/15.

@mvader (Victron Energy) special (software)parts that need attention?


Greetz Martin


3 comments
2 |3000

Up to 8 attachments (including images) can be used with a maximum of 190.8 MiB each and 286.6 MiB total.

mvader (Victron Energy) avatar image mvader (Victron Energy) ♦♦ commented ·

Good morning @PoloCamper / Martin. Thanks. GPS & WiFi working already helps. Can you let me know what wifi dongle & what make & model gps dongle?

I've gone through our internal test documents and added the highlights of things to test to my initial post above. In summary, what needs testing are things that relate to hardware and/or kernel.

0 Likes 0 ·
polocamper avatar image polocamper mvader (Victron Energy) ♦♦ commented ·

Hardware Rpi3b+

Ve.direct with mppt smartsolar 75/15 works.

Vrm connection works, can remote access the rpi, and the mppt via Victron connect vrm Option


Bluetooth Not detected, 3b+ should have it.

Remote acces for debugging is possible when needed.

Touchscreen is orded so I'll test that soon.


Greetz Martin

0 Likes 0 ·
polocamper avatar image polocamper commented ·

Used hardware :

WiFi internal on rpi3B+.

GPS is GY-NEO-6MV2 GPS China Clone via USB.

Greetz Martin


0 Likes 0 ·
Innar Järva avatar image
Innar Järva answered ·

Thanks for the great news! Awesome work! I installed it repeatedly on my Rpi4, but I see black console window with login screen and blinking cursor and three Victron logos on top of the screen. Cannot get by this - Ctrl+Alt+Fx does not change the view also...

6 comments
2 |3000

Up to 8 attachments (including images) can be used with a maximum of 190.8 MiB each and 286.6 MiB total.

mvader (Victron Energy) avatar image mvader (Victron Energy) ♦♦ commented ·

So maybe showing the gui on the hdmi port you are using does not work? How about the other one? And how about remote console on lan?

0 Likes 0 ·
Innar Järva avatar image Innar Järva mvader (Victron Energy) ♦♦ commented ·

Thanks mvader for the help! HDMI-s showed same login screen, but true - I could access the gui over lan. Onboard wifi now works great, onboard bluetooth not. With bluetooth dongle I saw the bluetooth item on the settings menu, managed to change PIN, but I could not connect to it over pc/phone as pairing did not succeed. Becoming a superadmin worked, so did the ssh. MK3-USB is ok for multiplus. As I see MPPT, then VE.direct to USB is good. VRM is ok. So another happy customer here :)

My setup is really simple and because of trees I cannot produce too much: https://advancedcreations.blogspot.com/2020/05/victron-and-raspberry-for-solar-life.html

0 Likes 0 ·
mvader (Victron Energy) avatar image mvader (Victron Energy) ♦♦ Innar Järva commented ·

Thats a nice place you have there @Innar J, really cool.

0 Likes 0 ·
jeroen avatar image jeroen ♦ commented ·

It should drop you to a prompt, not a login. Let me know if it doesn't do that.

If you want to have the gui on the screen, remove /etc/venus/headless and reboot.

0 Likes 0 ·
Innar Järva avatar image Innar Järva jeroen ♦ commented ·

Yep, it showed me a typical linux prompt for username/password verification. All good now as I accessed gui first by lan, followed by wifi config. And thanks a lot for the knowledge about headless!

0 Likes 0 ·
mvader (Victron Energy) avatar image mvader (Victron Energy) ♦♦ Innar Järva commented ·

hi both. think there is some confusion, and took it as a nice reason to finally unpack the rpi4 model B thats been waiting here for a long time in a corner.

@Jeroen: the rpi4 shows a login prompt ( ;o) ) - not ok. And my rpi3 shows the normal plain prompt, no login required - ok.

So, an issue on the rpi4 to fix. I'll put it on the list above.

Thanks for pointing us to this Innar, fyi, having the login their isn't very helpful: its impossible to login as there is no password set. The wanted behaviour is to get the terminal console prompt (I really don't know what the best word is) immediately. Without having to login.

0 Likes 0 ·
mvader (Victron Energy) avatar image
mvader (Victron Energy) answered ·

ok, I tested various things myself as well. And updated them in above table. I didn't look into any reasons.

For the bluetooth on my rpi 3B-v1.2 (maybe it doesn't even have bluetooth? I'll check later): the vesmart-server service is not running. On a CCGX with a bluetooth dongle it is running (ofcourse)

2 |3000

Up to 8 attachments (including images) can be used with a maximum of 190.8 MiB each and 286.6 MiB total.

Jeremy Albrecht avatar image
Jeremy Albrecht answered ·

I can confirm all of the above ok/not ok reports on the RPi4. I also can confirm that boot drops me to a login prompt, not a terminal, and the GUI does not start without going in and removing /etc/venus/headless.

2 comments
2 |3000

Up to 8 attachments (including images) can be used with a maximum of 190.8 MiB each and 286.6 MiB total.

mvader (Victron Energy) avatar image mvader (Victron Energy) ♦♦ commented ·

Thanks. The requirement of removing the headless file to see the gui is by design by the way. See also the manual.

And for anyone looking for a bonus assignment (:wink:) try to get the bluetooth operational. Not so much the victron side, but the kernel & driver side.

End result should be that you can see the bluetooth device with hciconfig or hcitool.

I‘ve done some googling, and seems to involve proper serial port, possibly setting that up with a overlay, and use of btattach command, and maybe more.. one way to go for it is to load raspbian and figure out what things it does to make the bluetooth work & then try it over into your venus os install.

0 Likes 0 ·
Jeremy Albrecht avatar image Jeremy Albrecht mvader (Victron Energy) ♦♦ commented ·

I'm working on the bluetooth as I type. Hopefully I'll have it figured out shortly.

0 Likes 0 ·
ray-mont avatar image
ray-mont answered ·

@mvader (Victron Energy)

after renaming headless on the Pi 3 B+

Raspberry Pi 7 inch Touchscreen type (d/5624/kit-nologo)

Worked immediately

calibration was not needed

also installing an usb stick will update that the storage is external, size reported correctly, eject will switch over to internal storage

onboard Bluetooth does not work

usb bluetooth adaptor does not want to pair with the pin 000000

but also not after the pin changed on the rpi into 123456

Raymond

1 comment
2 |3000

Up to 8 attachments (including images) can be used with a maximum of 190.8 MiB each and 286.6 MiB total.

Rob Duthie avatar image Rob Duthie commented ·

Hi Raymond

The internal blue has never worked, but the a external one does, well it use to in the older ver before 2.60. to get it to work you have to use Bluetooth command to activate.

using a command line program like putty to access etc.

To start the bluetooth control function
root@raspberrypi2:~# bluetoothctl

[bluetooth]# list
Controller 00:1A:7D:DA:71:13 ESS [default]

[bluetooth]# devices
Device 48:60:5F:F8:77:F9 G7 ThinQ


[bluetooth]# default-agent
Default agent request successful


[bluetooth]# pair 48:60:5F:F8:77:F9 (LG G7 number to use) pair code 111111
Attempting to pair with 48:60:5F:F8:77:F9
[CHG] pair 48:60:5F:F8:77:F9 Connected:
Request passkey
[agent] Enter passkey (number in 0-999999): 000000
[CHG] Device D1:1D:26:A9:D6:07 UUIDs: 00001800-0000-1000-8000-00805f9b34fb
[CHG] Device D1:1D:26:A9:D6:07 UUIDs: 00001801-0000-1000-8000-00805f9b34fb
[CHG] Device D1:1D:26:A9:D6:07 UUIDs: 306b0001-b081-4037-83dc-e59fcc3cdfd0
[CHG] Device D1:1D:26:A9:D6:07 UUIDs: 68c10001-b17f-4d3a-a290-34ad6499937c
[CHG] Device D1:1D:26:A9:D6:07 UUIDs: 97580001-ddf1-48be-b73e-182664615d8e

[CHG] Device D1:1D:26:A9:D6:07 Paired:
Pairing successful

0 Likes 0 ·
dirkmuc avatar image
dirkmuc answered ·

Hello,

Running my RV now with a headless Pi4 with v2.60~22. Everything works very well. I operate a BMV712, a MPPT 100/30 and a MPPT 75/15 with the latest firmware.

Wifi works as well. Sorry no GPS.

Via VRM everything is updated and the remote console is working.

Let's see how stable the pi is over time.


Cheers

Dirk


2 |3000

Up to 8 attachments (including images) can be used with a maximum of 190.8 MiB each and 286.6 MiB total.

thomas-binder avatar image
thomas-binder answered ·

Well, I will try to test, but first I need to change for touchscreen trough as suggested, but what are the console root credentials?

2 |3000

Up to 8 attachments (including images) can be used with a maximum of 190.8 MiB each and 286.6 MiB total.

dakoal avatar image
dakoal answered ·

Hi.

Installed on RPI 3B.


Multiplus II 3kVa 48V System on MK3USB.

I can query and set everything via MK3USB to the Multiplus II.

pi@raspberrypi2:~$ dbus -y com.victronenergy.system /Dc/Battery/Voltage GetValue
52.66999816894531


MK3USB to Multi II on RPI3 -> OK

VRM Portal on RPI3 -> OK

onboard Bluetooth RPI3 -> OK.

(Using VictronConnect APP on Iphone shows a cerbo with Firmware v2.60~22)


UPDATE:

USB Stick is found on OS, but not in Remote Console as logging location.

Do I have to format it specially?

[ 5105.120370] usb-storage 1-1.3:1.0: USB Mass Storage device detected
[ 5105.140581] scsi host0: usb-storage 1-1.3:1.0
[ 5105.165468] usbcore: registered new interface driver uas
[ 5106.489693] scsi 0:0:0:0: Direct-Access     SMI      USB DISK         1100 PQ: 0 ANSI: 4
[ 5106.504030] sd 0:0:0:0: [sda] 7864320 512-byte logical blocks: (4.03 GB/3.75 GiB)
[ 5106.512966] sd 0:0:0:0: [sda] Write Protect is off
[ 5106.517896] sd 0:0:0:0: [sda] Mode Sense: 43 00 00 00
[ 5106.518960] sd 0:0:0:0: [sda] No Caching mode page found
[ 5106.524360] sd 0:0:0:0: [sda] Assuming drive cache: write through
[ 5106.535980]  sda: sda1


If remote access is needed, no problem.


2 |3000

Up to 8 attachments (including images) can be used with a maximum of 190.8 MiB each and 286.6 MiB total.

mvader (Victron Energy) avatar image
mvader (Victron Energy) answered ·

Hi all, thank you for the feedback, very encouraging!

We'll post a new image soon - time permitting.

2 comments
2 |3000

Up to 8 attachments (including images) can be used with a maximum of 190.8 MiB each and 286.6 MiB total.

Jeremy Albrecht avatar image Jeremy Albrecht commented ·

Any chance the new image will be the “extended” image that contains NodeRed?

Unfortunately I’ve not had much time to troubleshoot the RPi4 Bluetooth issues since the first day, but I don’t want to do more work on the existing image if a new one is releasing soon.

0 Likes 0 ·
mvader (Victron Energy) avatar image mvader (Victron Energy) ♦♦ Jeremy Albrecht commented ·

Hi, eventually all will come together; yes. But hard to say when.


bluetooth: no problem ofcourse

0 Likes 0 ·
jfchnet avatar image
jfchnet answered ·

Installed OK on a RPI4

  • MK3-USB works perfectly with multiplus
  • VE Direct to USB works perfectly with BMV 712
  • WIFI and Ethernet works fine
  • Bluetooth was discovered as a Cerbo on my iphone Victron Connect immediately.
  • VRM worked right away also.


Will RPI4 will be 'supported' in the final 2.60 release? Is it thinkable ?

2 comments
2 |3000

Up to 8 attachments (including images) can be used with a maximum of 190.8 MiB each and 286.6 MiB total.

mvader (Victron Energy) avatar image mvader (Victron Energy) ♦♦ commented ·

Hi, not likely. v2.70 is more likely.

Thank you for the report!

0 Likes 0 ·
jfchnet avatar image jfchnet commented ·

Thanks mvader for this work, it is a game changer for me! very appreciated.


Just tried the HDMI headless, it is working perfectly on HDMI 0 or HDMI 1. Need to be connected at bootime.


It is extremely fast on the directly connected monitor, but on the web interface, it seems laggy VS headless mode. You can more see it when switch between pages.


I used a computer monitor @1080P resolution.


For reference, I have a RPI4 with 2G of ram in case it can make a difference.


I don't have smaller monitor to test yet.

0 Likes 0 ·
mvader (Victron Energy) avatar image
mvader (Victron Energy) answered ·

Hi all, just a note to say thank you and that we've read all your individual comments.

We've fixed the console requiring a login when connecting a computer monitor to one of the hdmi ports; and made progress on the built-in bluetooth as well. I'm not sure what exactly works & what doesn't on the various rpi models - more about that later:


For now its on hold, until v2.60 is released - and then we'll continue this as part of v2.70.


Thank you again, and looks like we'll add rpi4 support to v2.70 so thats a good progress!

2 |3000

Up to 8 attachments (including images) can be used with a maximum of 190.8 MiB each and 286.6 MiB total.

federico993 avatar image
federico993 answered ·

Hi, I have installed the rpi 4 image on my rpi 4 with a 7" HDMI screen and it works!

At first it wasn't working only by following the guides steps. To make the screen working you need to put these strings on the Config.txt file:

hdmi_group=2
hdmi_mode=14

Touch is working, Wi-Fi is working, VRM works perfectly.

Please tell me if I need to do some test.


Is there any news about the 2.70 update?


Thanks, Federico

2 |3000

Up to 8 attachments (including images) can be used with a maximum of 190.8 MiB each and 286.6 MiB total.

s-exley avatar image
s-exley answered ·

Rpi4 using version 2.60-22

GPS: Stemedu USB GPS Module Vk-162 - Working fine
Internal wifi working fine
USB VE direct connection to smart shunt and smart solar working fine
Relay working fine
Digital inputs don't seem to be working, possibly me....
All data going to VRM
USB keyboard working fine

Cheers
Simon

2 |3000

Up to 8 attachments (including images) can be used with a maximum of 190.8 MiB each and 286.6 MiB total.

Brian Brown avatar image
Brian Brown answered ·

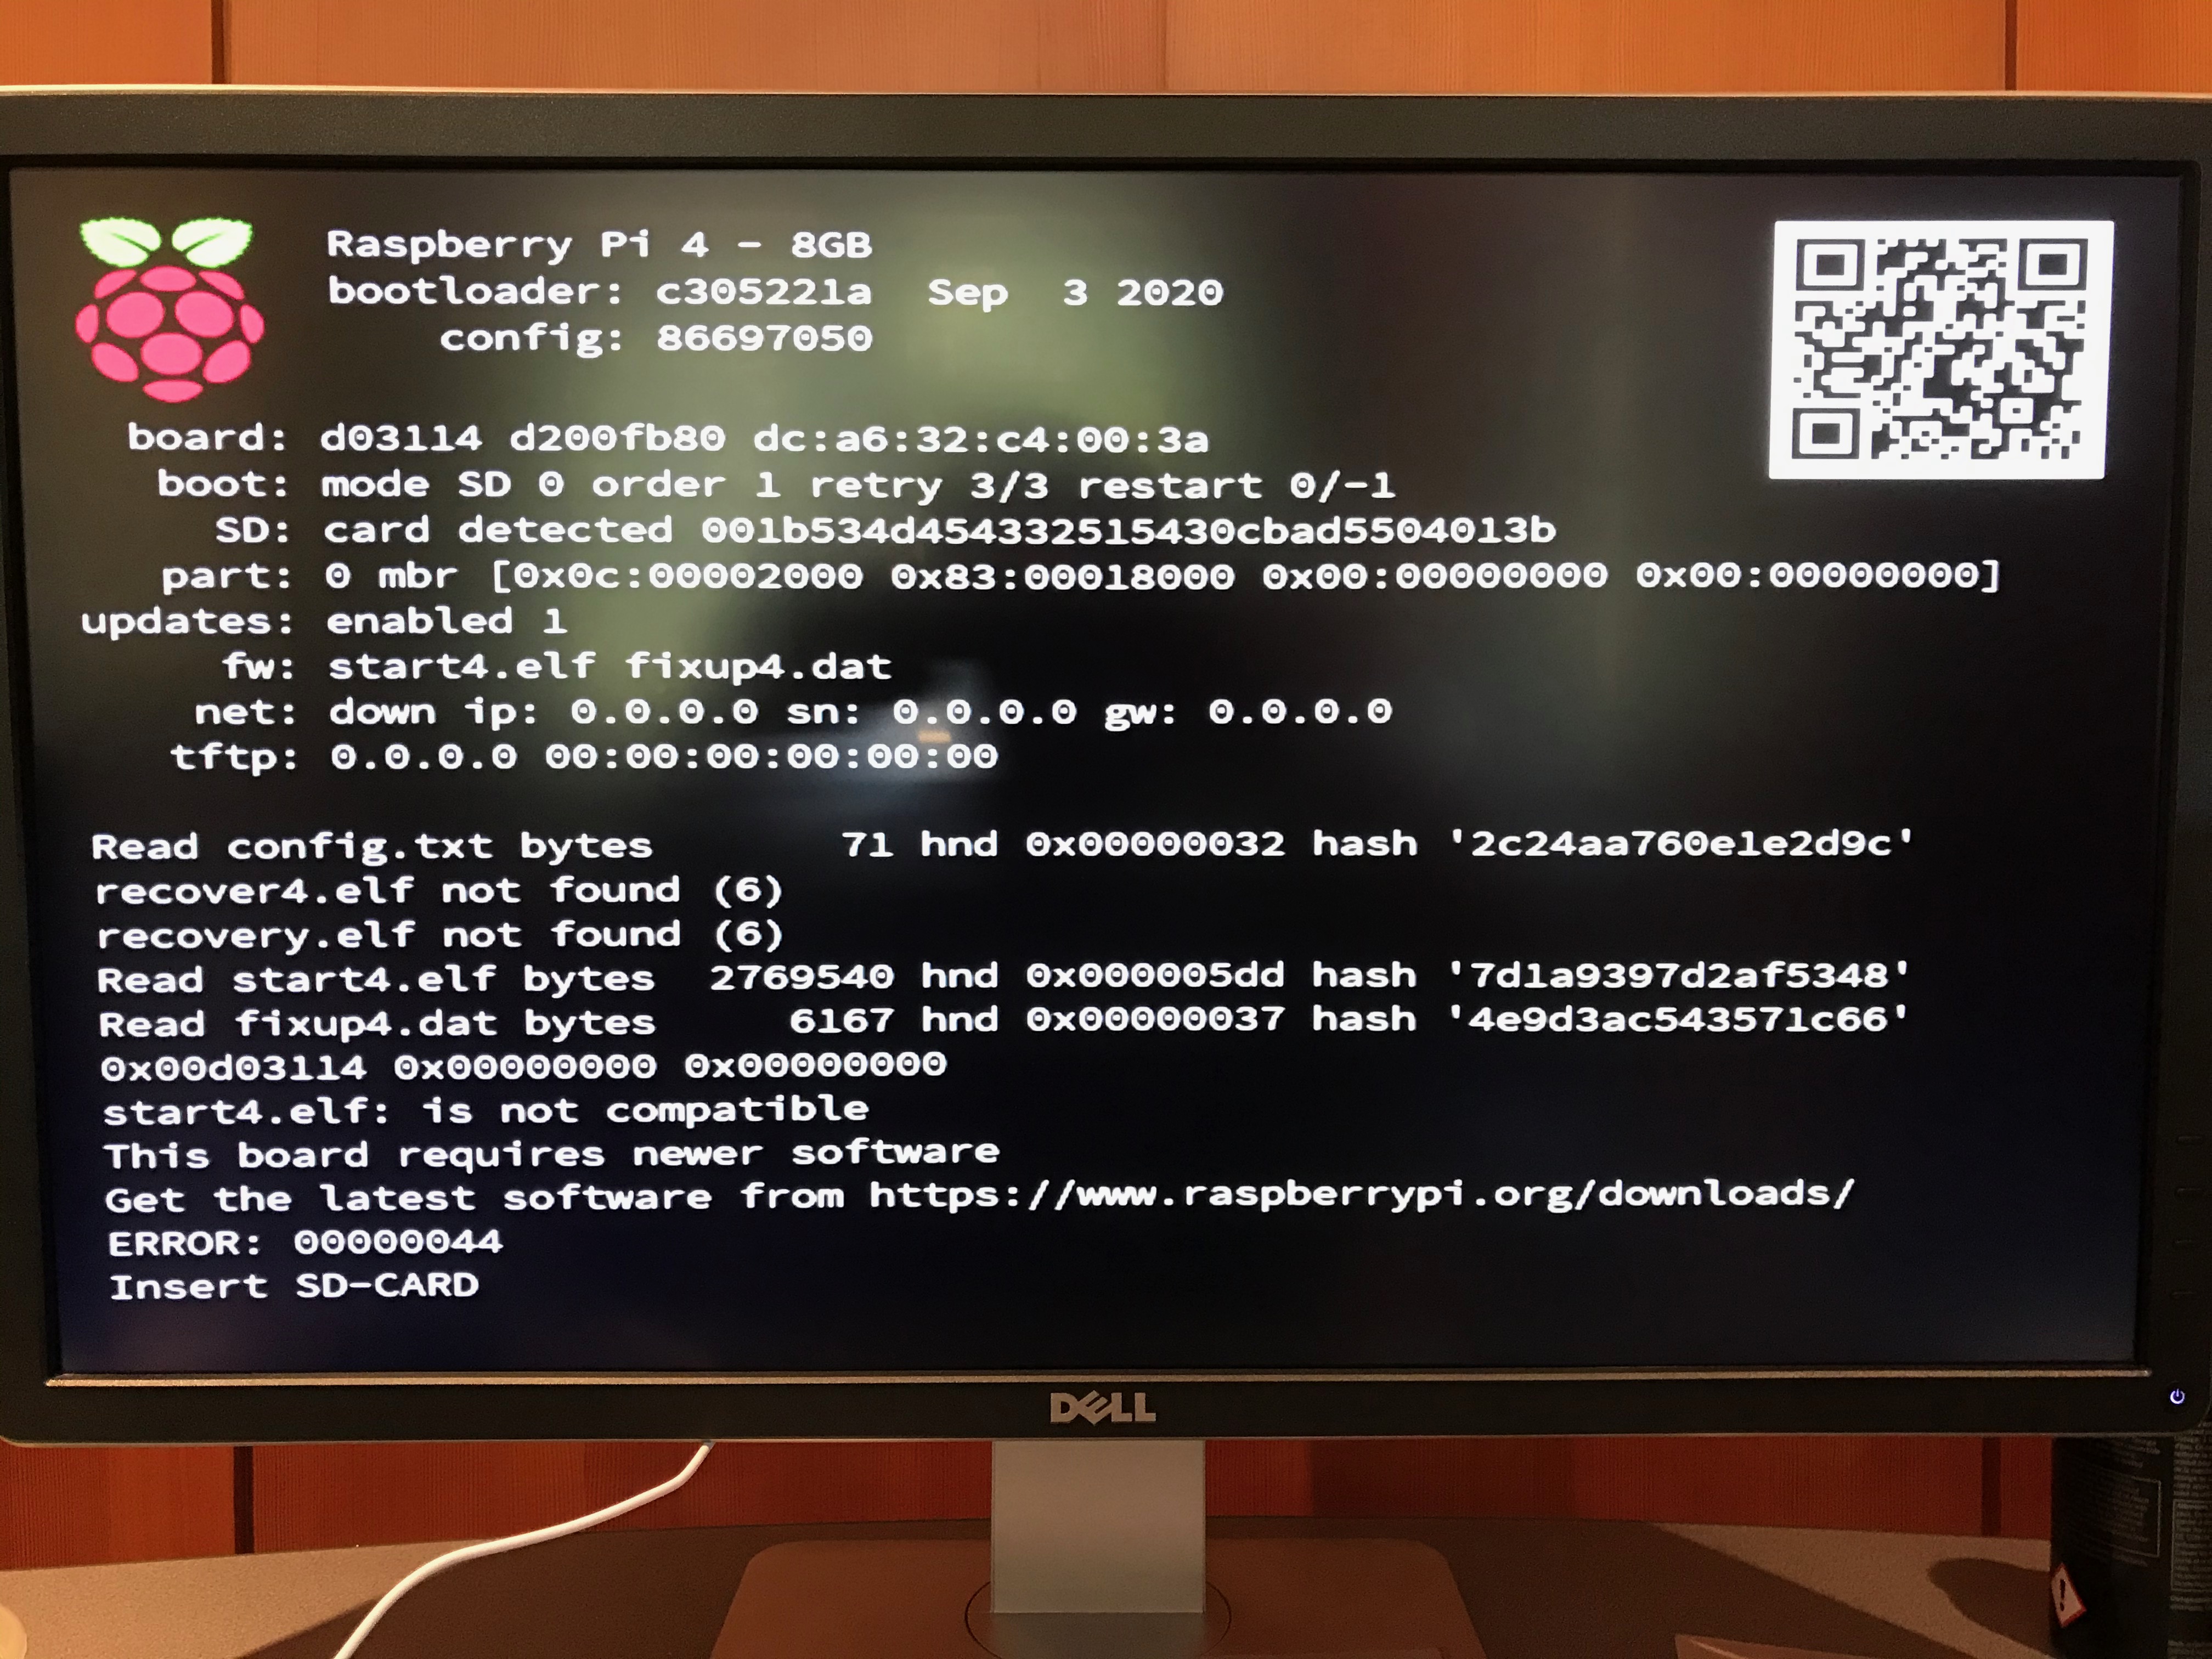
I'm new to Victron but familiar with Linux and Raspberry Pi and happy to test Pi 4. I was unable to get the above raspberrypi4 image to boot on a brand new Raspberry Pi 4 Rev B 8G. I tried win32diskimager, balenaEtcher and raspberry pi imager with the same results. I know the Pi 4 and 64G SD card are good because they boot Raspberry Pi OS just fine using those SD imagers. The HDMI boot screen complains that "the start4.elf: is not compatible" "This board requires newer software". The Pi 4 LED error code (4 short, 4 long) indicate "Unsupported board type" Is there a step I'm missing?


img-8348.jpg (2.1 MiB)
1 comment
2 |3000

Up to 8 attachments (including images) can be used with a maximum of 190.8 MiB each and 286.6 MiB total.

Mack Allison avatar image Mack Allison commented ·

Facing the same issue with two pi 4 units. both test well pi OS, are brand new. The first I tested shipped with the same firmware referenced above. I've downgraded the firmware as far as Apr 16 2020 with the same result. The second booted with Mar 19 2020 and also has the same result. Still poking at it. . . .

0 Likes 0 ·
Kevin Windrem avatar image
Kevin Windrem answered ·

I can confirm CANbus is working on the PI 4 using the CANable Pro module. I based the work on this:

https://github.com/victronenergy/venus/wiki/RaspberryPi-CAN-Interfaces

There are two different firmwares: slcand and candlelight. I was able to configure both to run but needed to add the ip link up ... commands and restart the related services to the udev shell scripts to support replugging the interface.

There is one outstanding issue: When using a powered USB hub, CANable crashes during a PI reboot. Many (most?) powered USB hubs don't drop power to the devices plugged into them when the incoming USB power drops which the PI does during boot. CANable doesn't recover from this for some reason. I'm looking for a powered USB hub that does cycle power to connected devices based on incoming USB power but until then, I'm using an unpowered hub. (Note that the Victron VE.direct to USB and the MK3 survive a reboot even when connected to a powered hub.)

I had to modify the scripts udev calls to include bringing the link up and to restart related services. This was needed to support hot-plugging CANable.

I also needed to modify the udev rules supplied by CANable to support candlelight. Candlelight bypasses slcand and is recommended for better throughput. It does require re-flashing the CANable device but that's easy. CANable provides an updater as a Google Chrome web page.


For slcand:

The udev rules and canusb_remove.sh supplied in Victron's instructions were used as is.

canusb_add.sh:

#!/bin/sh

#  canusb_add.sh

# Bind the USBCAN device
slcand -o -c -f -s5 /dev/$1 can0

# bring the link up
ip link set can0 up

# restart services so they see this new interface
svc -t /service/vecan-dbus.can0
svc -t /service/can-bus-bms.can0
svc -t /service/mqtt-n2k.can0


For candlelight:


The rules need to be modified with the actual device serial number.


I added the ACTION filter so the script is only executed on addition of the device,

and also added RUN lines and the candlelight.sh to what CANable provided.


udev rules:


# CANable USB module - candlelight
SUBSYSTEM=="net", ACTION=="add",\
  ATTRS{idVendor}=="1d50", ATTRS{idProduct}=="606f",\
  ATTRS{serial}=="002500005852430220363530",\
  NAME="can0",\
  RUN+="/usr/bin/logger [udev] CANable Candlelight detected",\
  RUN+="/usr/local/bin/candlelight.sh"

candlelight.sh:
#!/bin/sh

#  CANable candlelight

# bring the link up - down first just in case it's already runing
ip link set can0 down
ip link set can0 up type can bitrate 250000

# restart services so they see this new interface
svc -t /service/vecan-dbus.can0
svc -t /service/can-bus-bms.can0
svc -t /service/mqtt-n2k.ca
Maybe these changes can be incorporated in Victron's instructions referenced above.
4 comments
2 |3000

Up to 8 attachments (including images) can be used with a maximum of 190.8 MiB each and 286.6 MiB total.

federico993 avatar image federico993 commented ·

Thanks for your reply, I need to install a CAN hat as well. But I already have This hat on the PI and I don't know if a CAN hat can be installed above.

Someone has already installed the Venus v2.70 : v2.70

But I guess the link is hidden.

v2.62 has already been released, but is there any news about the v2.70 data release?


0 Likes 0 ·
Kevin Windrem avatar image Kevin Windrem federico993 commented ·

The CANable is a USB to CANbus module so you wouldn't need to add another hat to your PI stack. It would of course need different configuration but that's covered in the Victron document I referenced in my original post.

The Canberry hat is available but don't know if it would plug on top of your existing hat. It depends on that hat's pin lengths and parts clearances.

Good luck and let me know if there's anything else I can help with.

0 Likes 0 ·
mvader (Victron Energy) avatar image mvader (Victron Energy) ♦♦ commented ·

Hey Kevin, for above updates, can I give yo access to the wiki? Whats your github username?


@Kevin Windrem

0 Likes 0 ·
vassilis-bourdakis avatar image vassilis-bourdakis mvader (Victron Energy) ♦♦ commented ·

@mvader (Victron Energy) looks like the CAN Interfaces WIKI is accessible to all github users. Just added the WAVESHARE RS485 CAN HAT info (copied and edited the canberry data which are similar) hope it's OK

cheers


Vassilis

0 Likes 0 ·
Kevin Windrem avatar image
Kevin Windrem answered ·

I'd like to make a plea to add software update images for Raspberry PI 4 to the feed. It's currently not an issue but will be when the next version goes into beta.

1 comment
2 |3000

Up to 8 attachments (including images) can be used with a maximum of 190.8 MiB each and 286.6 MiB total.

mvader (Victron Energy) avatar image mvader (Victron Energy) ♦♦ commented ·

Hey Kevin, we're half way: all changes made a while ago (add rpi4 support, bluetooth as well as self expanding images) are already on the master branch. Meaning, that it will be in the feeds as soon as we're ready to start field testing v2.70 beta versions.

Best regards, Matthijs

0 Likes 0 ·
Rob Duthie avatar image
Rob Duthie answered ·

rpi3

RPI3 (Laurence Hardwick)

Raspberry Pi 3 Model B Plus Rev 1.3

Official Raspberry 7” pi touch screen running at 800x480

Serial console (debug)

OK (rpi3B-v1.2 by Matthijs)

OK

hdmi console

OK (rpi3B-v1.2 by Matthijs)

Nothing seen – not tried

hdmi gui (remove /etc/venus/headless)

OK (rpi3B-v1.2 by Matthijs)

OK

USB keyboard

OK (rpi3B-v1.2 by Matthijs)

Not tried – Using Ethernet terminal access

GPS Dongles (pls report which one you use)

OK (rpi3B+ by PoloC)

GPS Vk-162 Glonast Navigation

Reports as NMEA-0183 GPS (ACMo) [0]

NOTE see notes about the change in service name on D-Bus

Onboard WiFi

OK (rpi3B+ by PoloC)

Yes

Onboard Bluetooth (note that I don't know on which rpis bluetooth is supposed to work)

Not OK (rpi3B-v1.2 by Matthijs)

Use to work OK on pre ver 2.60 Auto, now need to manual start to work. Ver2.63 is now OK

No tried

VE.Direct USB

VE Direct port UART I2C

Works Ok
We have 2 ports working OK now

Not tried

MK3-USB to a Multi

Works OK

Not tried

GX GSM


Not tried

CAN (see here)

Works OK

That inserting a USB stick makes VRM Logger recognise it


OK

Pressing eject & then taking the stick out OK


OK

Digital inputs

Works OK

Not tried

Analog inputs

Works OK

Temperatures appear in the device list, but do not appear in the I/O/Analog in the menu

Read through kernel bootlogs


Unsure what this is

.swu updating online (impossible to test for now)

Works OK

.swu updating offline (sdcard or usbstick) (impossible to update for now)

Works OK

booting into backup image (impossible to update for now)

Works OK

Touchscreens and other add-ons that are being used

Works OK

Working see config above

Logging to VRM (and thus DNS)

Works OK

Venus – Rpi says no error but VRM portal shows no connection.

Venus menu - "Remote console on VRM" says “online” but connection from the Portal is not working.


2 |3000

Up to 8 attachments (including images) can be used with a maximum of 190.8 MiB each and 286.6 MiB total.

Kevin Windrem avatar image
Kevin Windrem answered ·

HDMI console works for me on RPI 4 2 GB.

The only issue is that the screen (HDMI or the "official" touchscreen is half filled with the Victron logo which makes using the console and eclipses command line output: more scrolls based on the full vertical height not the space below the logo(s). This makes the console pretty much useless forcing the use of ssh for command line work.

I think the Victron logo should disappear after logging in.

2 |3000

Up to 8 attachments (including images) can be used with a maximum of 190.8 MiB each and 286.6 MiB total.

Kevin Windrem avatar image
Kevin Windrem answered ·

Digital Inputs 1 and 2 appear to be working, 3-5 appear to be NOT working

Relay output appears to be working.


Raspberry PI 4 2 GB

Venus 2.60


/etc/venus/gpio_list from the PI 4 image is empty. I used gpio_list from PI 2 but should be the same for the PI 4.

Maybe there are other files that need to be updated but not sure what - an overlay maybe ?????

19 comments
2 |3000

Up to 8 attachments (including images) can be used with a maximum of 190.8 MiB each and 286.6 MiB total.

Rob Duthie avatar image Rob Duthie commented ·

Hi

This file should be in the gpio list to make all the relays and IO ports work.


# This is a list of gpio pins, set by the script /etc/rcS.d/S90gpio_pins.sh
# They are documented at: https://github.com/victronenergy/venus/wiki/bbb-gpio
# Format: <pin_number> <direction: in/out> <name>
#
# The <name> part is used to create an symlink in /dev/gpio.

# Relay 1 Pin 40 / GPIO 21
# Relay 2 Pin 11 / GPIO 17
# Relay 3 Pin 13 / GPIO 27
# Relay 4 Pin 15 / GPIO 22
# Relay 5 Pin 16 / GPIO 23
# Relay 6 Pin 18 / GPIO 24


21 out relay_1
17 out relay_2
27 out relay_3
22 out relay_4
23 out relay_5
24 out relay_6

# Digital input 1 Pin 29 / GPIO 05
5 in digital_input_1
# Digital input 2 Pin 31 / GPIO 06
6 in digital_input_2
# Digital input 3 Pin 33 / GPIO 13
13 in digital_input_3
# Digital input 4 Pin 35 / GPIO 19
19 in digital_input_4
# Digital input 5 Pin 37 / GPIO 26
26 in digital_input_5


Regards

Rob D

NZ

0 Likes 0 ·
Kevin Windrem avatar image Kevin Windrem Rob Duthie commented ·

Thanks for the information. There's still some odd things going on:

Digital inputs 1 and 2 have pull-ups on their inputs

Digital inputs 3, 4 and 5 have pull-DOWNS on their inputs.

I can't find anything where the internal pull ups/downs are set. Could be the chip defaults??? Is this code that needs to be added for all Raspberry PI builds?


I can specify AT MOST two relay. Regardless of which two GPIOs are selected, they appear as Relay 1 and Relay 2 in the menu.

Specifying any more than two makes the entire Settings/Relays menu disappear. In fact, if I look in dubs-spy, the victronergy.system service is missing !!!!!!!!!!

The log shows "KeyError: '/Relay/2/State'. So there appears to be an array that's too small. This probably doesn't matter since you can only assign functions to the first relay anyway which is too bad since there are 4 things that could be sent to a relay.


The file content you sent appears to be correct but it is NOT from the link you included.


0 Likes 0 ·
Rob Duthie avatar image Rob Duthie Kevin Windrem commented ·

Hi

Yes there are IO with pull up and pull downs as per my schematic that is how it is done hardware and code for CCGX and raspi etc

I have changed some setting in the code. Yes relay one has the functions for 4x different setting the rest are manual, as the CCGX has only one relay output etc..Victron Raspi Hat.pdfVictron Raspi Stetson.pdf

0 Likes 0 ·
Kevin Windrem avatar image Kevin Windrem Rob Duthie commented ·

The Victron manual for Venus GX indicates all 5 of it's inputs are pulled up to 3.3 volts and that you activate the input by connecting the pin to ground. Documentation for other products isn't specific.

From the Stetson documentation, it appears the PI has different pull up/down configurations as I determined through experimentation. Stetson converts all digital inputs to require a positive voltage relative to ground. The internal inactive state will differ between inputs 1 - 2 and 3 - 5 but can be inverted in setup. At least the Stetson schematic documents this.

The default state of each input as well as the direction to pull the line does not appear to be in the documentation. I suggest this information be added for each product.

0 Likes 0 ·
Rob Duthie avatar image Rob Duthie Kevin Windrem commented ·

Hi Kevin

When i first started the raspi Stetson PCB design this has always being the case with the IO ports some being inverted etc. Even in the Beagle Bones capes was the same. even when i tested the IO and looked at the raw data coming in it was inverted. So have keeped to the same convention right threw. I do have copies of the Beagle Bones PCB design as this was opened sourced, and just changed a lot of things to be compatable with the raspi and add new features like 6 relays etc.

Regards

Rob D

NZ

0 Likes 0 ·
Kevin Windrem avatar image Kevin Windrem Rob Duthie commented ·

Thanks for the background. It is what it is.

Do you know why we can't instantiate more than two relays? Is this just on the PI 4 image?

0 Likes 0 ·
Rob Duthie avatar image Rob Duthie Kevin Windrem commented ·

Hi Kevin

I am sure you can, there was some changes to be done on certain files to make this happen, as we did for the Raspi 3B+ which i use in all my projects and solar system i install for on grid and off grid etc.

Can you make the 6 relays work manually on the Raspi 4 in settings as a test? are there visible on screen under settings and device list and relay list?

If not you need to add in some Page settings files to the gui folder to work etc.

Regards

Rob D

NZ


0 Likes 0 ·
Kevin Windrem avatar image Kevin Windrem Rob Duthie commented ·

Innitially only two total relays on the relay settings page. Instantiating more than two crashed systemcalc. I went down the rabbit hole and found the changes that were needed to add 4 more manual relays. I can probably add the necessary code to hook other functions up to all the relays.


0 Likes 0 ·
Rob Duthie avatar image Rob Duthie Kevin Windrem commented ·

Hi Kevin

I Have all the files i can send to you if you want save writing code to do it.?

0 Likes 0 ·
Kevin Windrem avatar image Kevin Windrem Kevin Windrem commented ·

Thanks. Maybe put them up on GitHub and send me a link? If you'd rater keep it private you can post a response here to me only.

0 Likes 0 ·
Rob Duthie avatar image Rob Duthie Kevin Windrem commented ·

Ok i will upload the folder to GitHub and advise you. it contains all the files to make it update with out changing anything and keeps it all intact except for a screen calibrate needs to be done.

This includes all the canbus, 6x relays, etc.

Drop box link for files

https://www.dropbox.com/s/6sxpyvbn44qq1c4/Data%20Backup%20file%20raspi%20-%20Copy.rar?dl=0

0 Likes 0 ·
Rob Duthie avatar image Rob Duthie Rob Duthie commented ·

Hi

Send me a email so i can send a Dropbox link, as GitHub did not like all my files?

raduthie@gmail.com

0 Likes 0 ·
Kevin Windrem avatar image Kevin Windrem Rob Duthie commented ·

Drop box is fine. No need for GitHub just for me. Thanks

0 Likes 0 ·
Rob Duthie avatar image Rob Duthie Kevin Windrem commented ·

Hi As above link

0 Likes 0 ·
Kevin Windrem avatar image Kevin Windrem Kevin Windrem commented ·

The fact that some GPIO inputs have pull ups while others have pull downs bothered me, so I did some digging and found this post on the Raspberry PI forum:

https://www.raspberrypi.org/forums/viewtopic.php?t=202568

The first 8 GPIO pins default to pull ups, the rest to pull downs. So it appears Venus is using the default pull up/down configuration.

With all the work that's been done to this point, a generic change probably isn't a good idea. Stetson converts all digital inputs to use an external voltage AND there is an invert control in all digital input setup so you can get there from here if you understand the problem. Documentation will be essential.

The sysfs GPIO interface doesn't have access to the pull up/down settings.

A hardware solution would be to use an external pull-up that eclipses the internal 50K resistance. 3K would be sufficient only 1 mA per pin when the input is pulled active by the external device.

0 Likes 0 ·
Kevin Windrem avatar image Kevin Windrem Kevin Windrem commented ·

I have come up with a DT Overlay that makes all digital inputs have pull-ups.

Note that this may create issues with Stetson and other existing hardware running Venus OS, but if you have your own hardware, this overlay may help with a consistent digital input design across all pins.

The overlay and it's source can be found here:

https://github.com/kwindrem/RpiGpioSetup

0 Likes 0 ·
Rob Duthie avatar image Rob Duthie Kevin Windrem commented ·

Hi Kevin


I will do as test on the 3+ model and if looks good i could do a PCB revision change.

Regards

Rob D

NZ

0 Likes 0 ·
Kevin Windrem avatar image Kevin Windrem Rob Duthie commented ·

I know what impact a change like this can be to systems in the field especially since it interacts with hardware.

This is all in the /u-boot partition (overlays and config.txt) not in the root fs. So the DT overlay is applied before Venus boots and a normal software update would not make changes in this area.

I think the best way to handle this would be to include the overlay in the initial image then instruct the builder to uncomment a line in config.txt if they want the digital inputs to behave all the same (read high when there's nothing tugging on the pin). That way the image is the same as it's always been but a one-line edit can be made to change the behavior.

0 Likes 0 ·
Kevin Windrem avatar image Kevin Windrem Kevin Windrem commented ·

Oops: I had the Broadcom chip numbers for some of the Raspberry PI models. Should be fixed in GitHub now.

0 Likes 0 ·
madcomp avatar image
madcomp answered ·

Hello to all,

I wish you all a happy and healthy new year. I installed the venus-image-raspberrypi4-20200517094427-v2.60~22.rootfs.wic.gz on Raspberry Pi 4 4Gb. But I recgnized, that the the CPU will be very hot. Did someone make the same experience as me? I installed now a fan. It is better, but I hate fans. Maybe a kernel update or using the update firmware bin file from Raspberry a better solution? Thanks...

Best regards

4 comments
2 |3000

Up to 8 attachments (including images) can be used with a maximum of 190.8 MiB each and 286.6 MiB total.

Kevin Windrem avatar image Kevin Windrem commented ·

Did you experience the same issue with v2.60 (release version)? That's what I'm running and the CPU is only slightly warm with no fan. I do have a heat sink fitted to the CPU.

0 Likes 0 ·
madcomp avatar image madcomp Kevin Windrem commented ·

Do you have a link for me? Thanks...

0 Likes 0 ·
federico993 avatar image federico993 commented ·

I've noticed the same, but I am using an Armor heatsink.

0 Likes 0 ·
federico993 avatar image
federico993 answered ·

For the ones using HDMI screen, can you regulate the brightness or turn the screen off? I can't find a way to do it.

Can anyone help?

Thanks!

3 comments
2 |3000

Up to 8 attachments (including images) can be used with a maximum of 190.8 MiB each and 286.6 MiB total.

Kevin Windrem avatar image Kevin Windrem commented ·

It appears the answer is no. I started down this path and ended up switching to the "official Raspberry Pi 7" touchscreen" which does support brightness and screen saver.

Part of the problem is that there are no HDMI protocols for adjusting brightness or even turning the display on and off. The best that could be accomplished is to replace the content with all black but a glow from the display would remain.

0 Likes 0 ·
federico993 avatar image federico993 Kevin Windrem commented ·

Thanks Kevin! I've switched to the Official Raspberry Pi 7" touchscreen as well and now it works like a charm.

0 Likes 0 ·
Kevin Windrem avatar image Kevin Windrem Kevin Windrem commented ·

I found a partial solution: display blanking

Refer to this article for details:

https://community.victronenergy.com/questions/67108/screen-off-time-on-raspberry-pi.html?childToView=74916#answer-74916

0 Likes 0 ·
madcomp avatar image
madcomp answered ·

An understanding question from my side: If Blutetooth(internal or USB) works, will I need still the VE.Direct cable? or can I connect all devices via Bluetooth?

VE.Direct cable makes my MPPT 100/20 3 cm higher und there is no place for this 3 cm. I hoped that I can use all devices without any cable.


Thanks for your answers...

Best regards

10 comments
2 |3000

Up to 8 attachments (including images) can be used with a maximum of 190.8 MiB each and 286.6 MiB total.

Rob Duthie avatar image Rob Duthie commented ·

Hi Madcomp

The USB bluetooth dongle works OK Ver 2.62-7 the internal one is a issue and always will be, due the share UART ports etc.

0 Likes 0 ·
mvader (Victron Energy) avatar image mvader (Victron Energy) ♦♦ Rob Duthie commented ·

Hey @Madcomp to your other question: yes you'll need VE.Direct cables. See our Cerbo GX manual for what the Bluetooth can be used for (answer: setting up ethernet/wifi connection only, more or less)

0 Likes 0 ·
madcomp avatar image madcomp mvader (Victron Energy) ♦♦ commented ·

Hi @mvader (Victron Energy) thank you for your answer. I figured out too.

I am still testing the Raspberry Pi 4 and it works good. But the CPU will be really very hot. I am using the CPU heatsink, but still very hot/warm. I tested the 2.60-22 from here and the unofficial2.60 version. Still the CPU is very hot. If I use the Raspberry OS, the CPU stays cold or lukewarm. Do you have a explanation for it? Maybe the CPU shall set to IDLE mode? I have an Raspberry Pi 4 4GB...

Thanks...

0 Likes 0 ·
Rob Duthie avatar image Rob Duthie madcomp commented ·

Hi

I use the raspi3B+ MCU and they run cool with no issues they are more efficient than the raspi4 in power consumption. just my 2 cents worth.

0 Likes 0 ·
madcomp avatar image madcomp Rob Duthie commented ·

Hi @Rob Duthie

as I wrote, I don't have any problem with original Raspberry OS or with Ubuntu. They run really cool. Maybe some problems in your deploy? Not correct or an old power management?

If I don't remember wrong, you wanted to support the Raspberry Pi 4 officially in Version 2.70. Right?

Do you recommend the RPI3B+?

Thanks...


0 Likes 0 ·
Rob Duthie avatar image Rob Duthie madcomp commented ·

Hi

Yes i do, as they are cheaper and run cooler and have least power draw for solar system especially for off grid applications, That is all i install with the multiplus2 units with a raspi 3B+ now days.

0 Likes 0 ·
Kevin Windrem avatar image Kevin Windrem madcomp commented ·

My Rpi 4 2 GB. I have a heat sink mounted and with a fan it's very close to ambient. Without the fan it is only slightly warm to the touch. This is with Venus 2.60 and 2.70~3 (Raspberry Pi OS also runs only slightly warm.)

0 Likes 0 ·
federico993 avatar image federico993 madcomp commented ·

Hi, it was the same for me, I've solved it changing my 7" HDMI screen with the Raspberry 7" one and now the raspberry runs cold!

0 Likes 0 ·
madcomp avatar image madcomp Rob Duthie commented ·

Thanks. I use an USB dongle and it works with 2.60-22. :)

0 Likes 0 ·
Rob Duthie avatar image Rob Duthie madcomp commented ·

Hi

We are looking at getting the internal Bluetooth going now on the raspi 3B+.

0 Likes 0 ·
federico993 avatar image
federico993 answered ·

Are there any instructions on how to set the CAN bus data among the REC BMS and the Raspberry?

I was able to find the thread were the list of the compatible CAN boards were described, but how to make it working?

Can anyone help me with it?

Thanks!

24 comments
2 |3000

Up to 8 attachments (including images) can be used with a maximum of 190.8 MiB each and 286.6 MiB total.

Kevin Windrem avatar image Kevin Windrem commented ·

I am using the CANable USB to CAN interface.

Here's a link to some setup scripts I wrote to make implementation easier.

https://github.com/kwindrem/VeCanSetup

If you need to run multiple CAN interfaces, you'll need to flash CANable with the candlelight firmware.

The other option is Rob Durthie's "Stetson" hat

https://community.victronenergy.com/articles/38710/victron-raspi-hat.html

This is an evolving product. The current version has (or will soon have) two Ve.Direct ports, one CAN port, 4 relays, 5 digital inputs and 5 analog inputs.

0 Likes 0 ·
federico993 avatar image federico993 Kevin Windrem commented ·

Thanks Kevin for the detailed answer! I am new at the Raspberry world, so I am trying to understand how to do it.

I have a RS485 CAN HAT for Raspberry Pi with the MCP2515 chip:

https://www.waveshare.com/rs485-can-hat.htm

Since the RPi Venus image includes kernel drivers for the MCP2515 chip, I guess I have to use the same instructions for the "Canberry" board. Is it right?

But I don't know how to follow the 5 steps of the https://github.com/victronenergy/venus/wiki/RaspberryPi-CAN-Interfaces link:

To connect can0 to the Venus system the following should be added:

1 Create a file /etc/venus/canbus_ports that contains the entry can0
2 Copy the directory /opt/victronenergy/can-bus-bms/service to /service/can-bus-bms.can0
3 Copy the directory /opt/victronenergy/vecan-dbus/service to /service/vecan-dbus.can0
4 Copy the directory /opt/victronenergy/mqtt-n2k/service to /service/mqtt-n2k.can0
5 In all three of those /service/*.can0 directories change DEV to can0 in the run and log/run files.

What are the instructions for creating the file, copying the directory etc.?


0 Likes 0 ·
Kevin Windrem avatar image Kevin Windrem federico993 commented ·

You can use the files at:

https://github.com/kwindrem/RpiGpioSetup

to help set up things on the PI. The rpiCANableSetup shell script automates the installation. However you'll need to replace the stuff for CANable with the stuff for your Waveshare CAN hat.

The most involved part of the installation is creating the dbus services. That's handled at the bottom of the script (search for "# setup services").

You will also need to install a dt overlay which is not in my script. This is discussed in the instructions from Victron for Canbery. But your overlay setup will differ. You should follow directions you receive with the board to install the proper overlays. They differ from the Canberry instructions provided by Victron.

You shouldn't need the CANable.rules or the CANable...sh scripts.


I'm not sure if you'll need code to bring up the CAN interface and/or restart the services. That's handled in my CANable...sh scripts called by the udev mechanism. This was mainly needed for CANable to support hot-plugging.

The rc.CANable script is added to /data/rc.local so the installation can be repeated after a software update.

The Waveshare CAN hat could function differently than Canberry so you may need to do some tweaking.

Good luck.

0 Likes 0 ·
federico993 avatar image federico993 Kevin Windrem commented ·

Thanks kevin for the answer! I have found the overlay for the Waveshare CAN hat:

dtoverlay=mcp2515-can0,oscillator=12000000,interrupt=25,spimaxfrequency=2000000

But sadly I am not able at editing the shell script who you have linked.


0 Likes 0 ·
federico993 avatar image federico993 federico993 commented ·

I've put the overlay into the config.txt file and the CAN hat is actually working, I have tested it from the terminal!

I have created the file:

1 Create a file /etc/venus/canbus_ports that contains the entry can0

but I can't copy the directories:

2 Copy the directory /opt/victronenergy/can-bus-bms/service to /service/can-bus-bms.can0
3 Copy the directory /opt/victronenergy/vecan-dbus/service to /service/vecan-dbus.can0
4 Copy the directory /opt/victronenergy/mqtt-n2k/service to /service/mqtt-n2k.can0
5 In all three of those /service/*.can0 directories change DEV to can0 in the run and log/run files.

Which are the commands for copying these directories?

Thanks!

EDIT:

I have created the symlinks through the terminal that should work as for the steps above. Is it right?

root@raspberrypi4:# ln -s /opt/victronenergy/can-bus-bms/service /service/can-bus-bms.can0
root@raspberrypi4:# ln -s /opt/victronenergy/dbus-motordrive/service /service/dbus-motordrive.can0
root@raspberrypi4:# ln -s /opt/victronenergy/dbus-valence/service /service/dbus-valence.can0
root@raspberrypi4:# ln -s /opt/victronenergy/vecan-dbus/service /service/vecan-dbus.can0
root@raspberrypi4:# ln -s /opt/victronenergy/mqtt-n2k/service /service/mqtt-n2k.can0

root@raspberrypi4: #echo "can0" > /etc/venus/canbus_ports


0 Likes 0 ·
Kevin Windrem avatar image Kevin Windrem federico993 commented ·

The problem with the services is you can't just sim-link to the services dicrectory as you would with other services. That's because each needs to be specific to the CAN bus (in this case can0).

You must COPY the directory structure from their source to the services directory then EDIT the files as described in the Victron instructions.

I've added a script that will JUST add the services to my repo. You must remove the sim-links you added previous before you run the script.

https://github.com/kwindrem/VeCanSetup

0 Likes 0 ·
federico993 avatar image federico993 Kevin Windrem commented ·

Thanks Kevin, I was just trying to follow this thread:

https://groups.google.com/g/victron-dev-venus/c/R6qF8tnFQNI/m/xkpQ-v6SBgAJ

I can't see the script who you have added to your repo, maybe there was an issue with the upload?

Do I need to add the "rm" command in front of the symlinks to remove them?

Example:

rm /service/can-bus-bms.can0 

Thanks again!


0 Likes 0 ·
Kevin Windrem avatar image Kevin Windrem federico993 commented ·

The new script (rpiCanServicesSetup) is there now sorry.

Because it's a directory, you need to call rm with the recursive flag. The actual command would be

rm -r /service/can-bus-bms.can0

Then install my script somewhere and type

./rpiCANServicesSetup

You will need to rerun this script after each Venus update because the software update overwrites the changes. A good place to save these setup scripts is in /data because that part of the file system is not touched by an update.

I recommend you look into some basic unix learning. Without basic understanding, you might be better off getting someone local to maintain the system or switch to Cerbo so you don't need to dig into the code.

0 Likes 0 ·
federico993 avatar image federico993 Kevin Windrem commented ·

Thanks Kevin for the help, I am trying to install the script but I don't know how to do it. Do I need to use the chmod?

I tried some commands but I wasn't able to install it.

I really would like to make it work, but even studying the basic unix I am still not able to know what to do.

0 Likes 0 ·
vassilis-bourdakis avatar image vassilis-bourdakis federico993 commented ·

hi all,

I have the same WAVE RS485-CAN hat and editing the config.txt with the line Federico mentions above (12 and not 16MHz and 25 and not 22 irq) system works!


So, Federico, once you manage to copy and edit properly the services, it will work.

To make life easier (assuming you haven't edited much on your SDCard), I think you'll be better off wiping the card, starting fresh, copying the script file that Kevin made, chmod +x to the file, and run it using the command ./filename.

Then edit the config.txt with the two lines you mentioned and it works fine. Nothing else needed.


For the record thats on a Rpi4 (2GB) with can connected to NMEA2000. I can read all messages broadcasted on the bus.


cheers


Vassilis


PS. added the WAVE RS485 CAN HAT details at the bottom of the CAN interfaces wiki file, hope it's acceptable

0 Likes 0 ·
federico993 avatar image federico993 vassilis-bourdakis commented ·

Hi Vassilis, I am glad that the line I have mentioned has helped you making it working!

Thanks for the hint, I have copied the Kevin's script and looks like it has been installed.

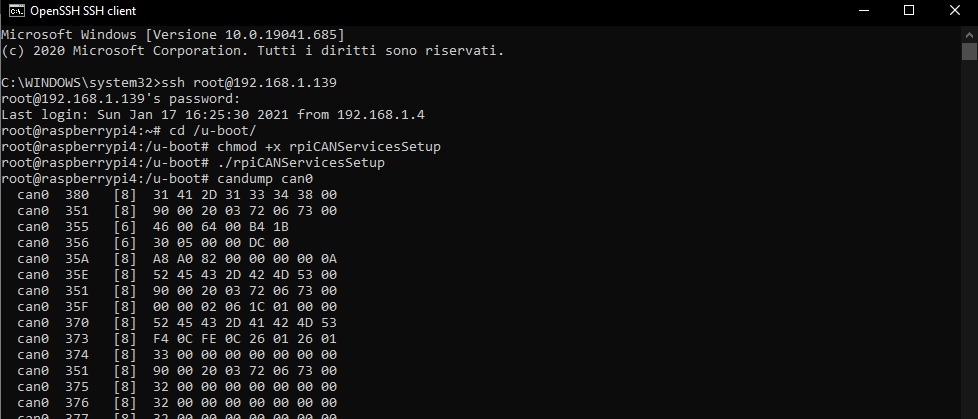
I can also read the CAN data coming from the BMS using the command candump can0, but the BMS doesn't show up in the Victron software.

help.jpg

What I am missing?

Thanks!

0 Likes 0 ·
help.jpg (96.6 KiB)
Kevin Windrem avatar image Kevin Windrem federico993 commented ·

The CAN bms service may not be running.

Enter this command:

 ps | grep bms

If you don't see a line similar to the following, the CAN bms service isn't installed properly

supervise can-bus-bms.can0

You may need to start the CAN services

Enter the command:

svc -t /service/can-bus-bms.can0

If you get an error, then that's another clue that the service isn't installed properly.

If this brings up our BMS data, then reboot and see if it comes up without typing the command above. If not, you'll need to run that command every time you boot. The easiest place to do this is to add the line to /data/rc.local. That file may not exist, so create it if it does not and make sure the file starts with the line:

#!/bin/sh


0 Likes 0 ·
Show more comments
federico993 avatar image federico993 vassilis-bourdakis commented ·

Hi Vassilis, one question: how did you terminate your CAN bus on the Waveshare HAT?

Thanks!

0 Likes 0 ·
vassilis-bourdakis avatar image vassilis-bourdakis federico993 commented ·

Federico, I didn't!

In theory you need 120Ohm resistors (iirc) but that's for the whole bus.

Mind you I'm using the normal NMEA2000 micro connectors (Garmin ones) so there's termination on the ends of the bus, the HAT fits in the middle of the backbone through a tee and drop cable - topology is different. I do get all NMEA2000 messages coming up on SignalK without any issues. I'll test it tomorrow on the boat with a dozen devices and not only 1 I have at home and see.


Obviously if you just connect the HAT to a CAN device, things are different, you should have termination on either end (don't ask me how though!) Try a 120 Ohm resistor on the two bus cables maybe?


cheers


V.

0 Likes 0 ·
Rob Duthie avatar image Rob Duthie federico993 commented ·

Hi

I have Script files that make this make this happen automatically.

This include all the can bus, VE Direct ports extra relays,screen backlight etc.

These get all added to the data folder at the start when doing a new image file etc.

Regards
Rob D

NZ

0 Likes 0 ·
Kevin Windrem avatar image Kevin Windrem Rob Duthie commented ·

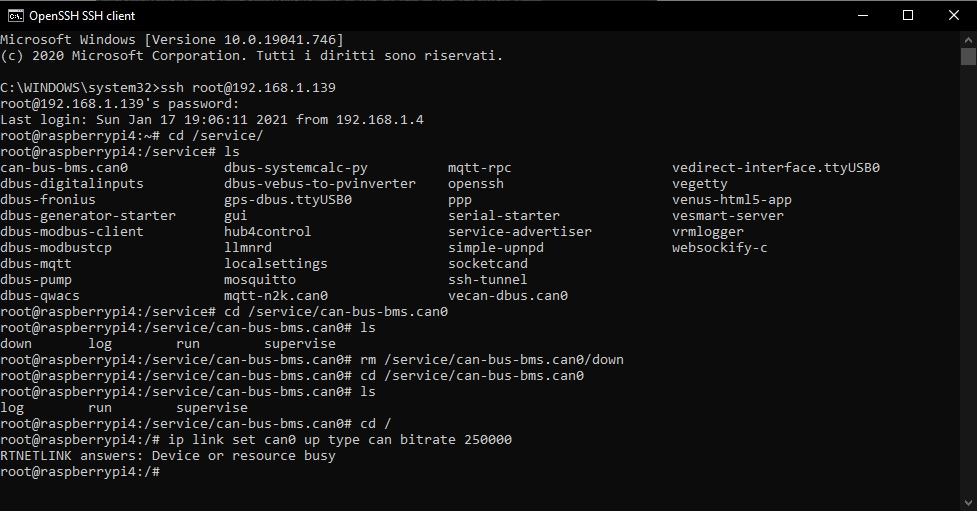
The "busy" warning when you do the ip link up command indicates that part of the system is already running which is what you want. That is confirmed by you receiving messages in candump.

See if there is a file named down in /service/can-bus-bms.can0. The file will prevent the service from running. I'd thought svc -u ... or svc -t ... would remove the file but it doesn't.

If so, try removing it:

rm /service/can-bus-bms.can0/down


0 Likes 0 ·
Kevin Windrem avatar image Kevin Windrem Kevin Windrem commented ·

I discovered a bug in my script: the run files in the service directories did not have execute permission.

To fix this run the following commands:

chmod +x /service/*can0*/run
chmod +x /service/*can0*/log/run

The script in my repo has been corrected but you can't rerun the command since it checks for the existence of things it will install.

0 Likes 0 ·
federico993 avatar image federico993 Kevin Windrem commented ·

Hi Kevin, thanks for all your help!

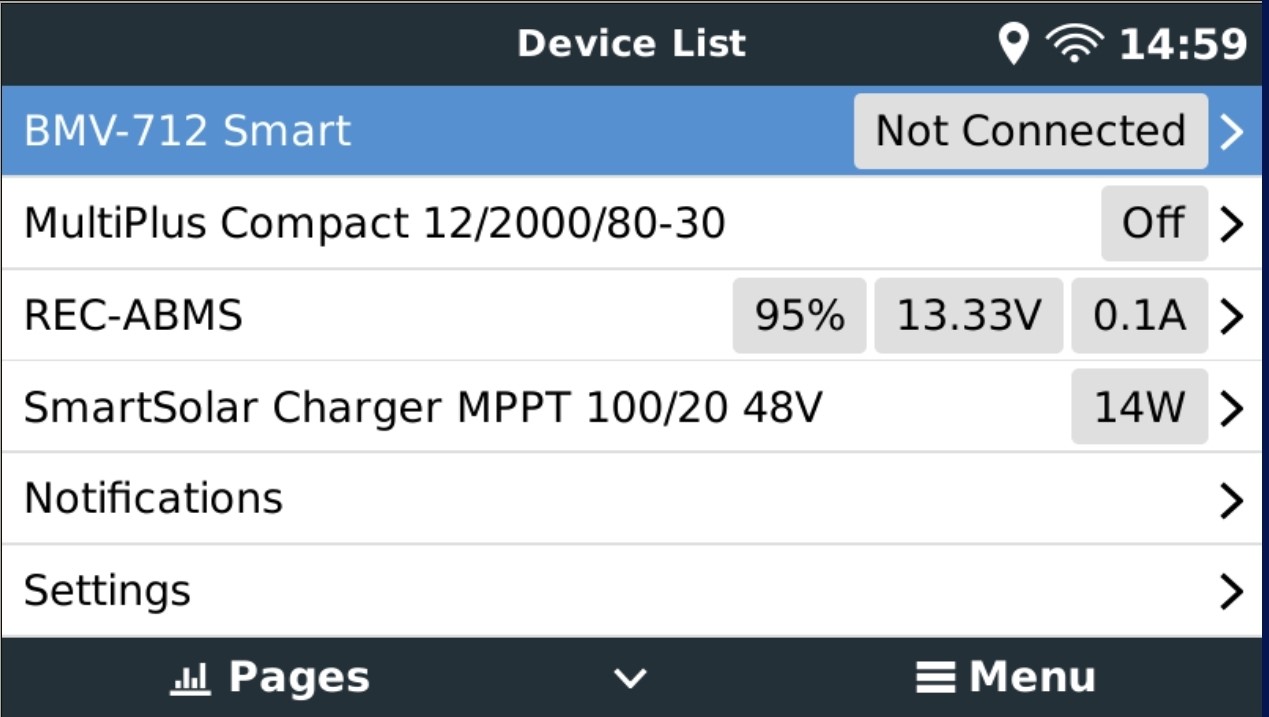
Today I have followed your instructions and finally the REC BMS showed up in the Victron software!

Some settings needed to be changed in the "Service" menu of the Victron software as well.

Here you can see the terminal's printscreen while executing the commands.

Do I need to follow your last two command lines though it is working?service-down-busy-message.jpg


Another question, now I can see the lower and the higher cell voltage in the Victron monitor. Do I need to add more messages to the REC CAN data messages to be able to see the voltages of all the cells?

Will the Victron software show them all if I do this?


Thanks!

0 Likes 0 ·
Kevin Windrem avatar image Kevin Windrem federico993 commented ·

I'd run the commands just to make sure, but you've probably already made the changes manually.

Sorry, but I can't answer your question regarding the BMS messages.

0 Likes 0 ·
vassilis-bourdakis avatar image vassilis-bourdakis Kevin Windrem commented ·

Kevin,

would be v.helpful for newcomers if you would link your excellent script to the wiki:

https://github.com/victronenergy/venus/wiki/RaspberryPi-CAN-Interfaces

cheers


Vassilis

0 Likes 0 ·
Kevin Windrem avatar image Kevin Windrem vassilis-bourdakis commented ·

Done

0 Likes 0 ·
Show more comments
hummingbear avatar image
hummingbear answered ·

@mvader (Victron Energy) thank you and your dev's for putting in this work. The thing that moved me from buying Outback to Victron was the fact that data is so easily accessible on your products.

I started with a smart shunt and now my charge controller and inverter (+ a autotransformer) have been replaced by Victron. I'm able to build some really great logic with NodeRed and victron's mqtt that lets me power different devices depending on a number of conditions. It lets me get so much more power out of my system because of these automations that happen behind the scenes.


Victron should consider making paid time for these open source projects. They definitely attract customers like myself any many others here. I have also built out systems for friends now with victron products.


As for the testing, you got it. I'm going to fiddle with the new images tonight on a rpi4

2 |3000

Up to 8 attachments (including images) can be used with a maximum of 190.8 MiB each and 286.6 MiB total.

Kevin Windrem avatar image
Kevin Windrem answered ·

Many have reported troubles with dimming the RPI display. I just found the cause:

Apparently, /Settings/Gui/AutoBrightness is initialized to true (1) which prevents the manual dimmer control from appearing in the GUI.

Run the following command to fix this:

dbus -y com.victronenergy.settings /Settings/Gui/AutoBrightness SetValue 0

The code for the GUI tests vePlatform.hasAutoBrightness to display the Adaptive brightness button but only checks the AutoBrightnss setting to show/hide the manual dimming slider.

This is really a bug but may only be an issue for the Raspberry PI builds.


1 comment
2 |3000

Up to 8 attachments (including images) can be used with a maximum of 190.8 MiB each and 286.6 MiB total.

Rob Duthie avatar image Rob Duthie commented ·

Hi

It seems to be fixed in Ver 2.70.12 now incorparated.

0 Likes 0 ·
hardwic avatar image
hardwic answered ·

Does anyone have any experience with running a MCP2515 on spi0.0 and a mcp3008 on spi0.1?

The problems is polling MCP3008 at 2000-3000 times a second (which we need to calc power factor) causes rx overruns on CAN0. Checking CAN interrupt is not set helps a bit.

Running the kernel drivers mcp251x and mcp320x and not accessing spi0.1 directly helps a lot but does not fully solve the issue.

The same issue exists in raspberry2 2.66 and 2.71.

15 comments
2 |3000

Up to 8 attachments (including images) can be used with a maximum of 190.8 MiB each and 286.6 MiB total.

hardwic avatar image hardwic commented ·
It seems that MCP2515 is a poor choice unless you have a dedicated SPI. 2 buffers is not exactly a fifo device with real memory. I have improved this a lot by watching the CANINT and avoiding polling MCP3008 when it is active but some data loss still happens and seems unavoidable.


This is not an issue for the Venus image or Kernel driver it seems but a fundamental issue with the hardware I have chosen.

0 Likes 0 ·
mvader (Victron Energy) avatar image mvader (Victron Energy) ♦♦ hardwic commented ·

Hi @hardwic . Yes. And thats why we use the mcp 2518 when we need to add an external spi connected can controller. Perhaps that one helps you.

0 Likes 0 ·
mvader (Victron Energy) avatar image mvader (Victron Energy) ♦♦ mvader (Victron Energy) ♦♦ commented ·

But what you’re doing (calculating power factor) shouldnt that be done in a dedicated small microcontroller instead?

0 Likes 0 ·
hardwic avatar image hardwic mvader (Victron Energy) ♦♦ commented ·

Originally this ran on a ATMEG1281 which has a free running ADC so no problem with oversampling. This is now ported to ARM and runs fine. The MCP2515 is the issue. If I had 2 SPI busses this would also work fine.

I could offset all the AC sampling onto dedicated hardware but there are advantages in being in the sampling loop. This also increase cost and reduces flexibility.

Your previous advice r.e. MCP2518fd is the answer and thank you for that. Problem here is it looks like a world wide shortage and only deliverable in 42 weeks!
I have sort of worked around the problem and MPPTS run as expected. My only remaining problem is when MPPTS go to sleep, they don't always wake up in the morning. This is clearly related to overruns and some key packet not being ack'd.

Oddly enough mppts runs through the day without switching to float (which is typical of CAN data loss). Anyway I need to fix the hardware rather than spending more time on figuring out why.


0 Likes 0 ·
federico993 avatar image federico993 hardwic commented ·

I am getting the #67 error "BMS connection lost" for the 100/20 MPPT, and it disconnects from the system for safety. I am wondering if the problem is due to the Waveshare RS485 CAN hat with the MCP2515 chip.

I have a REC BMS connected to my Raspberry Pi4 rev 1.2 running the Venus 2.60.

Everything works but when the #67 error appears, I need to reboot the raspberry to make the MPPT charging again.

I am also considering updating the Venus software, what is the last Venus version compatible with the Raspberri Pi 4 4GB rev 1.2?


Thank you

0 Likes 0 ·
Kevin Windrem avatar image Kevin Windrem federico993 commented ·
v2.84 is the latest released version. On-line updates will work with the v1.2 RPI4 board.


0 Likes 0 ·
federico993 avatar image federico993 Kevin Windrem commented ·
Thank you Kevin, it appears on the Venus online update, but before to update I wanted to ask if it works with CAN bus boards?

I'll need to run your script as I did last year thank to your help )) !

0 Likes 0 ·
Kevin Windrem avatar image Kevin Windrem federico993 commented ·
If you have a working CANbus board then the new Venus OS version should work with it.
0 Likes 0 ·
federico993 avatar image federico993 Kevin Windrem commented ·
I updated the Raspberry to the rev 2.84 though I still need to make the CAN bus working again.

But I still have problems with the MPPT that disconnects randomly and disappears from the Venus page. It is now woeking standalone, it doesn't show any error, but I need to reboot the Venus system to turn it on again.

Any hint?

0 Likes 0 ·
federico993 avatar image federico993 federico993 commented ·

Updated to v2.84 and everything is working, but after plugging, unplugging and plugging again the USB cables from MPPT and BMV-712, the BMV-712 is disconnetting after few time and it results "not connected" in the Venus OS. The same was happening with the MPPT before, so maybe there is a USB port issue in the settings or code?


bmv-712-not-connected.jpg

0 Likes 0 ·
johnny-brusevold avatar image johnny-brusevold federico993 commented ·

@Federico993

What kind of usb cable/adapter are you using?

lsusb

lsusb -t

usb devices

Can give you a lot of information

0 Likes 0 ·
hardwic avatar image hardwic hardwic commented ·

This is quite weird. It turns out the transmit buffer is going down. There is no bus off event just tx buffer is full. Restart command does not work for this driver so the only way to reset the interface is to change speed to 500 and then back to 250kbs. As a work around (until I can change the hardware) I did a quick script to test sending a can0 message every minute. If it fails then reset the interface by changing speed up/down. Having done this, the tx buffer has not hung at all. So sending a message via cansend, somehow is causing SocketCAN not to lockup?? Strange!!


I am going to check if the same issue is true for 2.71 as 2 sites above are still 2.66 and I have not been able to simulate that on my development kit. 2.71 has a newer kernel and mcp251x drivers so this may well be a 2.66 issue.

0 Likes 0 ·
Rob Duthie avatar image Rob Duthie hardwic commented ·
i

Yes Ver 2.66 runs perfectly any version there after has issues with canbus and analog inputs.

0 Likes 0 ·
hardwic avatar image hardwic Rob Duthie commented ·
I don't have any issues with 2.71 and can bus except that rng-tools (rngd) clashes with the mcp2515 interrupt. The work around was to remove rug-tools but the real problem must be some device tree setting which I have not found. Other than that, 2.71 seems great.
0 Likes 0 ·
Rob Duthie avatar image Rob Duthie hardwic commented ·
Hi

Thats odd. i am using a raspi3B+ with version 2.66 all runs OK all functions.

On Ver 2.66> canbus and the Analog inputs still missing etc.

Regards

Rob D

NZ

0 Likes 0 ·
Kevin Windrem avatar image
Kevin Windrem answered ·

I know Victron software team is busy. Just wondering where support the Raspberry PI 4 v1.4 board is no the current priority list.

I am mostly past the Raspberry PI solution since I now have a Cerbo, but I see a fair number of people looking to run Venus OS the RPI 4 and finding a v1.1 or v1.2 board is no longer likely.

1 comment
2 |3000

Up to 8 attachments (including images) can be used with a maximum of 190.8 MiB each and 286.6 MiB total.

Rob Duthie avatar image Rob Duthie commented ·
Hi Kevin


Part succes in getting the raspi 4 Ver 1.4 working, had to update 2 files in the u-boot from the raspi github site.

start4.elf

fixup4.dat

Now it boots but with endless bluetooth looping on the screen, i have disabled it in the config file but still loops?

Still working on it.

0 Likes 0 ·
Rob Duthie avatar image
Rob Duthie answered ·

Updating versions

Ver 2.80.41 for raspi 4 ver 1.4 PCB does not boot at all blank screen as normal.

Using the Pi venus-os v2.80_36.rootfs.img file still is ok and function as normal.

When upgraded to ver 2.80.41 crashed the raspi unit.


2 |3000

Up to 8 attachments (including images) can be used with a maximum of 190.8 MiB each and 286.6 MiB total.