question

Chris Wilberg avatar image
Chris Wilberg asked

Venus Node-RED - Example flow: Temperature controlled relay

Does anyone have a good example of flows for maintaining lithium battery temperature via GX relays?

I have one that I slapped together but it's pretty basic and I don't really have a very good grasp on node-red yet.

Seeing as how this is one of the most common reasons for someone to want node-red, I'm pretty surprised that I can't find this already out there! The flows/dashboard from section 6.2 of the following link are very similar to what I am trying to do....but I can't see the rest of the flow and I'm lost. https://www.victronenergy.com/live/venus-os:large?utm_source=offline&utm_medium=qr&utm_campaign=qr%20code%20products#


I would also like to throw in some other variables such as warming the batteries to a higher temperature when the PV & battery voltage is above a certain threshold, and disabling warming when the battery voltage is too low.


Node-REDtemperature
2 |3000

Up to 8 attachments (including images) can be used with a maximum of 190.8 MiB each and 286.6 MiB total.

5 Answers
Mark avatar image
Mark answered ·

Hi Chris,

To assist yourself and others, I have created a NodeRED flow example that:

  • Allows a relay to be controlled based on temperature (with only minor changes this same flow could be adapted to use any input or control any output)
  • Has separate ON and OFF thresholds (hysteresis) that can be dynamically set
  • Has separate ON and OFF time delays that can be dynamically set

1614606982674.png

To keep this flow simple, I have not used any 'function nodes' with code and also not incorporated any dashboard nodes; creating a dashboard would allow the ON/OFF thresholds and time delays to be set dynamically and the status to be monitored live via the user interface screen.

This flow is within the ZIP file attached, since JSON files cannot be directly uploaded; just unzip and import it into your NodeRED editor.

Regards, Mark.

210302 VenusNodeRED Temp Controlled Relay.zip


2 comments
2 |3000

Up to 8 attachments (including images) can be used with a maximum of 190.8 MiB each and 286.6 MiB total.

Chris Wilberg avatar image Chris Wilberg commented ·

Mark, thaks for taking the time to put this together! I'm sure it will be quite helpful for many users. The function nodes definately had me scratching my head more than the others and that's what I kept trying to use. Also I'm finding the dashboard nodes to be easy to set up, other than a decimal rounding problem that displays ridiculously long decimal places at times. I have gotten around that by using a conversion node that has a check box for decimal rounding. I'm sure there is a better way, but I haven't found it yet.

Another interesting challenge I'm having is making a mobile link to the dashboard that doesn't require altering the url multiple times. Is this even possible through VRM or do I need to use dyndns and port forwarding for this?

0 Likes 0 ·
Mark avatar image Mark ♦♦ Chris Wilberg commented ·

No problem Chris.

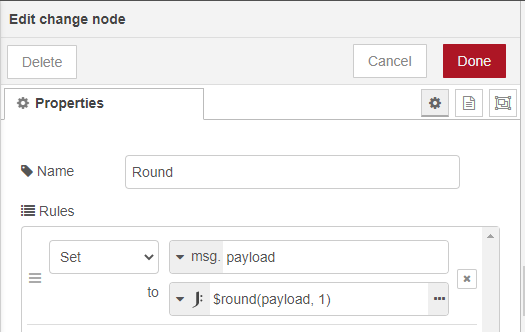
There are many ways to round to a given number of decimal places, the simplest is probably to use another change Node with a JSON expression - like this:

PS. Change the digit after the comma to specify how many decimal places you want, you can also specify a negative number to round to 10's, 100's, 1000's...1614650663340.png

1614650687046.png


As for the UI link, it should remain static/does not change - so once the proxy interface is open you can save the full link, or save it and edit down to just https://12345-nodered.proxyrelay3.victronenergy.com/ui/. The only complication is that after 30min of inactivity the proxy interface will automatically shut down, so then it just needs to be re-opened from the the proxy page (before opening/refreshing the UI link).

Once fully implemented the plan is to have direct links to the Node-RED editor and UI in VRM.

Regards, Mark.

0 Likes 0 ·
1614650663340.png (10.2 KiB)
1614650687046.png (15.5 KiB)
ulrikmailand avatar image
ulrikmailand answered ·

@Mark

Just wanted to say thanks for your node-red example flow, awesome work!

Managed to use that flow to control my dieselheater though the Cerbo GX so it turns on if the temperature goes below 4 degrees centigrade and off againg when it reaches 15. Couldn't have done it without your flow.


THANKS!

Br

Ulrik

5 comments
2 |3000

Up to 8 attachments (including images) can be used with a maximum of 190.8 MiB each and 286.6 MiB total.

Mark avatar image Mark ♦♦ commented ·
Hi Ulrik,

Your welcome and I am glad that you got it working for your application. Thanks for the feedback.

Regards, Mark.

0 Likes 0 ·
I @Ulrikmailand,

off topic question: wonder what the brand of the diesel heater is and how you switch the diesel heater off, completely de-power or a control wire?
Most diesel heaters require power for the time until they are cooled down, which usually take a couple of minutes. Mine is a Webasto and I've found no other way to control it remotely other than using an expensive Webasto brand remote box (via SMS), which is not really state of the art.

0 Likes 0 ·
ulrikmailand avatar image ulrikmailand Stefanie (Victron Energy Staff) ♦♦ commented ·

Hi Stefanie


It is an eberspacher heater approx 10 yers old, believe the name is D4 - airtronic.

What i have done is to put the Cerbo GX in between the controller and the actual heater, so i leave the control unit always on at a specific level (approx 50%) and then i use relay2 in the Cerbo GX so when the relay is open the connection between the control box and the heater is disconnected and when closed connected and the heater then turns on and is managed by the control unit.

I can't turn the temperature up and down remotely, but that is ok i use it to keep the boat safe from freezing or to turn the heat on before arriving at the boat and for that it is ok that i can't turn the heat ekstra up or down. When i'm at the boat i just use the heater as always and can turn the level up and down as i please.

When at the boat, I either disable the node-red flow of just set the turn off temperature at a highlevel so the automation doesn't kick in.

Heres a picture of the control unit:


controlunit.jpg


0 Likes 0 ·
controlunit.jpg (48.7 KiB)
Show more comments
m-richards avatar image
m-richards answered ·

Hi,

(Different Mark Here)

I have attached a Node Red example that I'm using, based upon (the other) Marks post above.

(Thank you for the framework Mark)

This controls the cooling exhaust fan in my electronics / battery bay.

I have added:

  • A simple dashboard
  • Sending notification emails when the fan changes state
  • An overtemp alarm that sends emails in case the fan fails and the compartment reaches critical temperature
  • Hand-Off-Auto switch for the cooling fan
  • Ability to modify email address from the dashboard

Todo:

  • Add control for tank heaters
  • Add checkbox on dashboard to enable/disable email alerts for the different events


I'm a Node red novice, so if someone sees something I did that's silly, please let me know.


Regards,

Node Red Backup 7-22-21.zip


2 |3000

Up to 8 attachments (including images) can be used with a maximum of 190.8 MiB each and 286.6 MiB total.

alan-w avatar image
alan-w answered ·

Hi all

I am new to node red but have managed to get Mark’s well thought out example working above. The thing is I would like the heater to come on within a time window, I have tried to incorporate an inject node that outputs on a schedule between two times. My problem is integrating that node into Mark’a example to either block or allow output relay switching.

I would be grateful for any assistance


1 comment
2 |3000

Up to 8 attachments (including images) can be used with a maximum of 190.8 MiB each and 286.6 MiB total.

Mark avatar image Mark ♦♦ commented ·

Hi Alan, I think the best way would be to:

  • Wire 2 inject nodes to a change node, use one to send 1 at the start of the time window and the other to send 0 at the end of the time window - use the change node to store the value as a flow context variable.
  • Add a switch node to the end of the current flow just before the output, set it up with 2 outputs and setup both to read the time window flow context value, if the value is 1 then send the msg through to output 1 and if the value is 0 then send the msg through to output 2.
  • On output 2 add a change node to always change the msg to 0 (relay off).

In case you can't figure this out based on above, best to create a new question and I'll help you to get it working.

Regards, Mark

0 Likes 0 ·
alan-w avatar image
alan-w answered ·

Hi just wanted to add I found a node red time filter and integrated it into the flow and so all sorted

Thanks

2 |3000

Up to 8 attachments (including images) can be used with a maximum of 190.8 MiB each and 286.6 MiB total.