question

ngm011 avatar image
ngm011 asked

MultiPlus-II charged only 2 out of 5x Battle Born 100Ah in Parallel

Hi guys,

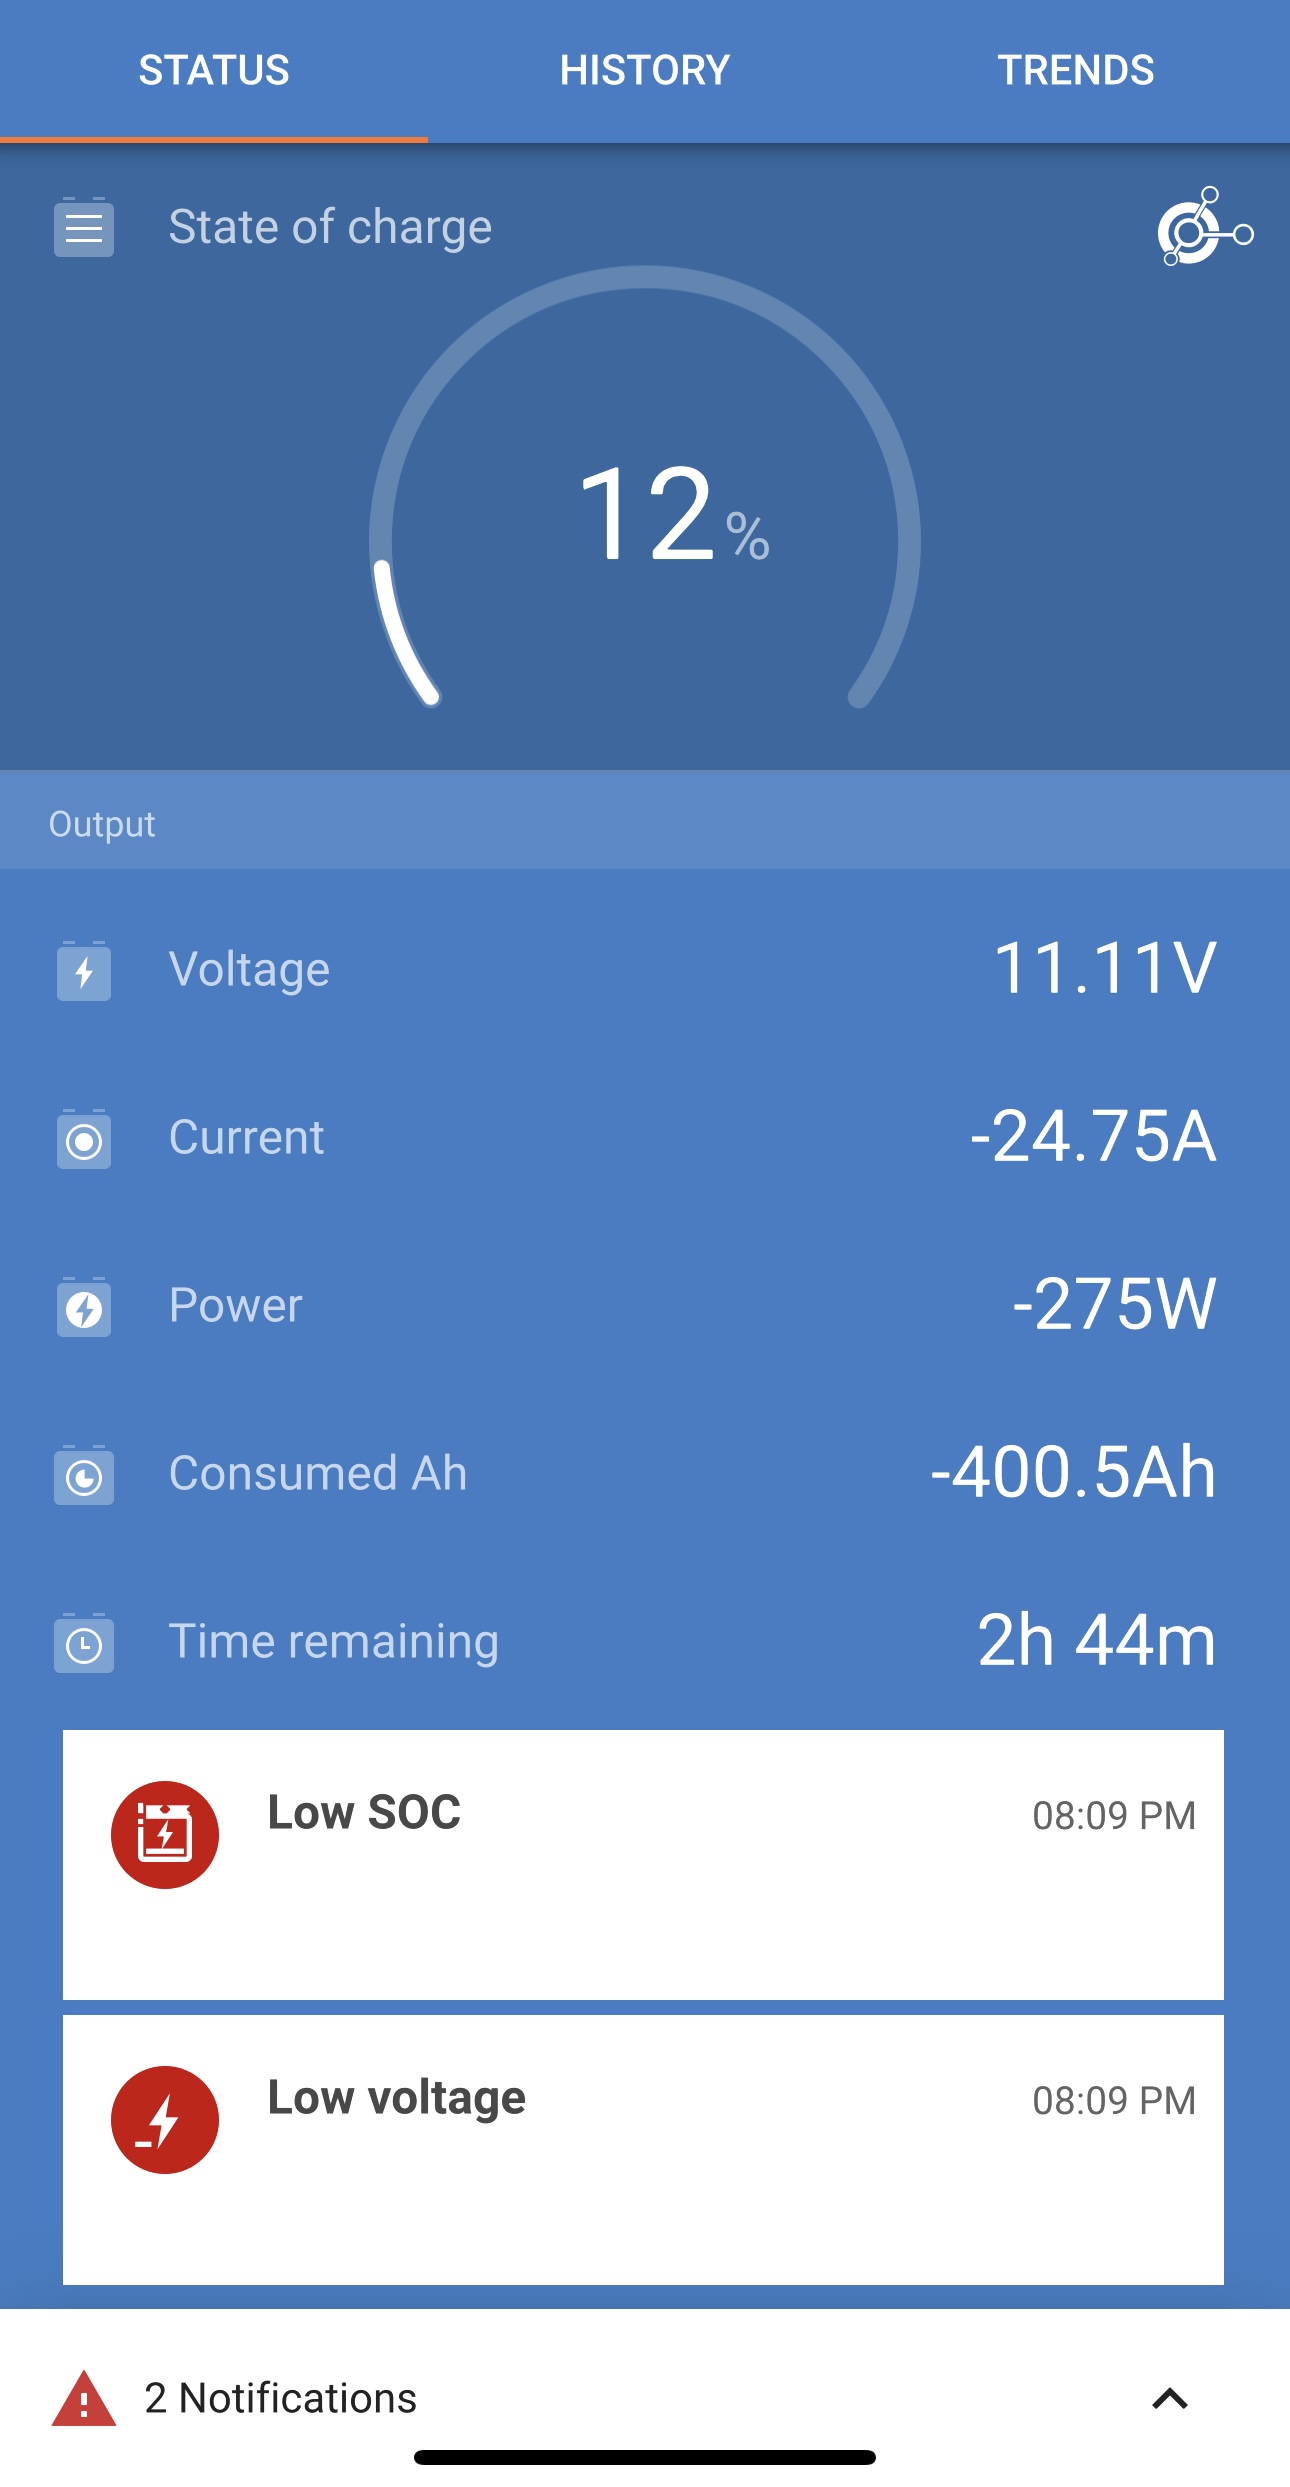
After almost 2 years of using my victron + Battle Born setup I encountered the first issue where the voltage significantly drops - below 11.5V at around 50-60% SOC.

My setup is

  • 5x Battle Born 12V 100Ah in parallel
  • SmartShunt
  • MultiPlus-II 12v
  • MPPT 150/100 with 6x 200w solar panels

I went through full charge from MultiPlus-II i.e. 14.4V at bulk, 13.6V absorption and 13.6V floating - all for more than 24h connected to the 50amp shore. I synchronized SOC to 100% on the shunt.

Then I disconnected from the shore and added the load from ~500W to ~3000W consumers.

It started at 12.4V/12.3V at 100% SOC, the solar was hovering between ~500W. Once the load was increased to ~3000W the voltage dropped to 11.83V raising low voltage alarm. Once back to ~2000W the voltage was 12.17V at 85% SoC. I lower the consumption to ~200W and the voltage was 13.03V at 82% SoC. Finally, I stop all major consumers, the solar charged kicked in and the voltage was 13.37V at 83% SOC.

At 50-60% SoC I was getting into low voltage with 11.03V. The voltage started dramatically to drop at ~200Ah which indicates like only two batteries are active.

I have tested battery terminals with the multimeter. At the rest (battery switch off) first three batteries (closer to plus wire that goes to the bar) read 13.3v while the last two batteries (closer to the minus wire that goes to the bar) read 13.6v. The test was performed while the batteries were connected in parallel.


Any help to move forward would be much appreciated,

- ngm

Multiplus-IIMPPT SmartSolarSmartShunt
2 |3000

Up to 8 attachments (including images) can be used with a maximum of 190.8 MiB each and 286.6 MiB total.

9 Answers
snoobler avatar image
snoobler answered ·

I would conclude that the connection issue has contributed to insufficient charge voltage for multiple batteries for an extended period of time resulting in internal cell imbalance reducing capacity. The most likely cause was insufficient torque at the time of installation, and the condition worsened over time. This is VERY common; hence the recommendation to check ALL connections for proper torque. Once you have confirmed all bolts are torqued to spec, I would conclude the issue will not return.


The fact that extended absorption yielded approximately 7% increased capacity suggests that capacity can be re-claimed by normal cycling and increased absorption periods.


If you don't NEED the ~500Ah total available right now, I would proceed as follows:

  1. Set absorption to 4 hours on both MP and MPPT.
  2. Continue to use normally.
  3. In a month, repeat the discharge test.
  4. Repeat as needed while observing gains.
  5. Once 500Ah is obtained, reduce time to 1 hr.


If you NEED the full capacity ASAP, recommend you leave the absorption period set to 24 hours. Every 168 hours total absorption (equivalent to 1 week, 7 days @ 24 hours), repeat discharge test. Once 500Ah+ is attained, reduce absorption time to 1 hr.


You could also set your float voltage to 14.39 to keep the float at elevated voltage as well.

12 comments
2 |3000

Up to 8 attachments (including images) can be used with a maximum of 190.8 MiB each and 286.6 MiB total.

Kevin Windrem avatar image Kevin Windrem commented ·

There may also have been heat damage inside the battery where the bolt got hot. The only way to know for sure would be to load test each battery individually. You could replace that battery and see if your expected 500 Ah returns but that's expensive.

Clean all connections and retorque. This includes shunt, disconnect switch, fuses and inverter.

Running a high load test for 30 minutes then checking temperatures at all connections may turn up additional issues such as bad crimps.

1 Like 1 ·
snoobler avatar image snoobler Kevin Windrem commented ·
IMHO, if there's no evidence of damage of the plastic around the terminal, it's highly unlikely there is internal damage.


The terminal and attached cables are great heat sinks.

2 Likes 2 ·
ngm011 avatar image ngm011 snoobler commented ·
Well, both terminals on that battery are 100% clean. No burnt signs at all.


This morning I checked again after you sent this message.


I found that when touching the base where the (-) comes from - the flat area. It is not flat on the touch, visually it doesn't look different than other batteries.

I'll try to take a picture of it.

0 Likes 0 ·
ngm011 avatar image ngm011 Kevin Windrem commented ·
I checked the temps on everything - each battery, terminals, wires. While there's heat when drawing 2000-3000W (around 90-100F) they are all at the pretty same temperatures.
0 Likes 0 ·
ngm011 avatar image ngm011 commented ·

I'll try that charge/discharge pattern for sure.

I don't need 500Ah now, but I have a big trip coming over holidays so I'm looking to address this issue. If the battery is fauly I should just replace it with BB.


0 Likes 0 ·
snoobler avatar image snoobler ngm011 commented ·
BB is good about warranties, but there is no evidence of a faulty battery and every evidence of an improper installation - that BB is not obligated to warranty.


Trying to recover lost capacity via elevated charge voltage is likely far less effort than completely breaking down the bank and testing each battery individually, which would be required before warranty could be considered, and with your history, they would almost certainly recommend attempting to recover capacity in a similar fashion.


It's likely affecting all three of the batteries that were at lower voltage.


Holidays feels like the next few weeks, so I'd consider that short term. I'd pursue elevated voltage for at least 72 hours and then repeat the discharge test. Repeat until 500Ah is achived.

1 Like 1 ·
ngm011 avatar image ngm011 snoobler commented ·

I'm currently hooked to 50amp for the next 10 days. The MultiPlus-II finished 24h absorption but solar kicks in every day at 14.4V absorption (I set 4h absorption time in SmartSolar).


I didn't discharge for 5 days. Should I be discharging again? So that MultiPlus-II can kick in with 24h absorption again?

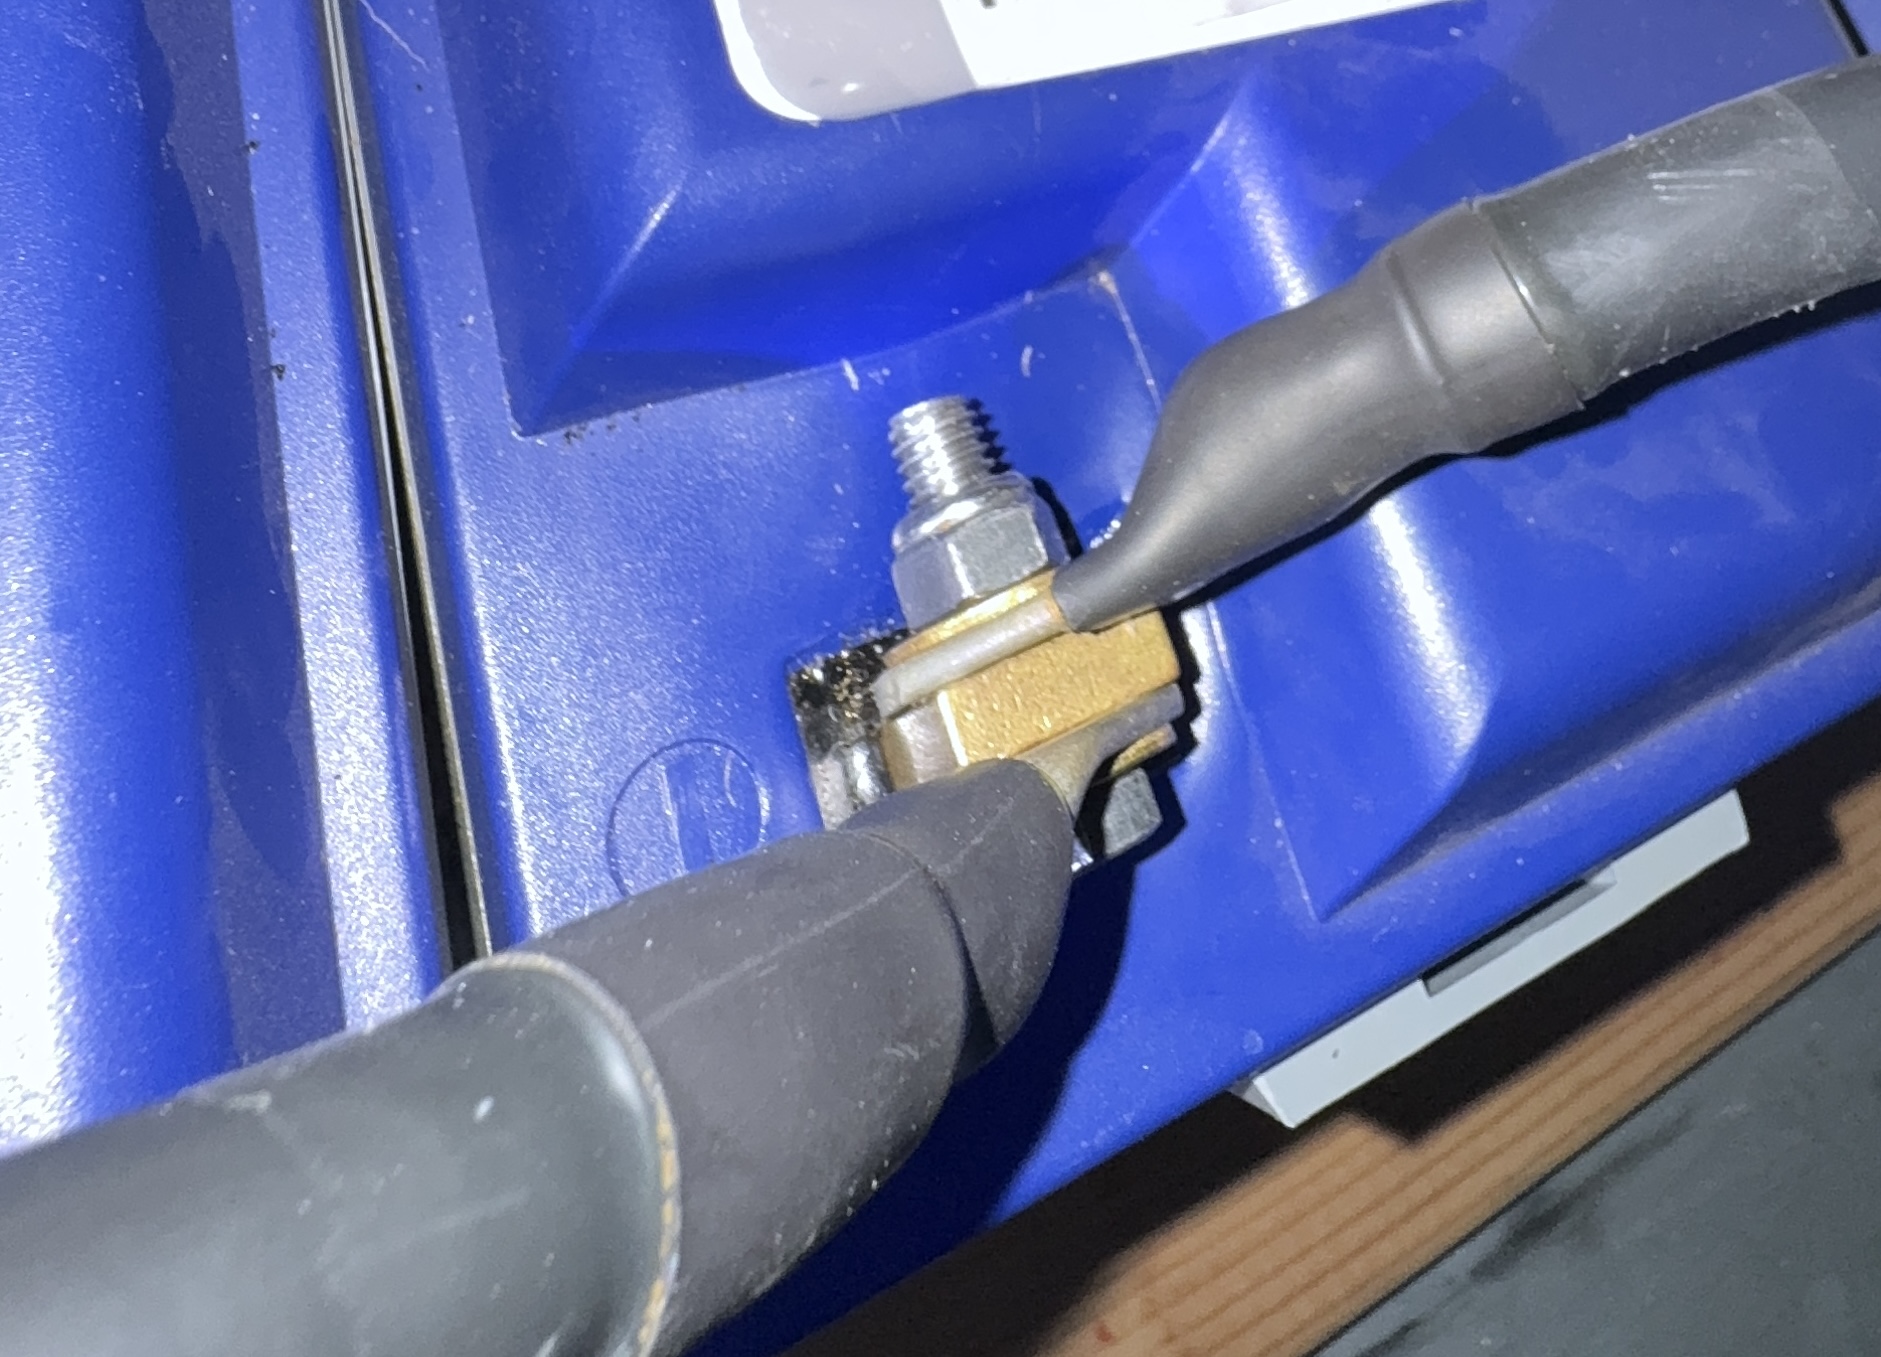
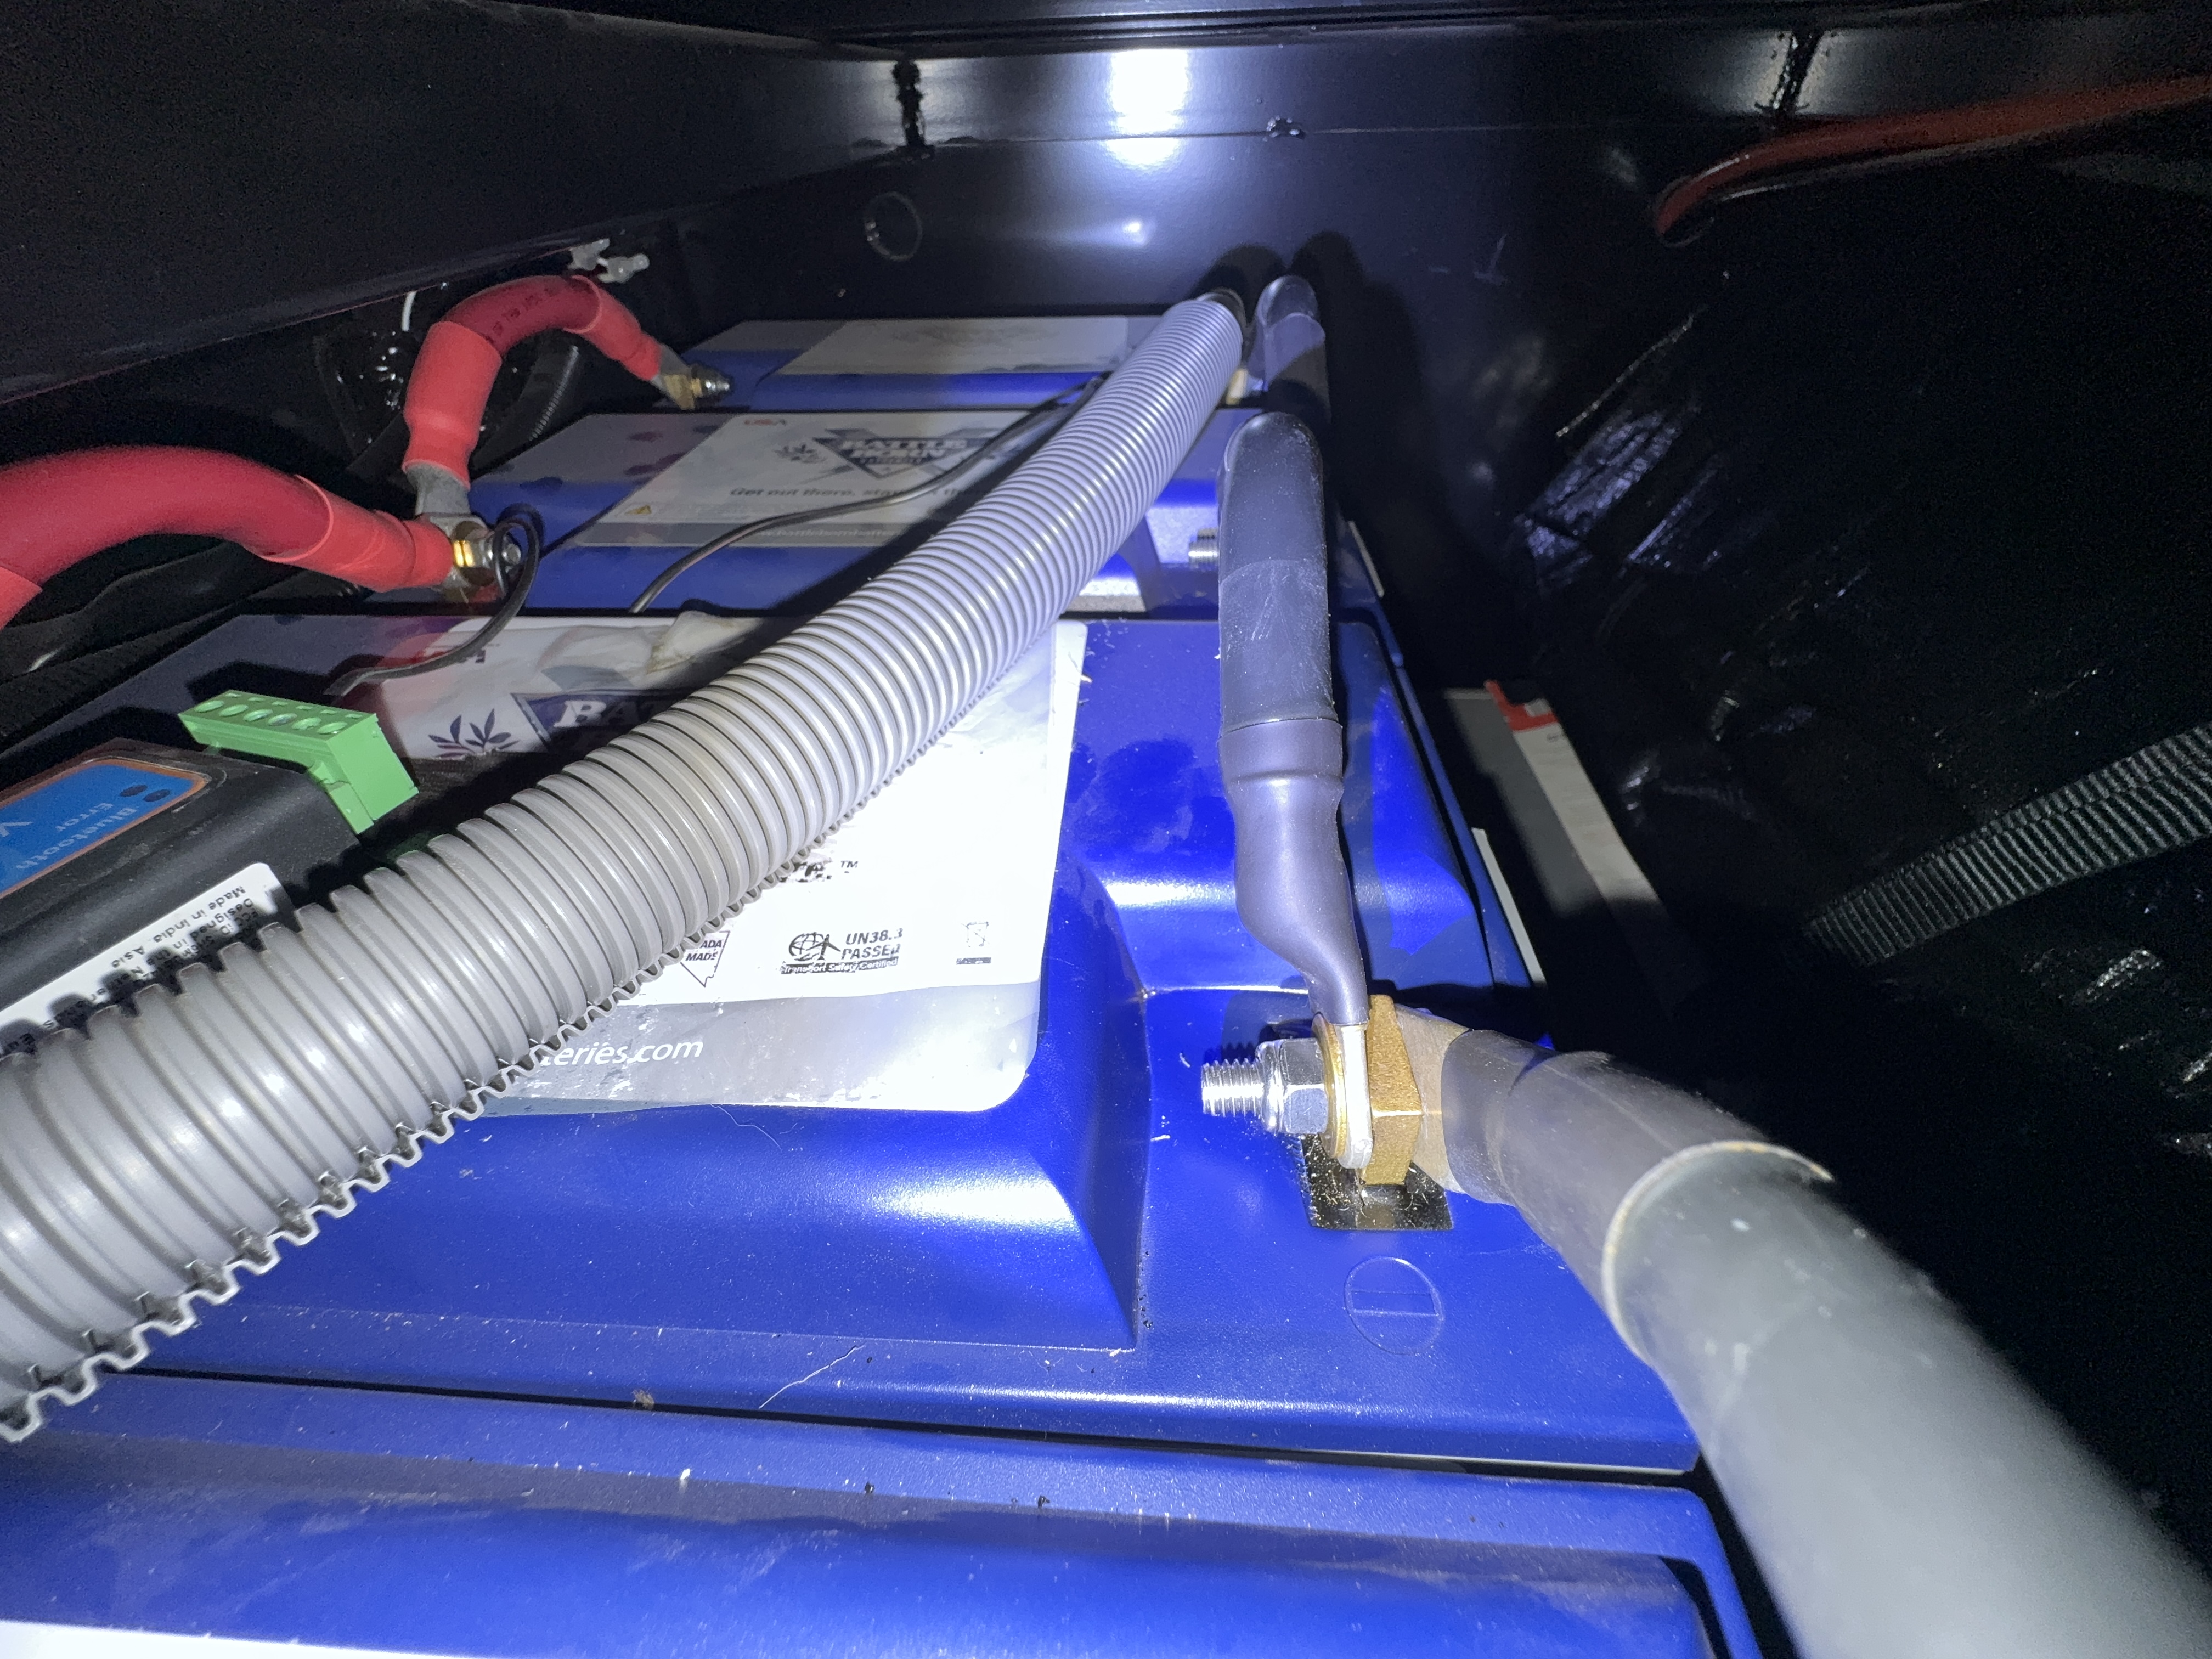
Aside from that, here's how the terminal and around it looks at that battery where the issue occurred. You can notice that the plastic around it is not even.


img-5164.jpg

Considering my car battery is dying (not much luck with batteries these days) I ordered Victron's Blue Smart 12V 15amp battery charger.

Should I disconnect this battery and try to charge it directly with Blue Smart on its own?

Thanks,

0 Likes 0 ·
img-5164.jpg (604.7 KiB)
snoobler avatar image snoobler ngm011 commented ·
It's up to you on the discharge. 5 days @ 14.4V should see similar or better improvement.


This isn't just an issue with the battery in question. It also impacted the others at reduced voltage when taken out of parallel. Sure, you could just charge the one, but at least two others need attention.


2-3 years out of a starter battery is pretty good. The only way you can prolong them is to regularly top them off with a separate charge. Vehicle charging systems are marginal at best. If it's > 1 year old, and you're already having problems, replace and get it on that blue smart on float when you're parked for awhile.... at least once a month and any time the vehicle is in storage. If vent covers can be readily removed, checking and filling with distilled water as needed is required.


Lastly, is the black substance on the terminal presumably the plastic from the locknut? Before concluding that appearance has significance, I would compare to the 9 other terminals.

1 Like 1 ·
ngm011 avatar image ngm011 snoobler commented ·

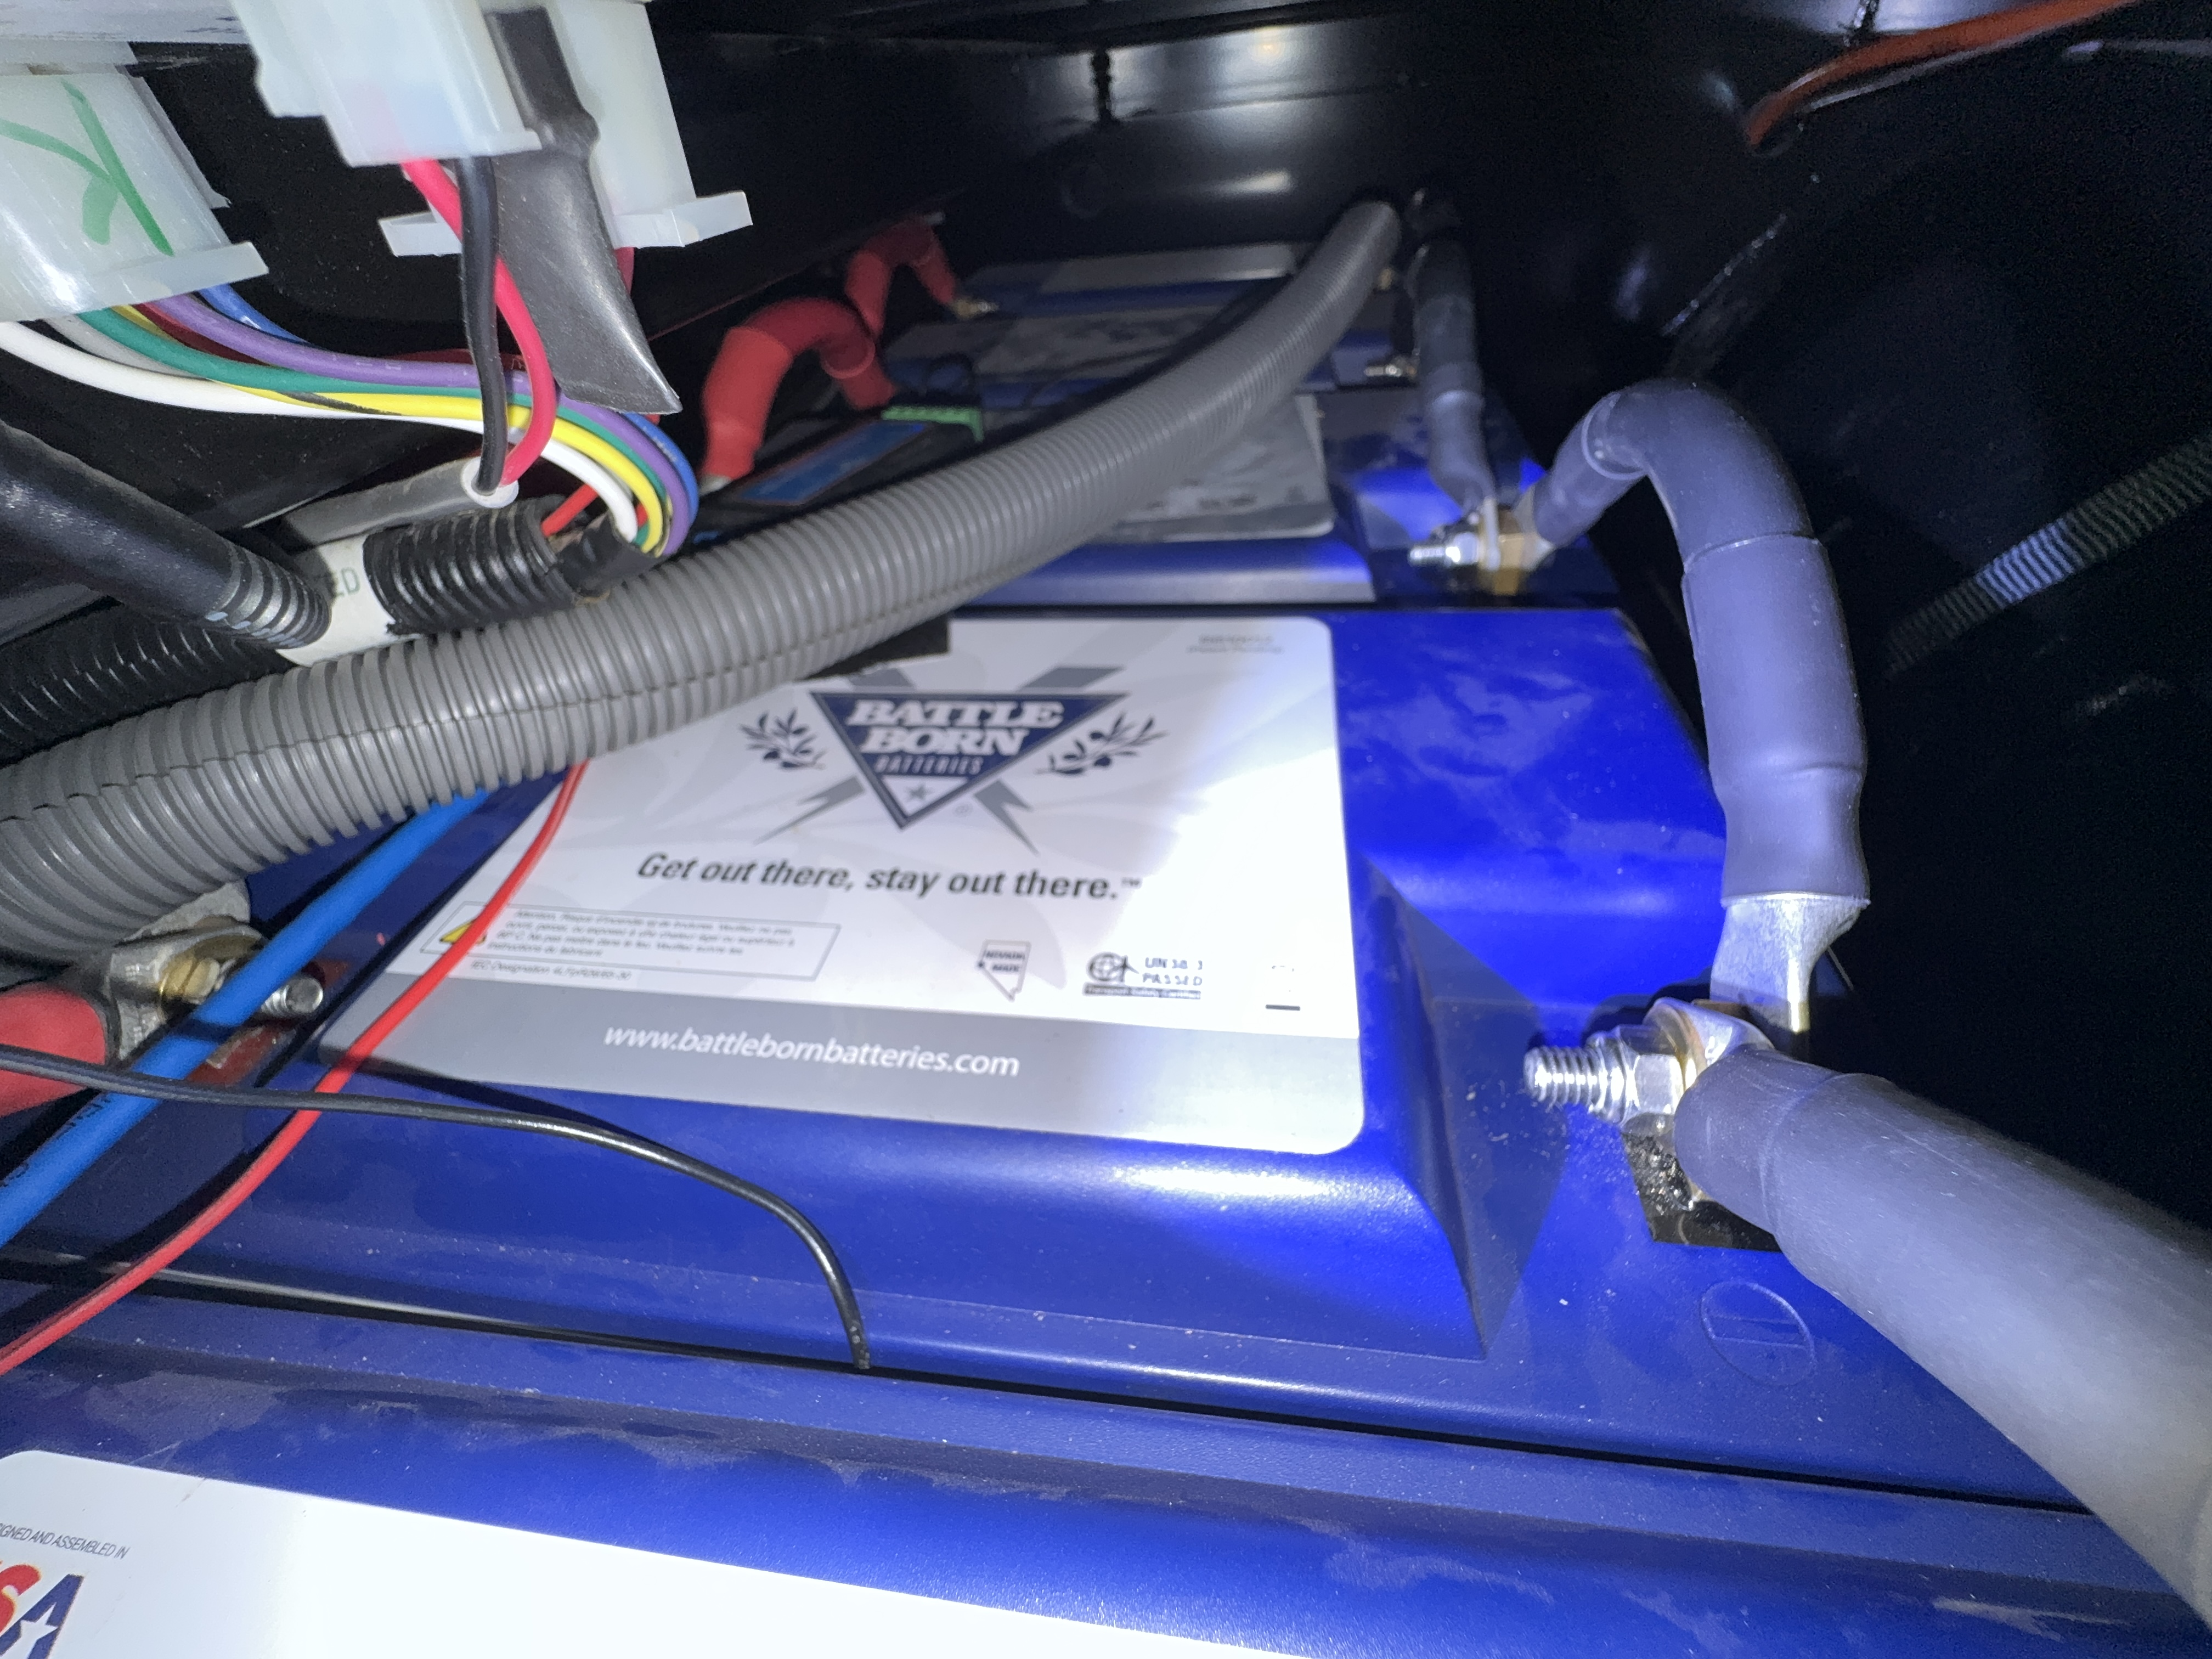
That what looks like "black substance" is just a shadow.

Again, the only noticeable thing is that the plastic base around the terminal is little bumpy.

The battery that had connection issue

img-5169.jpg

The other battery

img-5170.jpg

0 Likes 0 ·
img-5169.jpg (2.9 MiB)
img-5170.jpg (2.6 MiB)
Kevin Windrem avatar image Kevin Windrem ngm011 commented ·

We would only be guessing. Check with Battle Born to see if they think the battery terminal that got hot caused internal damages. They no the internal construction.

1 Like 1 ·
snoobler avatar image snoobler ngm011 commented ·
I can't see any difference in the pictures, and I wouldn't conclude significance unless it's the lone outlier of 10, which would require cleaning and photographing every terminal.
1 Like 1 ·
ngm011 avatar image ngm011 snoobler commented ·
BB rep said "That is just due to the high temps from that loose connection. It is probably fine but do keep an eye on that battery. I'm assuming it is just cosmetic".


That's exactly what we're doing here - keeping an eye on it ;)


0 Likes 0 ·
Matthias Lange - DE avatar image
Matthias Lange - DE answered ·

How did you make the parallel wiring?
Can you make some pictures or a wiring schematic?

Take a look at he section about parallel wiring of the "Wiring Unlimited" book:

https://www.victronenergy.com/media/pg/The_Wiring_Unlimited_book/en/battery-bank-wiring.html#UUID-7b9ab285-8db0-0c60-fd01-ab314f01ad82

Try to charge and discharge each battery individually.

6 comments
2 |3000

Up to 8 attachments (including images) can be used with a maximum of 190.8 MiB each and 286.6 MiB total.

ngm011 avatar image ngm011 commented ·

Hi Matthias,

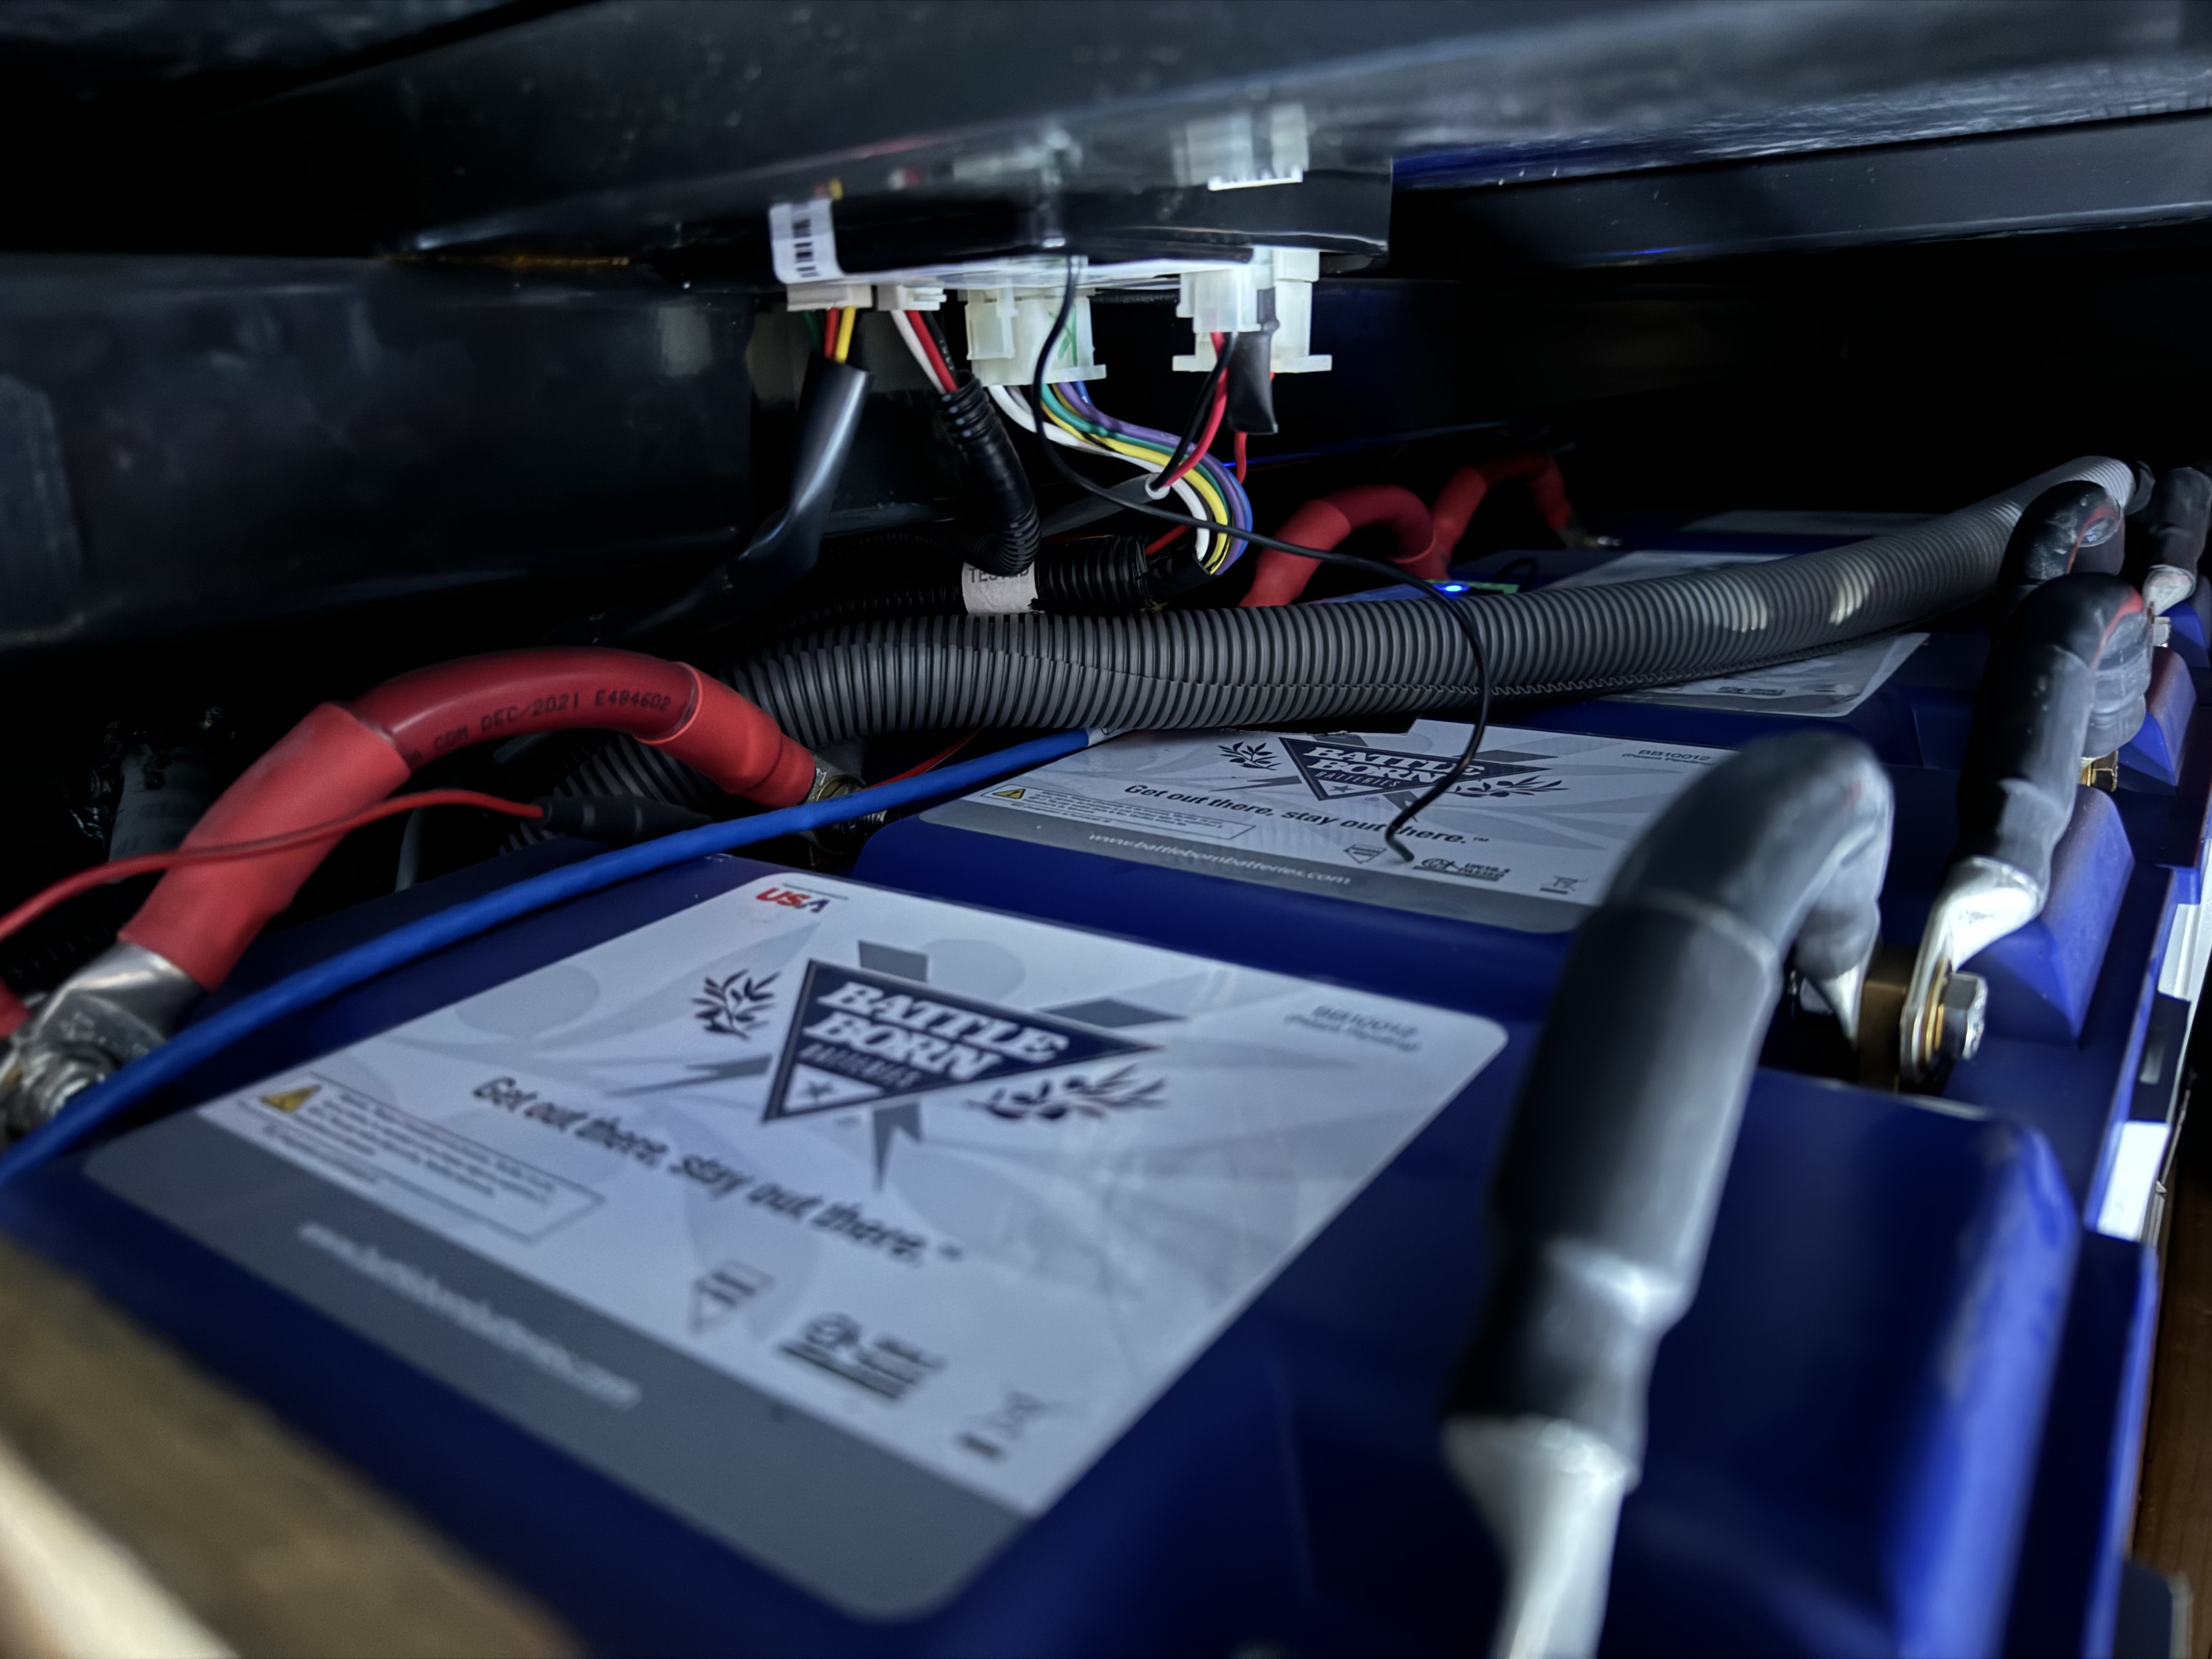
Pretty standard parallel setup.

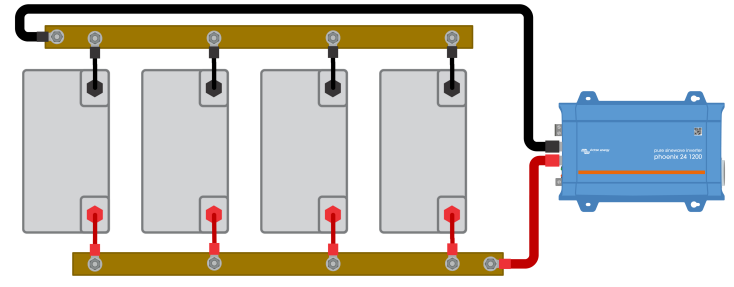
All batteries are placed as a stack, all pluses are connected together via red wire while all minuses are connected via black one. The plus on the closest battery (see the picture) is connected to the battery switch/ and minus on the last battery - diagonally is connected to the shunt.

img-5032.jpeg

- ngm

0 Likes 0 ·
img-5032.jpeg (1.5 MiB)
Matthias Lange - DE avatar image Matthias Lange - DE ♦ ngm011 commented ·

Sounds/looks right.

I think you have to test them one by one. Maybe just one have a problem.

Are those lithium batteries with Bluetooth?

1 Like 1 ·
ngm011 avatar image ngm011 Matthias Lange - DE ♦ commented ·

It's such a hassle to get them out, it's so tight in there.


They don't have bluetooth. This is the model: https://battlebornbatteries.com/product/12v-lifepo4-deep-cycle-battery/

- ngm


0 Likes 0 ·
Matthias Lange - DE avatar image Matthias Lange - DE ♦ ngm011 commented ·
I can imagine but I think that's the only way to figure out if it's just one battery or all.
0 Likes 0 ·
Alexandra avatar image Alexandra ♦ Matthias Lange - DE ♦ commented ·

Yeah, it's going to be a trial.

They will have to come out someone or sometwo has issues.

Can't see in the picture (unless the sprag covered thing over the top is it), but is the connection to the bank on either end (positive on one side negative on the other end of the bank) or both on one end off the same battery?

0 Likes 0 ·
ngm011 avatar image ngm011 Alexandra ♦ commented ·

Alexandra,


Positive is on the first battery in the picture and the negative is on the last battery in the picture with that wire that goes diagonally across with tubing shield on it.

- ngm

1 Like 1 ·
snoobler avatar image
snoobler answered ·

Sounds like your shunt value is inaccurate. It must be properly configured and regularly synched to maintain accuracy.

You need to regularly charge to above 14.2V, or the BB batteries will not balance and will lose capacity.

You also need to meet shunt sync criteria about once a week to remain accurate. Since you are using solar, you need to set "charged" voltage to 0.2V below ABSORPTION voltage, or you run the risk of premature sync from inconsistent solar charging current.

At this point, you can't trust the shunt because it's clearly inaccurate based on voltage.

You can't be confident in your 100% SoC until you've held the batteries above 14.2V for at least two hours.

6 comments
2 |3000

Up to 8 attachments (including images) can be used with a maximum of 190.8 MiB each and 286.6 MiB total.

ngm011 avatar image ngm011 commented ·
Well, I get that shunt might be out of sync. However, even if we put shunt and SOC out of picture, I tested consumption after the MultiPlus-II topped the batteries i.e. staying at 14.4V throughout the bulk and 13.6V throughout the absorption.


The shunt should not have any effect on the charging of the MultiPlus-II, correct?

On top of that, I have multimeter indicated 13.3V-13.6V on terminals of all 5 batteries at the rest with no current. That indicated they were all around 90-100% full.

Basically, the question is if all 5 batteries were full why the voltage dropped so low at around 200Ah? If they were not full, what prevented MultiPlus-II to charge all of them considering it completed 14.4V?


Thanks,

- ngm

0 Likes 0 ·
snoobler avatar image snoobler ngm011 commented ·
Batteries in parallel will all measure the same voltage, or something is wrong.


If you're regularly getting to 14.4V, then it's likely you have one or more failed batteries.


You need to disconnect the batteries from each other and evaluate them.

1 Like 1 ·
Show more comments
snoobler avatar image snoobler ngm011 commented ·
whoa... wait a minute.


How are you setting bulk and absorption differently? You should only have two voltages:

1) absorption 14.4V

2) float 13.6V

Just like your MPPT.

Please clarify.

0 Likes 0 ·
Show more comments
ngm011 avatar image
ngm011 answered ·

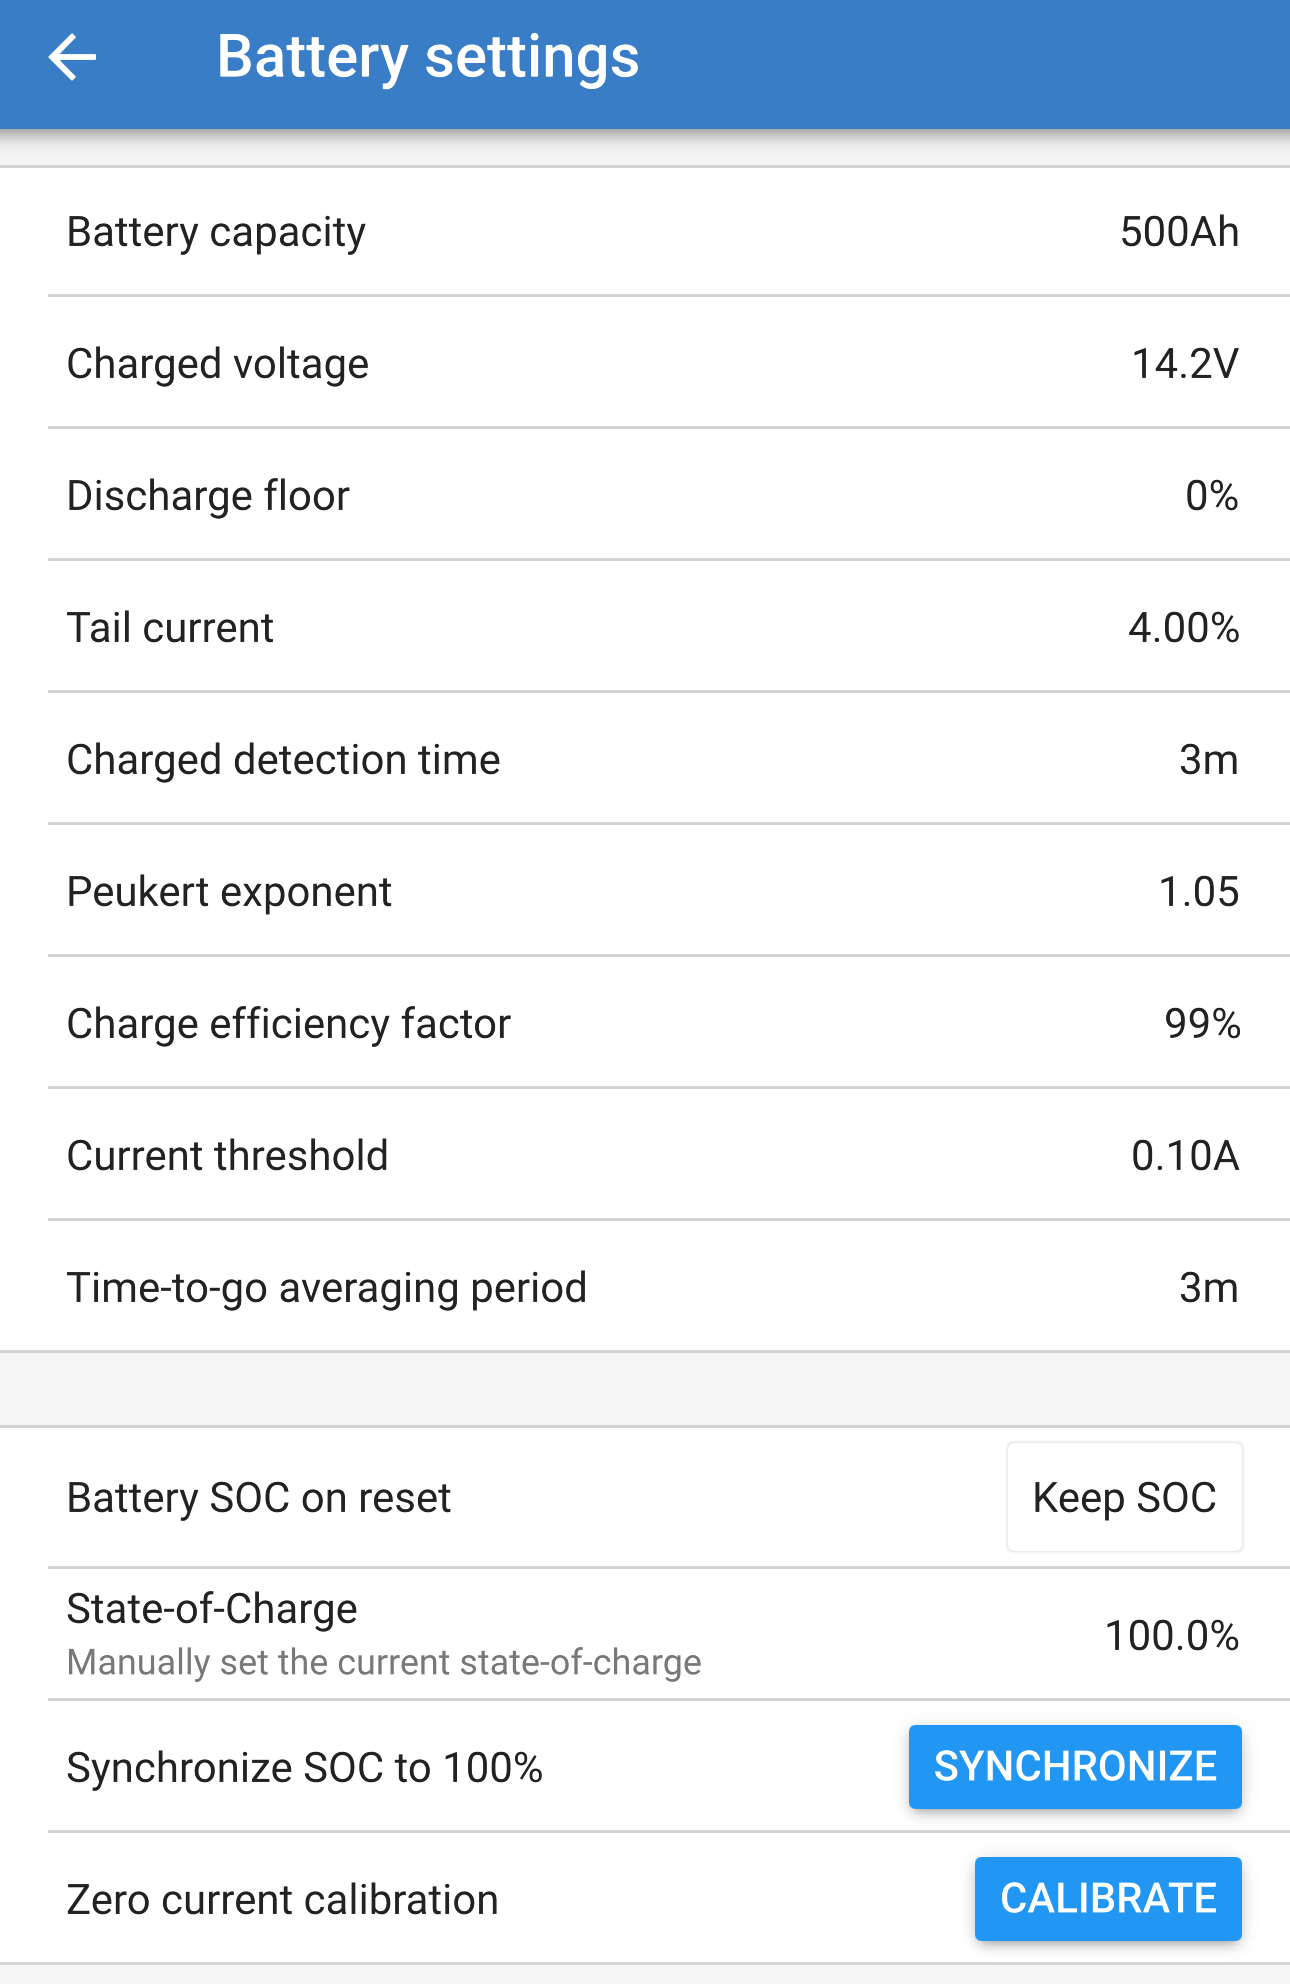
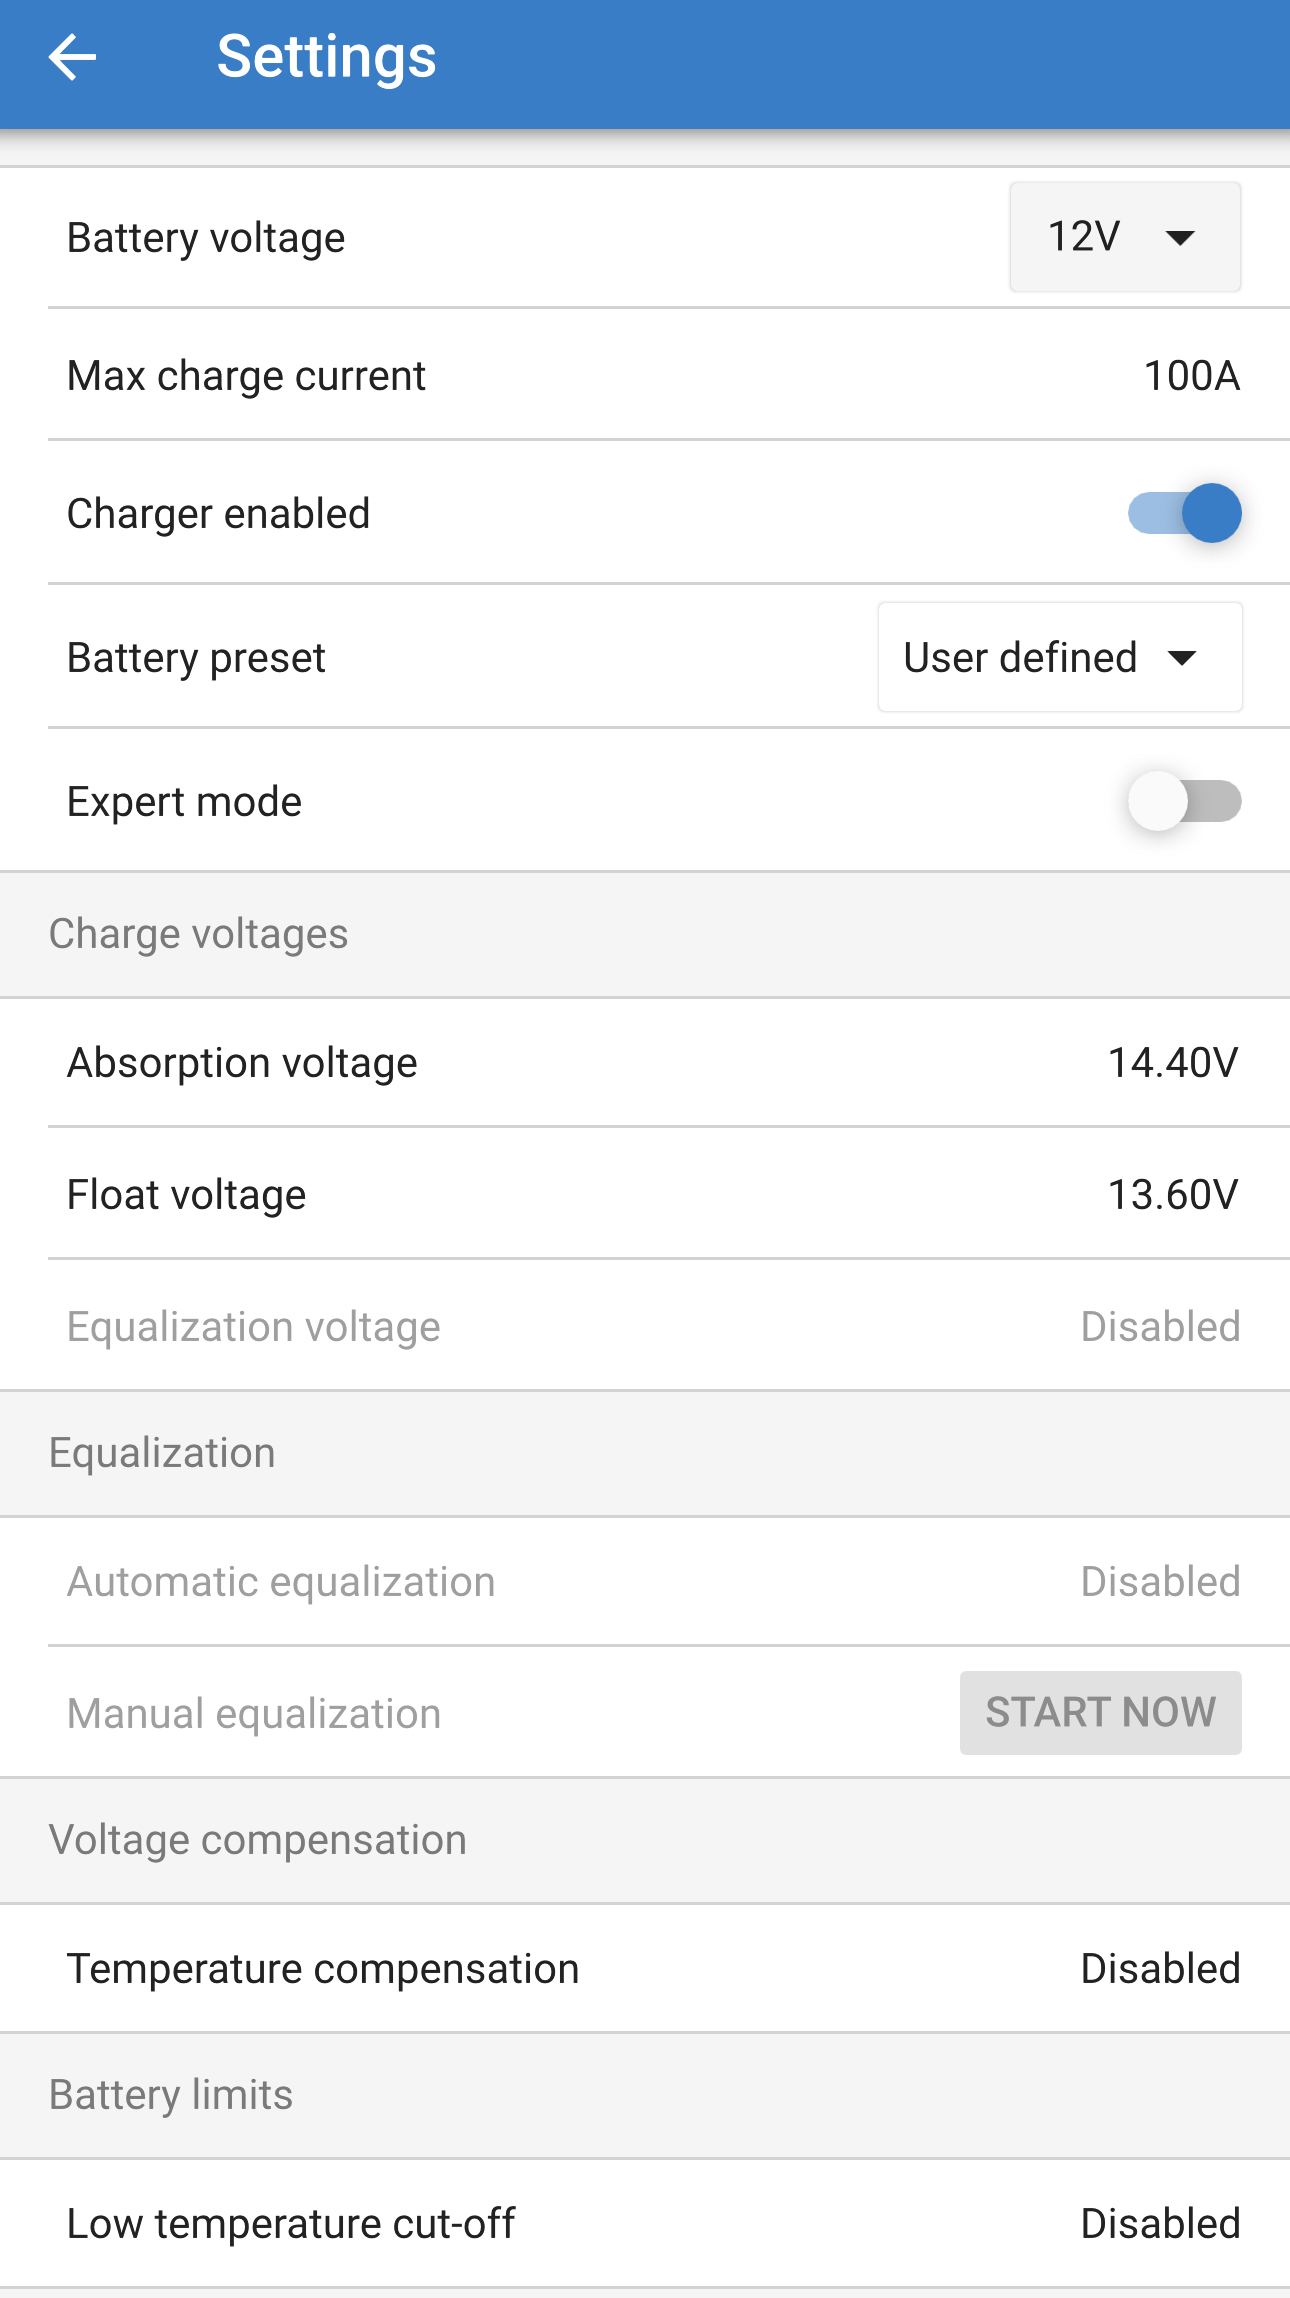
Here are my shunt and MPPT settings.

img-5101.jpg


img-5102.jpg

- ngm


img-5101.jpg (449.6 KiB)
img-5102.jpg (397.9 KiB)
2 |3000

Up to 8 attachments (including images) can be used with a maximum of 190.8 MiB each and 286.6 MiB total.

snoobler avatar image
snoobler answered ·

Those settings look okay. Are you regularly reaching 14.4V with current flowing?

2 comments
2 |3000

Up to 8 attachments (including images) can be used with a maximum of 190.8 MiB each and 286.6 MiB total.

ngm011 avatar image ngm011 commented ·

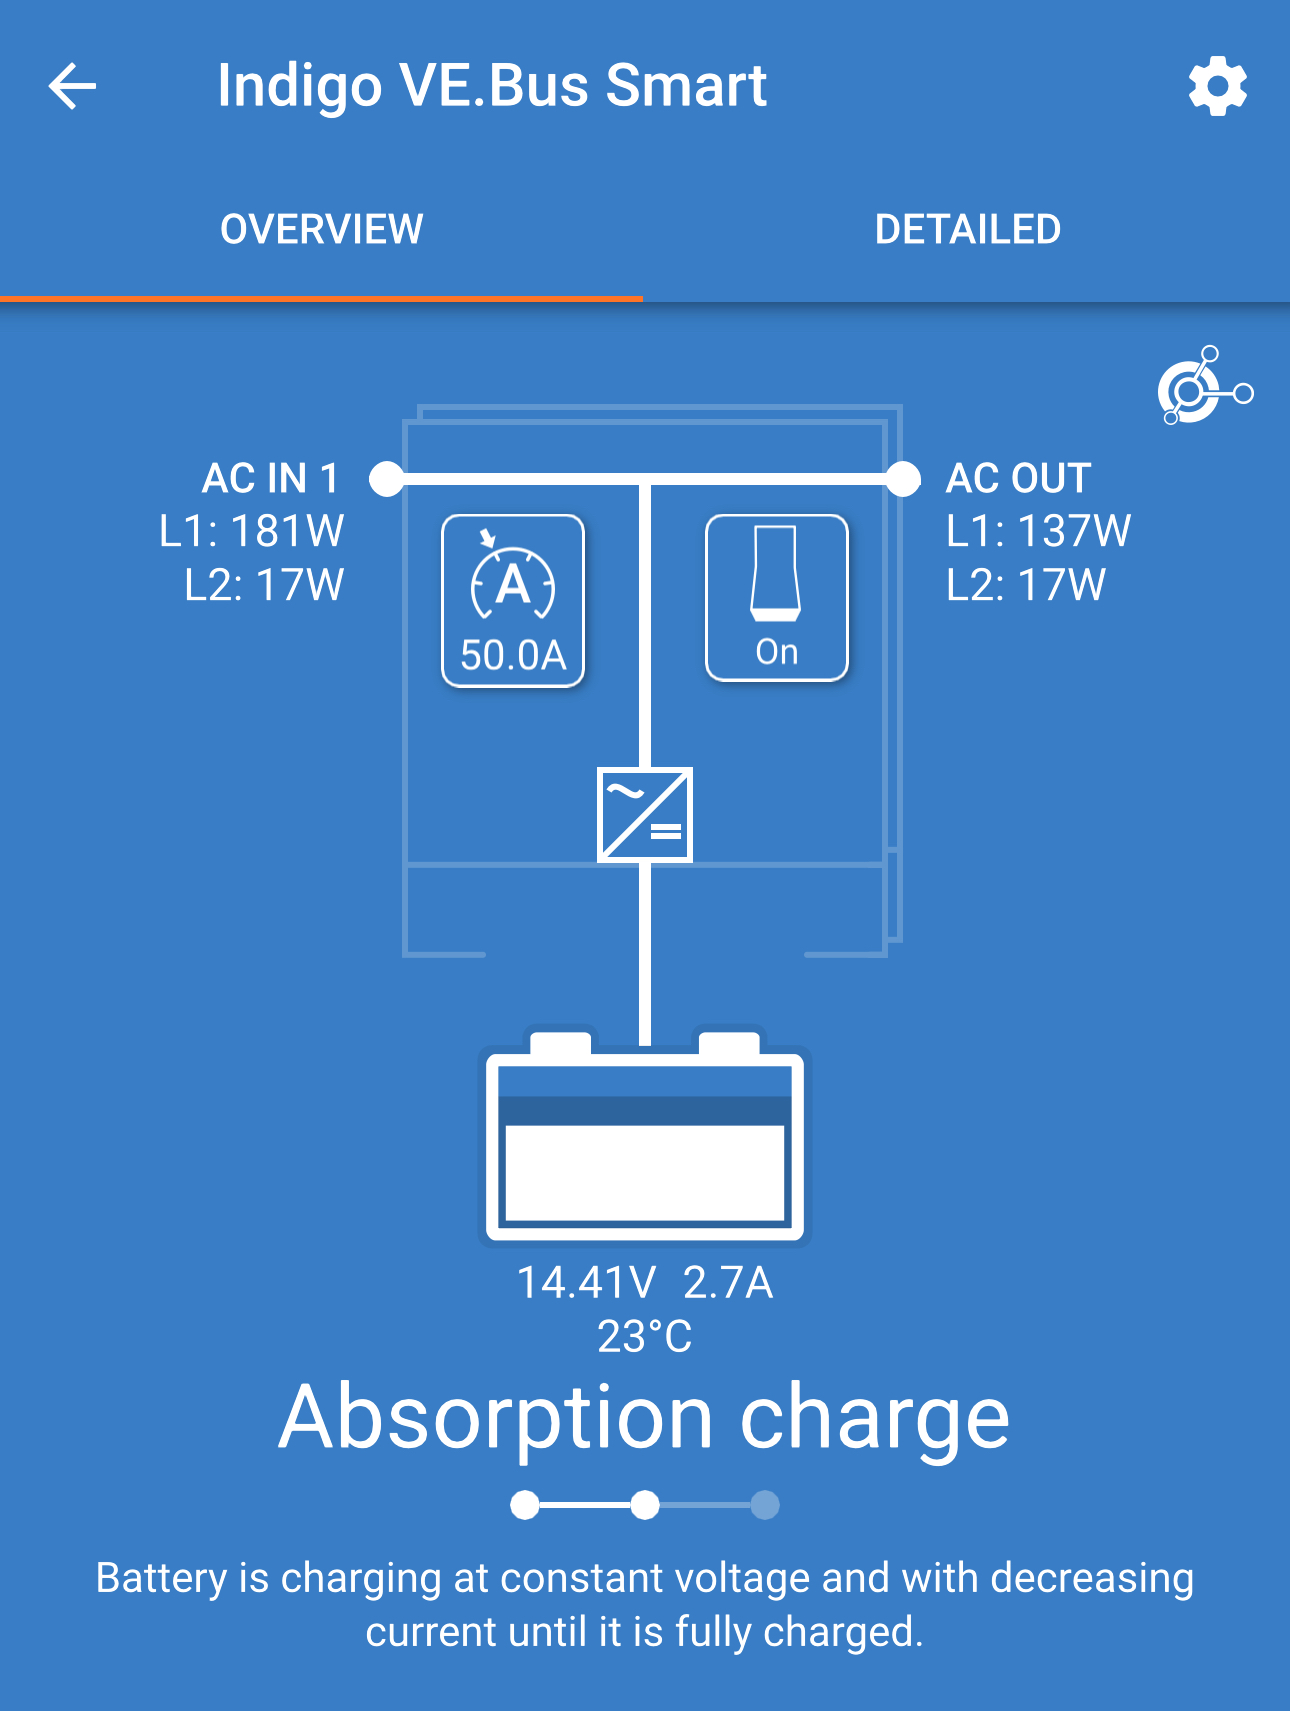
Yep, I just increased absorption in my MultiPlus-II from 2h to 3h and it's hovering on 14.4V when restarted:

img-5103.jpg


Humm, shouldn't it be at 13.6V?

- ngm

0 Likes 0 ·
img-5103.jpg (550.0 KiB)
snoobler avatar image snoobler ngm011 commented ·
No. Charging works like this:

1) max current to absorption voltage

2) hold absorption votlage while current falls as batteries fill.

3) once full, drop to float voltage and hold there.

0 Likes 0 ·
snoobler avatar image
snoobler answered ·

If their terminals are connected in parallel as you describe and show in pictures, all 5 batteries will measure the same voltage at the terminals. That's just how electricity works. You will need to disconnect each battery from the others to check its individual voltage.


Rep doesn't know what they're talking about.


No. should not be at 13.6V


Charging works like this:

1) max current to absorption voltage


2) hold absorption votlage while current falls as batteries fill.


3) once full, drop to float voltage and hold there.

51 comments
2 |3000

Up to 8 attachments (including images) can be used with a maximum of 190.8 MiB each and 286.6 MiB total.

ngm011 avatar image ngm011 commented ·
Thank you for clarifying.


That's what I expected but BB rep. said it's fine.

What do you say that three of them are at 13.3V (first three batteries - closer to the positive connection) and two at 13.6V (furthest two batteries - closer to the negative connection) when *at rest* and *in parallel*? Does that indicate anything?


- ngm


0 Likes 0 ·
snoobler avatar image snoobler ngm011 commented ·

Sorry for the double post. I couldn't access the site.


13.3-13.6V measured on different batteries in parallel indicates measurement error, some other problem, or current flow between them. It shouldn't matter whether you measure battery terminals while at rest either at the battery terminals or 10' away at the other ends of beefy battery cables - should measure the same voltage.


If you have a clamp DC ammeter, it's worth checking to see if any current is flowing between batteries.


11.5V @ 200Ah after knowingly getting to 14.4V @ low current indicates one or more batteries are inop or in BMS protection.


it's also possible that if some cut off due to low voltage disconnect, they might now be in short circuit protection due to being in parallel with other batteries that can dump a lot of current into them. They will often register this as a short.

1 Like 1 ·
ngm011 avatar image ngm011 snoobler commented ·
That makes so much sense!


I'm still amazed that BB guy said I'll know whether the battery is in low voltage disconnect or not by just measuring on each while in parallel.


Is there anything else I can do to diagnose this issue while they are connected in parallel i.e. before I begin taking them out one by one?

I'm currently at 14.4V absorption at ~4.5A waiting to complete and then I'll give them one more test going down to 200Ah.

- ngm


0 Likes 0 ·
snoobler avatar image snoobler ngm011 commented ·

You could disconnect only one side and re-measure in place, i.e., all the (-) OR all the (+) interconnects. Even if all (+) OR all (-) are connected (only one side of the battery bank connected), they are electrically disconnected.

1 Like 1 ·
ngm011 avatar image ngm011 snoobler commented ·
Alright, that's something.


(-) is closest to the bay compartments door and way easer to reach than (+).

So I would put my battery disconnect switch to off, disconnect all minuses and then measure with multimeter the voltage on each terminal pair?

Anything else should I do why at it?

Thanks,

- ngm

0 Likes 0 ·
snoobler avatar image snoobler ngm011 commented ·

That would do it. As far as other stuf...


Any time you're dealing with connections, it's always a good idea to check that they are properly torqued, but that's after the fact.


Get yourself a #2 pencil, cut off the eraser and sharpen that end too, so you have a double ended pencil. This can be used as a resistor when paralleling batteries of different voltage (provided the graphite isn't broken inside). If you find any batteries at very low voltage, when you go to connect them in parallel with a battery at a good voltage, place the pencil between the terminal and final cable for several seconds. This will limit the current flow to about 2A and may "wake up" a sleeping BMS.


1 Like 1 ·
ngm011 avatar image ngm011 snoobler commented ·

After MultiPlus-II transitioned from 14.4V absorption into 13.6V float, I switched on the battery off, measured all of them in parallel and first three of them are again at 13.3V and last two are 13.6V.

Then I took cable off first (-) terminal on the first battery (no more negative connections on it) and measured again. It's still at 13.3V.

I guess I should continue.

- ngm

1 Like 1 ·
ngm011 avatar image ngm011 snoobler commented ·

Alright, here's the update.

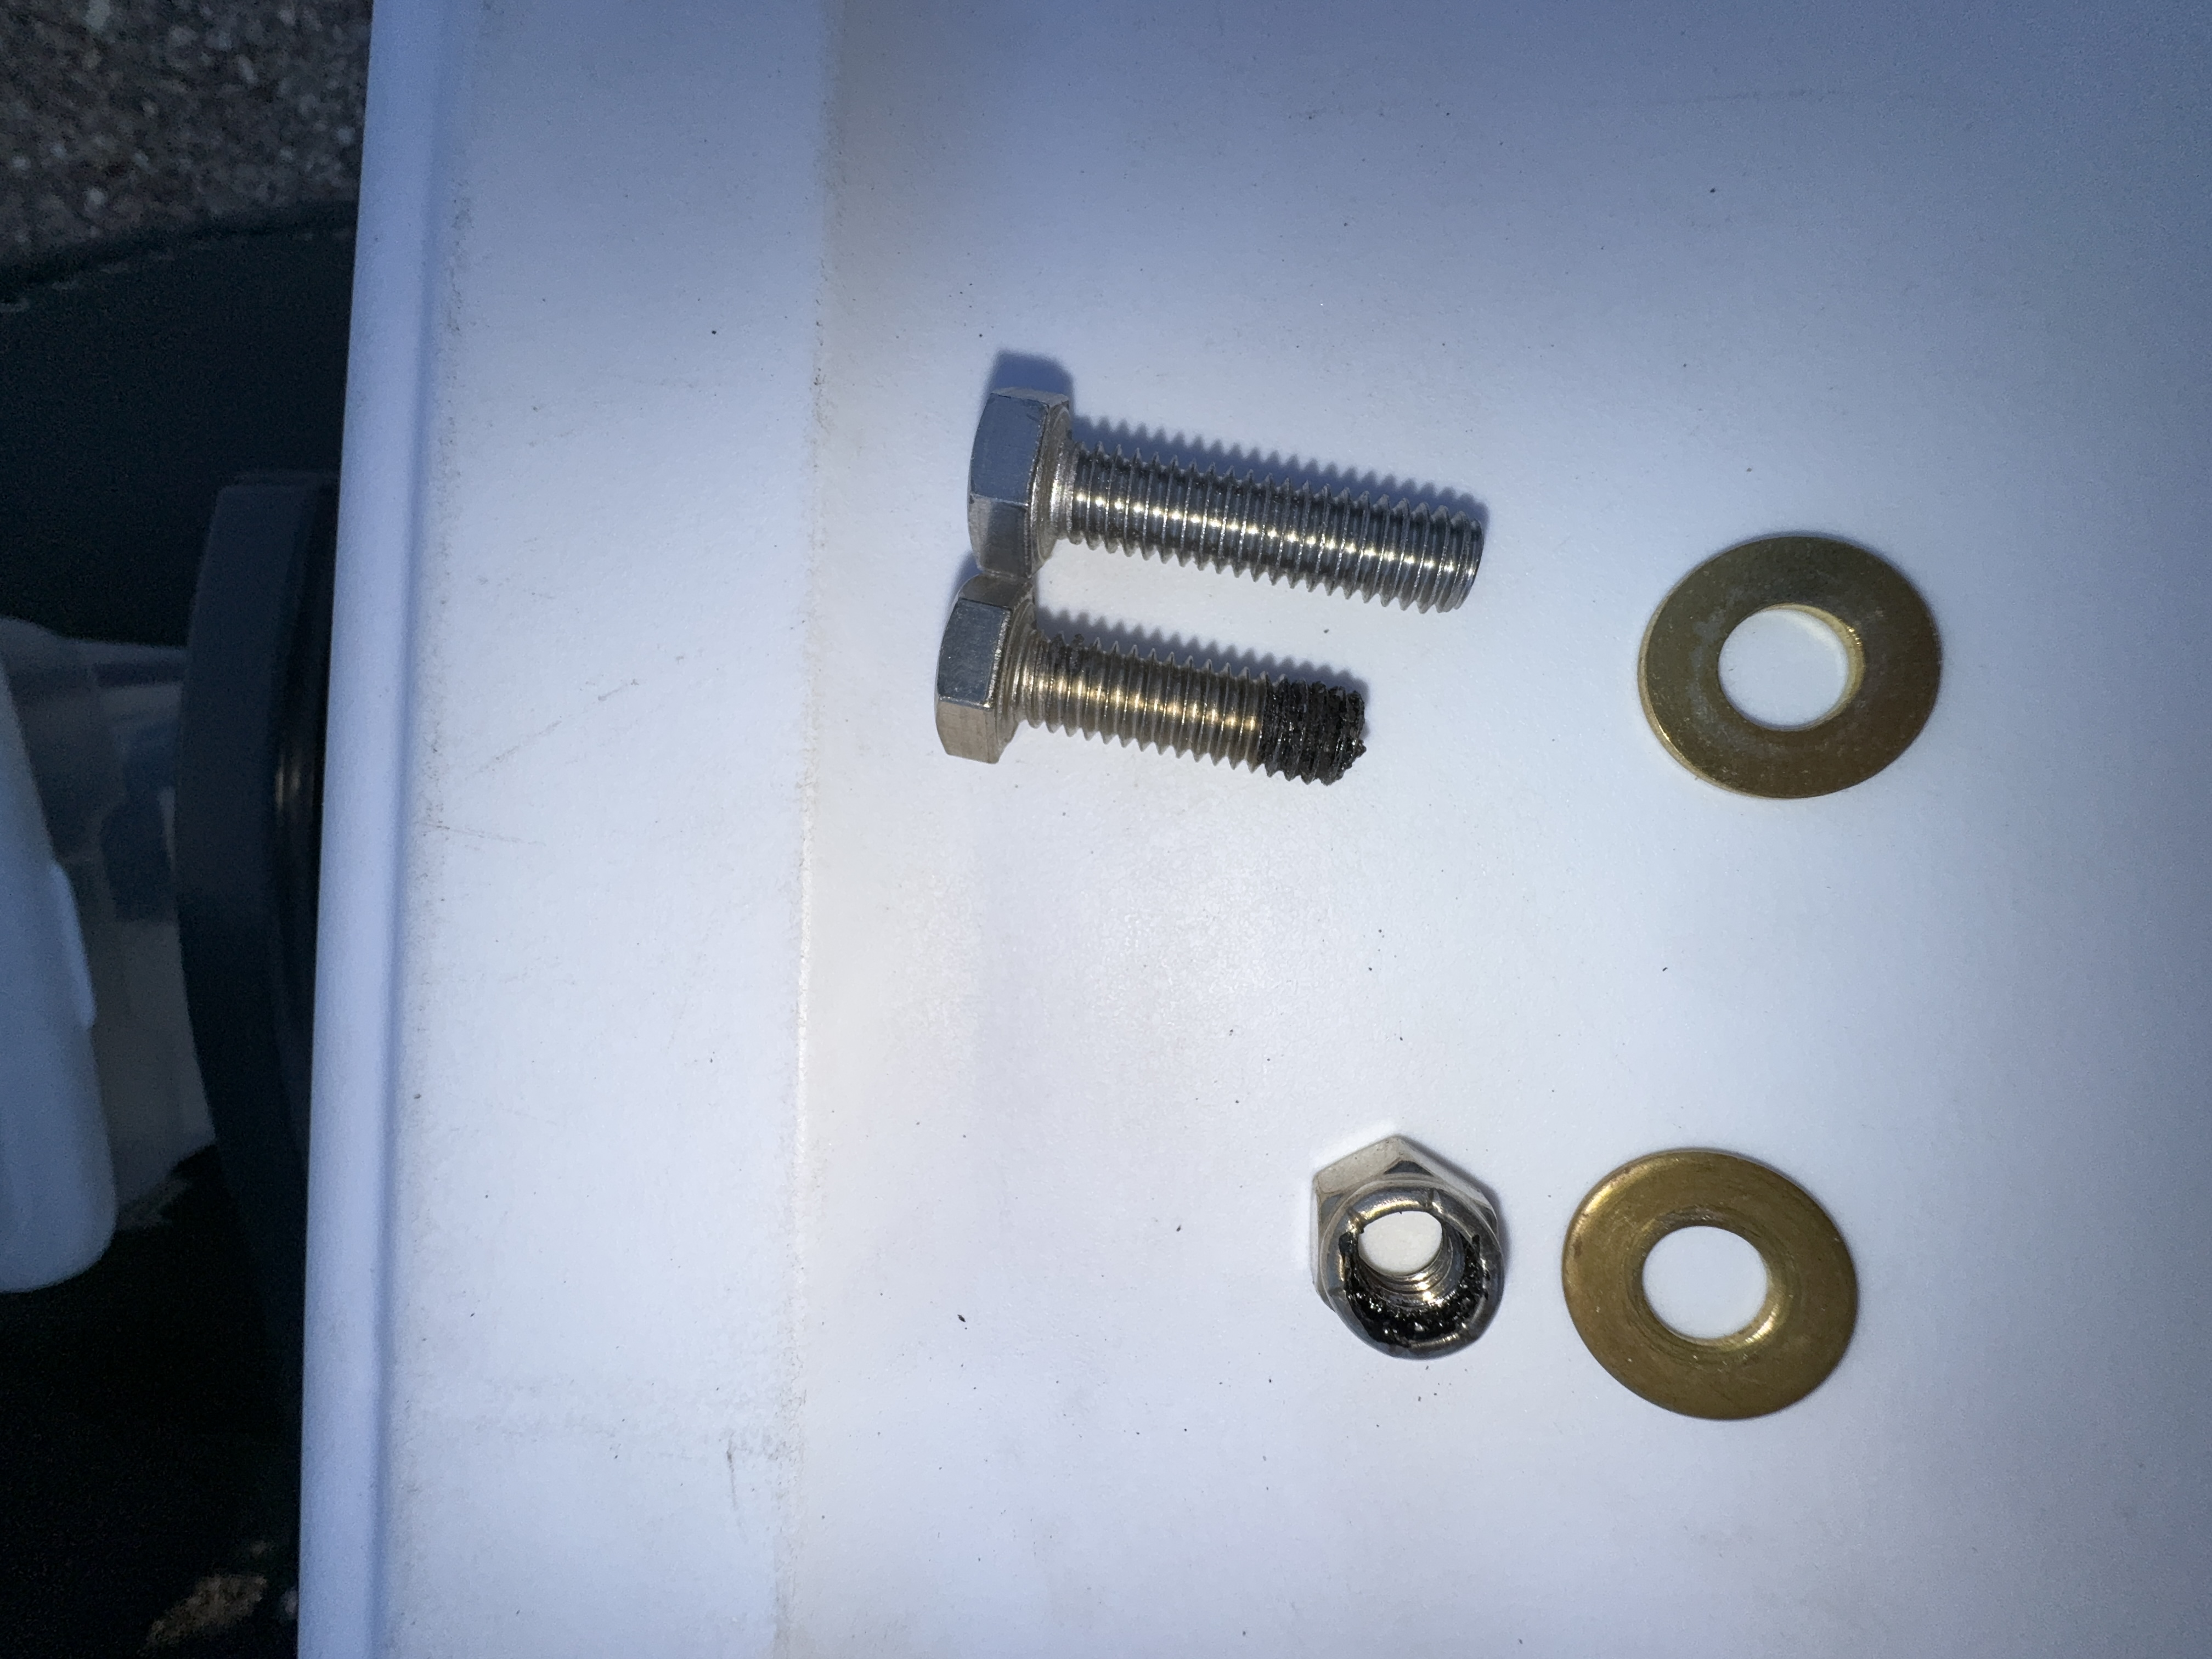
When I started removing (-) line on the terminals, I found on the 3rd one the lose connection and the burnt screw (original Battle Born one). The terminal itself looked clean, no burns.

Below is the burnt one along with the normal screw - notice it's shorter which seems that it got literally cut.

img-5108.jpg

I measured only this 3rd battery with the issue and it read 13.23V without being connected to the negative wire at all.

I replaced the new screw and I reconnected everything. Now they were all at the 13.3V, instead of 3 of them 13.3V and 2 of them 13.6V which was obviously issue due to the connection. Now when I measured all of them, they were at 13.3V. I turned MultiPlus-II on and it started charging straight away even though it already went through 14.4V bulk and absorption. It charged 14.4V at 120A for a good couple hours.

I tested the batteries. While I was able to go below 200Ah, now I hit the low battery voltage at 400Ah:

img-5121-2.jpg


- ngm

0 Likes 0 ·
img-5108.jpg (2.0 MiB)
img-5121-2.jpg (232.0 KiB)
snoobler avatar image snoobler ngm011 commented ·

Also worth checking all of the (-) terminals... even though is a pain the dumper. At least loosent and re-tighten, and to confirm... those washers are NOT between the cable and terminal.


With that connection, it's unlikely the last charge you did fully charged all 5 batteries.


13.3V resting is likely in the ~80% SoC range...


80Ah * 5 = 400Ah.


Another full charge and discharge should yield near 500Ah

1 Like 1 ·
ngm011 avatar image ngm011 snoobler commented ·

I did check all of terminals including (+) ones. I have tighten them all, none of them have any burnt signs or being lose.


Again, I have checked that battery that had bad connection while it still had (-) disconnected and it read 13.23V meaning it wasn't full but it wasn't empty either.


Then I connected them all and they all read 13.3V. I did full charge 14.4V at ~120A bulk then absorption and float.


I switched them off with the battery disconnected, measured them in parallel every pair of terminals and they all read 13.61V exactly.


Finally I started testing but it went only up to 400Ah before hitting low voltage.


It's weird again, right?

If that battery is bad it would've not given me 13.23V on its own?


Any suggestion? Should I disconnect the 3rd one from the (-) and check it again after full charge to see if it's at 13.6V?


What did you mean by " those washers are NOT between the cable and terminal."?


Thank you for all your assistance,


- ngm


0 Likes 0 ·
snoobler avatar image snoobler ngm011 commented ·

Gotcha, so you did another full charge after fixing the connection and before discharge. That wasn't clear.


Washers: The terminals and cables must all be touching directly. No washers can be in between them. A washer directly under the bolt head and directly under the nut are fine.


It's likely you had a bad connection for a long time. It's highly likely that one or more of the batteries impacted by that connection are out of balance internally and suffering from capacity loss as charge is cut when the first cell hits peak and the discharge is cut when the first cell hits empty. If they're not all at the same SoC, they won't deliver full capacity.


Recommend you set absorption to 14.4V and fixed duration for 24 hours and repeat the discharge test. If you see an incremental improvement, then they are likely just out of balance, and they will improve with regular use with normal charges to full.


Not making this up:

https://www.youtube.com/watch?v=BIYRlnikWY8


This gentleman lost nearly 50% of his capacity by not hitting balance voltage for three years:

https://diysolarforum.com/threads/3-year-battle-born-capacity-issue.34375/

After 30 hours, 7Ah recovery:

https://diysolarforum.com/threads/3-year-battle-born-capacity-issue.34375/#post-430553

After a little over a week, up to 91Ah from 52Ah:

https://diysolarforum.com/threads/3-year-battle-born-capacity-issue.34375/page-2#post-438689

1 Like 1 ·
ngm011 avatar image ngm011 snoobler commented ·

Those batteries love to go to the gym! ;)

"Washers: The terminals and cables must all be touching directly. No washers can be in between them. A washer directly under the bolt head and directly under the nut are fine."

Thank you for the clarification, yes, all washers are next to the nut and bolt head, the terminals are in the sandwich with the cable connections.

"Recommend you set absorption to 14.4V and fixed duration for 24 hours and repeat the discharge test. If you see an incremental improvement, then they are likely just out of balance, and they will improve with regular use with normal charges to full."

To set Charger / Absorption time from 3h to 24 hrs?

Let me see if MultiPlus-II will allow that value there.

- ngm

0 Likes 0 ·
snoobler avatar image snoobler ngm011 commented ·

Yes, change from 3 to 24. 24V is the max of my Quattro, so I assume it applies to all VE.Bus inverters including your MP-II. If less than 24 hours, set for as long as possible.


Something to consider with the busbar recommendation.


When you use bus bars, it's critical that the battery cables connecting to the bus bar ALL be the same length. IMHO, given your installation, I would not regard bus bars as practical or beneficial.


If you install bus bars or a Lynx, and your farthest battery needs 10 total feet of cable to get to the bus bar, ALL batteries should use a total of 10 feet of cable EACH. This added cable has additional resistance and will offset any benefits.


If you fabricated LONG bus bars that ran the entire length of the battery bank like this:


1701410471021.png


But that would likely be even more difficult to manage than your existing configuration for very little benefit.

From:

https://www.victronenergy.com/upload/documents/The_Wiring_Unlimited_book/43562-Wiring_Unlimited-pdf-en.pdf

page 18

1 Like 1 ·
1701410471021.png (30.8 KiB)
Show more comments
ngm011 avatar image ngm011 ngm011 commented ·
Again, it reaches below 11.5V at ~200Ah.


- ngm


0 Likes 0 ·
Kevin Windrem avatar image
Kevin Windrem answered ·

The blackened bolt is from the plastic in the lock nut. That connection obviously got very hot. Not knowing the internal construction of the BattleBorn batteries, there might be internal damage from the heat also. If you have not done so, replace that nut also.

I'd check all the other bolts to make sure they are tightened to the torque specified by BattleBorn.

Note that BB ships two different length screws and lock nuts. Make sure the bolt extends through the far side of the nut or it might not stay tight. IIRC, with two wires on the connection, you need the longer bolt.


2 comments
2 |3000

Up to 8 attachments (including images) can be used with a maximum of 190.8 MiB each and 286.6 MiB total.

ngm011 avatar image ngm011 commented ·
Good point Kevin.


All my bolts, nuts and washers are BB original long ones. It's true there's some plastic kind a coat inside in the lock nut.

First I thought that the bolt was cut because of the heat, but it doesn't look like that - the bottom is still flat, not melt in any way. Then I checked the head and there are different part number than on the rest of them. I started to believe that I installed the shorter one on this terminal - back to your point.

How come that the (-) gets so hot, wouldn't you expect it from the (+) side?


- ngm


0 Likes 0 ·
Kevin Windrem avatar image Kevin Windrem ngm011 commented ·
Heat is from the high resistance connection, not the direction of current flow. The positive terminal was tight enough for a low resistance connection so it did not heat up. Quite possibly, the current flow that heated the connection was from the two up-stream batteries not the one with the burned nut.


The plastic in the nut is a friction device that reduces the risk of the bolt loosening up. With these heavy wires however, you could possibly still loosen the connection with enough force on the wires. I think of these lock nuts as a way to prevent the connection from completely coming apart should things loosen. A loose connection with a regular nut will get looser with vibration and movement until the nut comes off the bolt.

1 Like 1 ·
ngm011 avatar image
ngm011 answered ·

Do you think that the lose connection cause the heat?

How should I test if the battery survived? Apparently, I can come down to 400Ah but not below than that. Before this incident, I hit two or three times ~520Ah.

Thanks,

- ngm

1 comment
2 |3000

Up to 8 attachments (including images) can be used with a maximum of 190.8 MiB each and 286.6 MiB total.

Kevin Windrem avatar image Kevin Windrem commented ·
YES, the loose connection was the source of heat. Remember at these currents, EVERYTHING is a resistor!


Check with Battle Born on possible damage.

As was suggested above, give your batteries a few charge cycles to see if the ability to draw 500 amps returns. Also, check ALL connections for proper torque. Running the system with a large load then checking temperatures with a IR meter can pinpoint additional high resistances. You can use your fingers also but be careful. A loose connection can burn you.

In the end, a load test of each individual battery is probably the only way to know for sure if there was damage.

1 Like 1 ·
Kevin Windrem avatar image
Kevin Windrem answered ·

I would suggest use a busbar for combine your 5 batteries. With 5 in parallel and no individual fusing a fault in one battery could cause a melt-down due to current from the other 4 batteries. Plus, you reduce the current in the battery connections. The current summing occurs at the busbar not at each battery terminal.

The Lynx distributor can also be used for combining batteries and provide a fuse for each one.

4 comments
2 |3000

Up to 8 attachments (including images) can be used with a maximum of 190.8 MiB each and 286.6 MiB total.

kevgermany avatar image kevgermany ♦♦ commented ·
@ngm011

It would also be a good idea to clean the terminal and cable ends where the burn out occurred back to clean metal. Could still be a lot of resistance there.

2 Likes 2 ·
ngm011 avatar image ngm011 kevgermany ♦♦ commented ·

I kind of did it.

Can I spray it with something? Like dielectric grease?

- ngm


0 Likes 0 ·
frankmsc68 avatar image frankmsc68 ngm011 commented ·
sorry,ngm011,kind of is not the right approach....I,personally,disconnect my bank into single peaces,bring them individually to 100% soc,clean before the contacts,screws and cable connections rigorosamente even three times a year.We still pay for those batteries a lot of money,we might as well care for them well!As more batteries there are in parallel,the more chance you are running into improper balanced charching/discharging...As always treat your loved once with love!Frank
0 Likes 0 ·
ngm011 avatar image ngm011 commented ·
That would be good idea, if I only had some vertical space above batteries.

If I add a couple more 100Ah BB, do I need multiple Lynx distributors?

- ngm

0 Likes 0 ·