article

Jono (Victron Energy Staff) avatar image
Jono (Victron Energy Staff) posted

Victron VW Van Electrics Install - Schematic Drawings


You may have seen our VW Van videos on YouTube.

If you haven't here is a link to them:
Episode 1 - Solar: https://youtu.be/YW_xDerTycQ
Episode 2 - Alternator: https://youtu.be/vCOJ3nBFpIM
Episode 3 - Mains Electricity: https://youtu.be/TDSzfmHHjsA
Episode 4 - Color Control & Battery Monitor: https://youtu.be/2PyMIndbz6w


Here are the slides for the concept:

Single Line Diagram PNG images

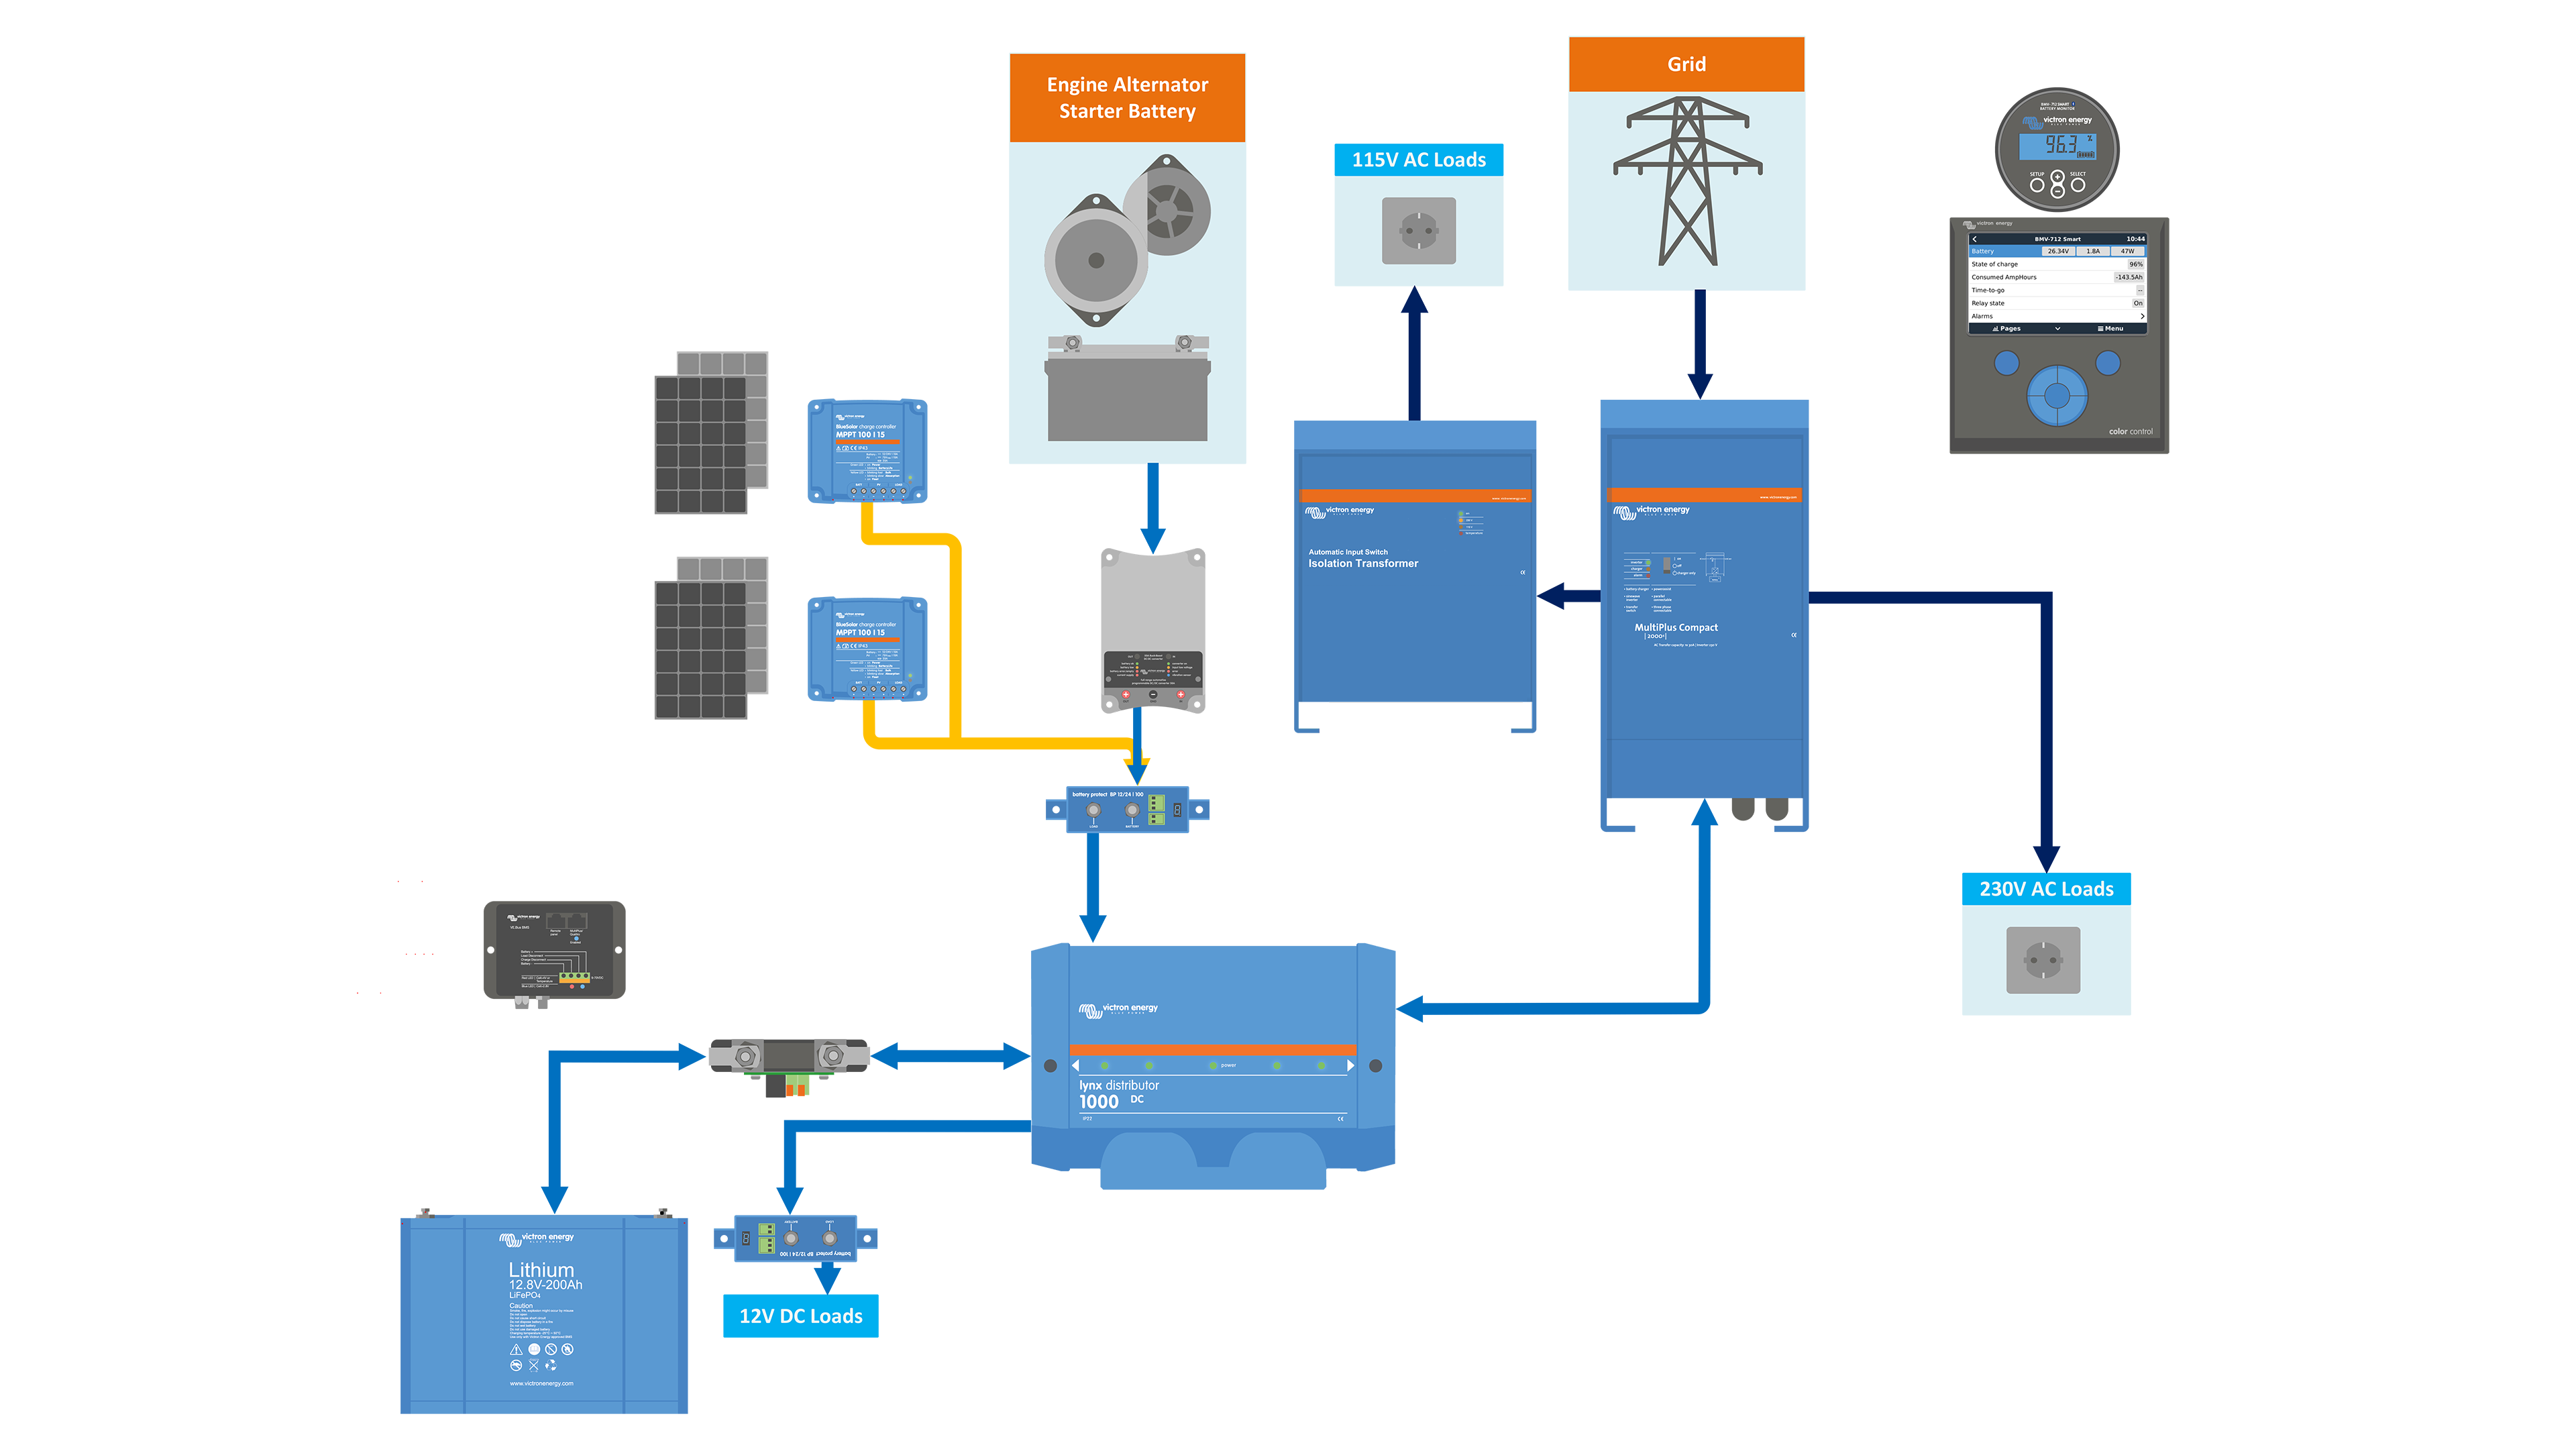
Overall Idea

Solar Idea

Alternator Idea

Single Line Diagram PDFs

SLD - Victron Van - Automotive - Alternator.pdf

SLD - Victron Van - Automotive - Overall.pdf

SLD - Victron Van - Automotive - Solar.pdf


After lots of tweaks and changes, here are the schematic drawings for each section of the vans install:

Detailed Schematic PNG Images

Solar

Alternator

Mains Electricity

Full Schematic Wiring Diagram

Detailed Schematic PDFs

DS - Victron Van - Automotive - Alternator.pdf

DS - Victron Van - Automotive - Full.pdf

DS - Victron Van - Automotive - Multi.pdf

DS - Victron Van - Automotive - Solar.pdf


wiringwiring diagramcampervanschematics
32 comments
2 |3000

Up to 8 attachments (including images) can be used with a maximum of 190.8 MiB each and 286.6 MiB total.

JohnC avatar image JohnC ♦ commented ·

Thank you Jono. Destined to become a standard reference, so if you do make 'improvements', please let us know. Cheers.

0 Likes 0 ·
Ben Pearson avatar image Ben Pearson JohnC ♦ commented ·

They are indeed extremely useful for reference, thank you very much Jono.

I was wondering if it is possible to get hold of the individual icons/images in order to create our own schematics.

For instance I am designing a system very similar to the "full schematic wiring diagram' off the back of the youtube video but want to use a different multiplus and not use the isolation transformer, so was hoping to build my own schematic. Or perhaps if it is a piece of software then how we might be able to get hold of that?

If there isn't I'd be really interested in either helping out on making one or testing/giving feedback to anyone working on it.

Thanks

0 Likes 0 ·
nebulight avatar image nebulight Ben Pearson commented ·

Victron is hesitant to share their templates. It's probably due to it looking too official and if someone creates a bad diagram, it probably looks bad for Victron.

With that said, I recreated the products I used for my own diagram in Adobe Illustrator. I went a little overboard with the small details.... Some say it was a waste of time. Others (including my wife) say it was an INCREDIBLE waste of time :)


0 Likes 0 ·
Ben Pearson avatar image Ben Pearson nebulight commented ·

Oh I would argue that that time was not wasted, they look great! I have found myself doing very similar things.

It makes sense that Victron would not make them readily available, just thought I'd check. I shall follow suit and make my own, thanks for the reply!

0 Likes 0 ·
wkirby avatar image wkirby ♦♦ commented ·

Thank you Jono!

0 Likes 0 ·
boekel avatar image boekel ♦ commented ·

Why is there a smart battery sense? doesn't the VE.bus BMS send all values to the system?

0 Likes 0 ·
nebulight avatar image nebulight boekel ♦ commented ·

The video states it's there for demo purposes as that's the point of this van. A standard install wouldn't need it.

0 Likes 0 ·
veganvanlife avatar image veganvanlife commented ·

Hi there, can anybody shed some light on whether the BuckBoost connects to the starter battery or the alternator? I plan to install a 50A BuckBoost in my 2015 Sprinter 313.


Kind regards, Tom

0 Likes 0 ·
Guy Stewart (Victron Community Manager) avatar image Guy Stewart (Victron Community Manager) ♦♦ veganvanlife commented ·

There is usually a more robust and accessible place to connect to the starter battery terminals, than the alternator.

All are electrically connected. You should take into consideration any fusing that might be in line of the alternator to the starter battery, so as to not exceed it with the combined loads of starter charging and buck boost.


0 Likes 0 ·
eliott avatar image eliott commented ·

Hi!

In the video, it is said that the current limiting will be done in the CCGX. Is it a new feature of the MultiPlus II? I thought that all VE.Bus BMS systems needed the Color Control as the current setting in the CCGX is disabled.

0 Likes 0 ·
Lucian Popescu (Victron Energy Staff) avatar image Lucian Popescu (Victron Energy Staff) ♦♦ eliott commented ·

Hi, can you give me more details? I'm not sure which of the movies you heard that , if you can give me the link and min:sec, I can check and answer.

0 Likes 0 ·
eliott avatar image eliott Lucian Popescu (Victron Energy Staff) ♦♦ commented ·

Hi!

It is on episode 3 - from 8:30, when the narrator says that you need to set overruled by remote otherwise you would not be able to change this from the CCGX.

0 Likes 0 ·
nebulight avatar image nebulight commented ·

This is almost EXACTLY how my van is setup minus the transformer. I assume the Battery protect is going through the BMV for relay settings for cold weather charging prevention since you can't control the buck/boost via the venus? I have a DC-DC battery charger and that's how I set mine up. I'd just like clarification as I get a lot of questions about my van setup and it would be nice to just point people to this thread.

0 Likes 0 ·
Lucian Popescu (Victron Energy Staff) avatar image Lucian Popescu (Victron Energy Staff) ♦♦ nebulight commented ·

yes, the Battery Protect is just a supplementary protection, and being controlled by the Ve.bus Bms, will protect against overcharge and of course, charge at low temperature.

0 Likes 0 ·
bathnm avatar image bathnm Lucian Popescu (Victron Energy Staff) ♦♦ commented ·

I am considering such a setup, and being based in the UK temperature controlled charging is something to be considered. Is it possible to get some further information.

How does the BMV get temperature details to disable charge through the inbuilt relay. It has it's second port connected to the + input of the Buck/Boost to monitor the starter battery voltage, and not the temperature sensor probe that can be connected to the monitored battery.

Many Thanks

0 Likes 0 ·
nebulight avatar image nebulight bathnm commented ·

I have the charge disconnect signal wire from my BMS going through the relay of the BMV. With the temp sensor setup in the BMV (you have to hook it up to the shunt and a special BMV temp sensor is required), you can open the relay to disconnect the battery protect when the temp on the BMV is set to whatever you'd like. However if you have a VE.smart network or GX device with DVCC you can turn off the MPPT from charger at a set temp. I have a non-victron DC-DC charger so that's hooked up to the BP100 so it has no other means of disconnect.

0 Likes 0 ·
bathnm avatar image bathnm nebulight commented ·

Thank you makes sense and what I understood. It was the fact that in the diagram the shunt didn't have the extra tempo sensor, but used the second port to monitor the voltage of the start battery, therefore I didn't understand why the charge disconnect was routed through the BMV relay.


Once again many thanks for the explanation.

0 Likes 0 ·
Tim from Eat Sleep Van avatar image Tim from Eat Sleep Van commented ·

Hi I'm confused how the Buck/Boost converter is connected to the battery. From the video and wiring diagram there is only 1 cable connecting positive output from the converter to the house battery positive. I'm definitely no expert but I thought you need a circuit for electricity to flow?! I see the alternator has both positive/negative. What am I missing?!

0 Likes 0 ·
Guy Stewart (Victron Community Manager) avatar image Guy Stewart (Victron Community Manager) ♦♦ Tim from Eat Sleep Van commented ·

Good Spotting!

There is a connection missing from the drawing that shows the connection of the NEG of the Vehicle battery/alternator to the Chassis GND.

This is then connected through the GND on the BUS bar.

This usually happens as part of the car electrical system as the car is manufactured, but it is an omission from completeness.

0 Likes 0 ·
Tim from Eat Sleep Van avatar image Tim from Eat Sleep Van Guy Stewart (Victron Community Manager) ♦♦ commented ·

Thanks for the reply! That makes sense. I currently have a 12v vehicle battery & alternator, and a 24v (non victron) Lithium Ion battery pack which I want to charge. Currently they are isolated from each other. Is it actually OK for two circuits of two different voltages to have the ground connected together?

0 Likes 0 ·
Guy Stewart (Victron Community Manager) avatar image Guy Stewart (Victron Community Manager) ♦♦ Tim from Eat Sleep Van commented ·

Yes, it is ok to have a common GND for a 12 and 24 V system.

Like you said earlier, you need both poles to complete the circuit, so if you are only connecting the positive 12V cable to the 12V loads, they never get a complete 24V circuit.

1 Like 1 ·
Tom avatar image Tom commented ·

1) In the VW Van build video 4 it talks about connecting the ColorGX to the VW screen, but then the video does not speak of it? How do you get the color GC scream on say a VW, MB or a double din radio screen?

2) is it possible to use the Victron Buck converter in a 12-14.4 Volt alternator to charge a 24 volt battery bank?

3) the 12/2000 Multiplus has a 4 amp charger connected to the car starter battery. Can a 24/3000 Multiplus charge a car battery at 14.2 volts?

Tom


0 Likes 0 ·

Hi Tom, it is not the default VW screen, it was replaced with a smarter multimedia system (something android based). For the second question, the answer is yes, please have a look at the specs here. For the third question, the answer is also yes, on the 24/3k multi there is a 4A charger for the starter battery.

0 Likes 0 ·
kiko avatar image kiko commented ·

Hi Jono, thank's so much for this reference. It was extremly helpful! I just built a 24V system based on your design.

I am using Smart Battery Protects 220 and found out, that I have to use the Remote H pins to get everything to work. First I was confused by the the drawing, as on your BPs, the pins used are the ones on the "inside", also wihtout a label. On mine it's the outside ones.

Looking here https://www.victronenergy.de/upload/documents/Manual-Smart-Battery-Protect-12V-24V-65-A-100-A--220-A-EN-NL-FR-SE-DE-PT-ES-IT.pdf on Figure 5, it becomes obvious.

Can you confirm this?

Regards


0 Likes 0 ·
kiko avatar image kiko kiko commented ·

My real life test confirm, that the use of the H remote pins on the BPs results in the right behaviour.

0 Likes 0 ·
kiko avatar image kiko commented ·

I was also wondering about the settings for the BMV 712. I used the following logic:

• Battery Capacity: Total battery capacity in Ah - obvious, I used the 25°C value, 400Ah in my case
• Charged Voltage for Victron Lithium: Absorption voltage 14,2V - 0,3V = 13.9V for 12V and I guess -0,6V for a 24V system, so 28,4V - 0,6V = 27,8V
• Tail Current: 2%
• Peukert Exponent: 1.05
• Charge Efficiency Factor: 99%

I used these sources:

https://www.youtube.com/watch?v=yMJ_vzB2avE

https://amsolar.com/s/BMV-712-in-App-for-Victron-Lithium-46cy.pdf

0 Likes 0 ·

Hi Kiko, please have a look in the manual, there is a chapter for lithium at page 39.

0 Likes 0 ·
Show more comments

Article

Contributors

Guy contributed to this article jono contributed to this article

Related Articles